If you’d rather watch a video than read.
Layered Memory

Computer memory is a fairly complicated topic. The general principle is that you always have to compromise – choose one: price, size, access speed. So the sensible solution is combine different types of memory in several layers.
Layer 1 – Registers
The absolute fastest type of memory are registers, located directly in CPU Cores.
Any value that participates in CPU’s calculations eventually passes through registers. For example, if you were to ask your CPU to calculate 1 + 2, the CPU would put “1” in one register, “2” in second register, and then run the calculation and write the result in one of the registers.
Registers are super fast, but they are also super small. Basically, each register can store only one value.
Layer 2 – CPU Cache
CPU Cache is the link between CPU and RAM. Even though RAM is pretty fast, it still takes time to access.
So whenever a CPU does take something from RAM, it copies a few neighboring blocks of information as well, as it’s highly likely they will be needed next, and puts them into CPU cache.
The next time a CPU needs to take something from RAM, first it will look in CPU Cache.

If Cache contains the information CPU needed, it’s called a Cache Hit.

If it’s not there, and CPU still needs to look in RAM, it’s called a Cache Miss, and effectively the CPU just wasted time.
Larger cache makes cache hits more likely, but it also takes more time to sift through, so you have to strike a balance. If you make cache too large, it will take so long to search all of it, that it would be faster to just address RAM directly.
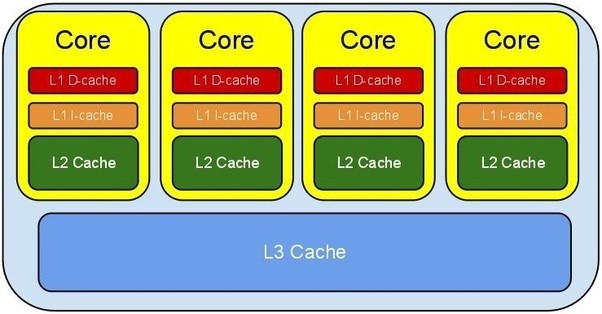
You are already familiar with solution to this problem – CPU Cache is made of several layers, called levels. Each next level is larger and slower than the previous one.

When CPU needs a certain value, first it checks Level 1 cache. If it’s not there – Level 1 Cache Miss – it checks Level 2 Cache, and so on. Most modern CPUs have three cache levels.
Different CPUs will have different amount of cache, and CPU description at various internet shops will often list Level 3 Cache size, as if it’s a value that’s supposed to mean anything to you. It’s really not. Unless you’re a CPU architecture engineer, you cannot judge a CPU by its cache size. You simply don’t have enough information. With some research, you can find cache size for every level, but there are tons of other questions. What is the access speed for each level? What is the projected cache hit rate? How does cache work in this specific CPU architecture? What are the effects of cache performance on the overall PC performance? It’s just way more trouble than it’s worth.
So when choosing a CPU, don’t look at cache size at all.
Layer 3 – RAM
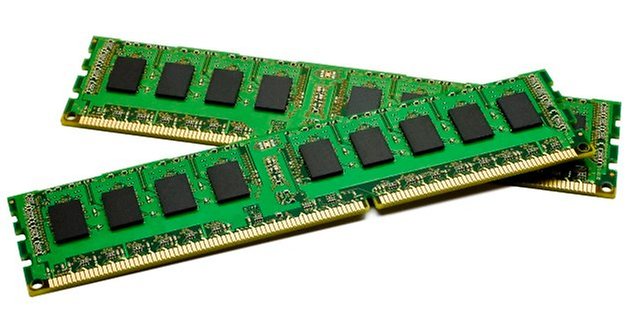
RAM – stands for Random Access Memory – is a temporary storage for things that CPU is likely to need in the near future. RAM needs a constant supply of power to store information. If the PC is powered down, all information stored in RAM is lost.
RAM modules have a lot of differences:
Generation
Currently, DDR3 and DDR4 are the most common generations.
DDR3 was released in 2007 and is slowly being phased out by DDR4. Standard voltage for DDR3 is 1.5V, overclocked modules go up to 1.65V. Standard operating frequencies go from 800 MHz to 2400 MHz.
DDR4 was released in 2014. Compared to the previous generation, it works at higher frequencies while consuming less power. Standard voltage is 1.2V, overclocked modules go up to 1.35V. Standard frequencies lie somewhere in 2133 MHz to 3200 MHz range, but there are overclocked kits that go all the way to 4400 MHz.
DDR3 and DDR4 are not cross-compatible.
Form Factor

Full-sized DIMMs are intended for desktop computers, while smaller SO-DIMMs are commonly used in laptops. They are not cross-compatible.
Frequency
Frequency determines the RAM cycle rate. When the CPU requests some data from RAM, a certain amount of cycles will have to pass before the data download can start. That amount of cycles is defined by RAM’s timings, and frequency determines how long does it take for these cycles to pass.
Once the data download starts, 64 bits of data per channel will be downloaded each cycle.
So RAM frequency determines both how fast data can be accessed, and how long it takes to download it. Higher frequency both makes RAM more responsive and increases throughput.
Timings
Timings determine RAM’s latency – how many cycles does it take to access certain data. Shorter timings will have a positive effect on RAM performance, but this effect is less noticeable than higher frequency.
There are four main timings, usually listed in RAM’s tech specs. For example, this Crucial RAM has 8 – 8 – 8 – 24 timings:
However, there are many secondary timings. When you have several RAM modules installed, all their timings must be exact same. That’s why it’s highly recommend to buy RAM modules only in kits, which are guaranteed to have all timings to be exact same.
There is no such guarantee if you buy several same kits from the same manufacturer. That said, you can “make” them compatible if you’re willing to fiddle with secondary RAM timings in BIOS, though not every motherboard provides access to all timings. You may have to first install kits separately from each other to find out which of their timings are different.
The important thing to understand is that timings’ effect on performance is directly tied to frequency. RAM with super short timings and low frequency can potentially yield better performance than RAM with higher frequency, but longer timings. And vice versa.
Capacity
Most common capacity for one module is 2 GB, 4 GB, 8 GB and 16 GB. For best performance, you should always use modules with the same capacity. At the very least ensure that all channels have the same capacity.
Rank
Memory modules can have 1, 2, 4 or 8 ranks. Having a multi-ranked module is more or less the same as having several separate modules in one. In other words, you could install four single ranked modules, or two dual ranked modules, and as far as your computer is concerned, both cases would count as having four separate RAM modules.
Having multiple ranks in the system increases performance. Think of each RAM rank like an open book on your desk. The more books you have, the higher the chance that when you look at those books, at least one of them will be open on the page you need.
Some tests were performed, and with all else being equal, dual ranked RAM provided up to 13.5% boost to minimum FPS in Hitman compared to single ranked RAM.
However, there is a maximum amount of ranks that a system can support. Additionally, using multiple ranks can potentially force the RAM to work at lower frequency. For example, AsRock B350M Pro4:
As you can see, it supports highest frequency when the system has 2 ranks, lower frequency when there are 4 ranks in dual ranked modules, even lower frequency when there are 4 ranks in single ranked modules, and lowest frequencies when there are 6 or 8 ranks.
Keep in mind that ONE dual ranked module will not work in dual channel mode.
You can combine RAM modules with a different amount of ranks within the same channel. For example, having a single ranked RAM module in A1 slot, and a double ranked module in A2 slot will work just fine. I wouldn’t recommend having different amounts of ranks in different channels, though.
Number of Channels
Depending on CPU’s memory controller, RAM can work in 1, 2, 3 or 4 channel mode. Dual channel is the most common one.
RAM can transfer 64 bits of data per channel. So in dual channel mode it will be able to transfer 128 bits of data. While this does double theoretical throughput, the actual effect on RAM performance is somewhere between 20% and 50%.
It is still a sizable boost, and you should always go for dual channel. Keep in mind that on motherboards with more than 2 slots, it does make a difference in which slots RAM modules should be installed in order to be able to work in dual channel mode. Consult your motherboard’s manual for that, as shown on the picture.
RAM Compatibility
What kind of RAM can you use depends on:
Operating System – determines maximum RAM capacity.
Motherboard and CPU, which contains the memory controller – determine maximum RAM capacity, RAM’s operating frequencies, which generation of RAM is supported, how many RAM modules can be installed.
Note that CPUs usually officially support a fairly low RAM frequency, but as long as the motherboard supports it, they usually can operate at higher frequency without any trouble.
RAM Overclocking
Overclocking RAM is done by increasing frequency and reducing timings. That can potentially make the system unstable, so the voltage is increased to compensate. Note that this puts additional stress on the memory controller, especially if multiple modules are installed.
Most high-frequency RAM kits come with factory overclock in the form of one or more XMPs – Intel Extreme Memory Profiles – they are basically presets with frequency, timings and voltage. That memory kit underwent factory testing with those settings and it’s guaranteed to operate in a stable manner. All you have to do is to select the XMP in BIOS.
How to choose RAM
First, figure out how much RAM do you need.
For modern gaming, 8 GB is enough, including Witcher 3 at maximum settings, though you might be cutting it close in some of the “heavier” titles.
Some games eat more RAM than others, and that doesn’t necessarily happen because of better graphics – some games are just poorly optimized. Eventually, there will come a time when 8 GB RAM will not be enough.
16 GB is recommended if you can spare the extra expense. If your motherboard has 4 RAM slots, you can always go for 2 x 4 GB modules now, and move to 4 x 4 GB later.
More RAM might be required if you intend to run a lot of background applications, or perform any professional work that benefits from more RAM.
What happens if there’s not enough RAM? When the system runs out of RAM, Windows starts moving extra data to the Page File – a special file on your hard drive. This takes time and reduces performance. Storing Page File on an SSD helps to mitigate that negative impact, but since even the fastest SSDs are much slower than slowest RAM, there will be a steep decline in game’s performance.
Is there a point where adding more RAM won’t do anything? Not exactly. Windows, with all its flaws, is a fairly smart operating system, and it will utilize unoccupied RAM by caching frequently accessed data to improve response time.

For example, the system keeps track that you’re frequently playing the same game every day, so while idling Windows will pre-load game’s files into RAM just in case you decide to launch it.
And if Windows needs RAM for something else, it will remove the cached data without a second thought, so there’s no harm in doing this.
That said, just having the game on an SSD is a much more economical solution.
General Recommendations
You always want to go for the maximum amount of channels your motherboard and CPU can support. Usually this means two channels, so you want at least two modules.
Go for dual ranked memory, when possible. Or go for a RAM kit with 4 modules from the get go. This will improve performance.
Once that is figured out, try to balance cost, frequency and timings. Just keep in mind the maximum frequency supported by your system.
Usually, going for high speed RAM is not worth the expense, especially for gaming, but sometimes you can get faster RAM for nearly the same price. You can do some manual overclocking later, if you so desire.
Overall, RAM performance means less for gaming than CPU and GPU, so as long as you have enough RAM in an optimal configuration (dual channel), you don’t have to worry too much about it.
Layer 4 – Storage
HDDs and SSDs fit into this category. They can store a ton of information for their price, but they also take a lot of time to access, and their data transfer rate is comparatively low.
They keep all the data safely stored even without any power.
Simple Analogy
Imagine the CPU is an engineer, working in a workshop somewhere in a city. He also rents a large storehouse (storage) on the outskirts of the city. Storehouse is cheap to rent, and has a lot of space. But transferring stuff between the workshop and the storehouse means a 30 minute ride. Obviously, the engineer wants to avoid that hassle as much as possible, so when working on a project, he tries to cram as many tools and materials in his truck as possible.
Then the engineers takes those materials to his workshop and unloads them on shelves (RAM). On the other side of the workshop, there’s engineer’s working desk (CPU cache).
Engineer grabs a few tools and materials that he will likely need soon, and carries them to the working desk. The desk has a lot of drawers (Level 3 CPU Cache), and there is also some space on the desk’s surface (Level 1-2 cache).
Engineer sits down and starts working. His hands are memory registers. To work on something, the engineer has to take it in his hands first.
Engineer keeps working and realizes that to do next part he needs another material or another tool. First he looks on the desk’s surface, as it would be closest to get from. If it’s not there, he starts going through desk’s drawers.
If Engineer finds it, it’s a Cache Hit and he keeps working. If he doesn’t, it’s a Cache Miss, and he just wasted time. He will begrudgingly stand and walk to the other side of the workshop to get the needed tool or material from one of the shelves. While he’s there, he’ll grab some other tools and materials.
When the engineer finishes working (power down), he cleans up the workshop, throwing away all tools and materials he used today. If something could still be useful, he takes it to the storehouse (permanent storage).