
This guide will cover the basics of recording, editing and uploading PlanetSide 2 videos. Keep in mind that I’m far from being a professional in this area, so I’ll just share whatever information I’ve picked up along the way. There’s probably an easier and simpler way to do everything described here.
Theory
Containers
First, let’s take a look at videofiles themselves. A videofile is basically a container, a shell. It has a certain extension, such as .mp4, .mkv, .avi, etc. Inside that shell there are:
- Header.
- Video Track.
- Audio Track(s).
- Optional Subtitle Track(s).

Videofile’s header, represented by a blue square on the right picture, describes the information stored inside the container. Header format is the only real difference between containers, and it determines what the container can and cannot store.
As you probably know, any file is not simply a box, it is a reaaaaaaaally long sequence of ones and zeroes. To make it easier to continuously playback the video file, its Video, Audio and Subtitle Tracks are all split in small segments, and intermixed inside the container.
This makes it easy for the videoplayer to interact with the storage device where the video file is located. For example, first it reads first minute of Video Track, then the first minute of Audio Track, then first minute of Subtitles, then the videoplayer piles them together and starts playing the video, and you start watching it. In the meantime, the videoplayer starts reading the second minute of video, and so on.
The process of splitting the Tracks on segments is called multiplexing, or muxing. It is always done when the video is recorded.
The process of restoring continuous video, audio and subtitle streams from these segments is called demultiplexing, or demuxing. It is always done when the video is played.
Encoding and Decoding
Video is a sequence of images, replacing each other so rapidly that the human eye is fooled and feels like it’s looking at actually moving objects. But any video can be paused and watched frame by frame. So the process of playing a video file is, in the nutshell, the process of displaying lots and lots of pictures, accompanied by synchronized audio.
Let’s make some calculations, just for fun, to figure out just how much information has to be processed in order to record and store one minute of video.
Let’s say you want to record a 1 minute video with 30 frames per second (FPS) and 1920 x 1080 pixel resolution.
It takes 32 bits, or 4 bytes to encode the color of each specific pixel. So each frame of video contains:
1920 x 1080 x 4 = 8 294 400 bytes of information.
That’s 8 100 kilobytes, or 7.91 megabytes (MB). So each frame of video “weighs” 7.91 MB. And we wanted 30 frames per second. So each second of video would take:
7.91 * 30 = 237 MB
And a 1 minute video would take:
14 238 MB of storage space.
That’s 13.9 gigabytes.
An 1.5 hour film would “weigh” 1.22 terabytes.
Wow, that’s a lot, even by today’s standards. However, all this time we’ve been talking about uncompressed video. Obviously, nobody wants to deal with such absurdly large files. Not to mention it would be technically impossible, most storage devices would struggle to transfer so much raw data in order to be able to play the video file in real time.
So Video and Audio Tracks in videofiles are always compressed:
- Compressing these tracks to save space is called encoding. It’s a process similar to archiving normal files, but it’s more complex.
- And the process of uncompressing to actually play the video file is called decoding.
- The special program that handles encoding and decoding is called a codec.
So when a video is encoded by a certain codec, you need a copy of that codec to actually play the video.
As technology has evolved over the years, so did the codecs. Old, less efficient codecs are constantly being replaced by newer, better codecs. That’s why there’s so many issues related to playing video files and compatibility.
Incidentally, recording and playing audio is very similar, and too requires the use of certain codecs, most popular being the notorious MP3 format.
How does that relate to recording
For simplicity’s sake, let’s say that you’re recording a video of display – what you are already seeing and hearing. So you have some raw video and audio coming to your display and speakers. Then the process of recording a video would involve these steps:
- Capturing the raw Video and Audio streams and copying them.
- Encoding (compressing) Video and Audio streams using certain codecs.
- Multiplexing (intermixing) the resulting Video and Audio Tracks and storing them in a videofile container on your storage device.

Capturing and encoding the videostream takes a lot of computer’s resources. That’s why the humanity has been forced to take some compromises and improve technology.
Technology
There are several different technologies that are used to make it easier for a computer to encode video.
Hardware Acceleration
Eggheads have come up with a special chip that can encode a Video Stream. You can imagine it as a black box, that inputs a real time raw Video and Audio streams, and outputs an already neatly encoded and packaged video file to be stored on a storage device.

Originally, these hardware encoders were used in separate devices, that you could plug into your PC as a middle chain between your display and the graphics card. This video capture device would capture and encode the video stream, and store the resulting video file on your PC.
Hardware Acceleration is most useful during real-time video encoding (recording a video), as it allows the PC to encode a video without actually putting any significant load on the CPU or the Graphics Card.
Hardware GPU Acceleration
Most modern Graphics Cards have a built-in hardware encoder:
nVidia Graphics Cards use NVENC – nVidia Encoder – utilized by Shadowplay, part of GeForce Experience. Shadowplay also takes advantage of a couple of proprietary technologies that help reduce the impact of capturing frames.
AMD Graphics Cards have a similar technology, called AMD VCE – Video Coding Engine – utilized by AMD ReLive.
Software GPU Acceleration
The process of encoding a video is a task that requires doing same actions to a large volume of data, and it massively benefits from multi-threading.
For example, if you have a CPU that can work on 8 threads simultaneously, you could split each frame on 8 parts, and let each thread handle each part.
However, despite the rise of multithreading in the last decade, CPUs still don’t handle it that well.
And that’s where Software GPU Acceleration comes in. The heart of each Graphics Card is a GPU – Graphical Processing Unit. It consists of hundreds or even thousands of small processors, each capable of applying a simple instruction to a piece of data.

Normally, GPUs only handle creating and relaying 2d and 3d images to the display. But there is a number of technologies, such as nVidia CUDA, that allow GPUs to execute basically any other program.
Naturally, due to differences in core architecture, only tasks that massively benefit from multithreading are ran on the GPU.
Using Software GPU Acceleration is different from using a built-in hardware encoder. Executing a video encoding program on the GPU would actually put a signicant load on it. For this reason, Software GPU Acceleration is more useful during transcoding. Some programs (not described in this guide) give you an option to use Software GPU Acceleration to speed up video rendering process.
Compromises
There is an eternal compromise between encoding speed, file size and video quality. Encoding a video with higher quality and/or smaller file size will take more resources and time. It will also take more resources to play the video after.
Example: if you need a simple analogy, imagine it like this: you’re going on a trip and you need to gather a backpack with your things. You can quickly shove everything in the backpack, but it will be inefficient use of space. You’ll be lucky if you can close the zipper, and such a backpack won’t be convenient to wear.
In contrast, you can organize your backpack with meticulous precision, and “tetris” your things so everything neatly fits with each other. You probably would be able to store twice as many things in half the space. Though a problem may arise if you need to take out your toothbrush from somewhere at the bottom of the pack 😉
Example 2: let’s talk about something closer to video: encoding images. Oh yes, image files are too usually compressed.
Bitmap files (.bmp) are uncompressed images, they contain information about every single pixel. And JPEG and PNG are the popular compression algorithms. Here are three images:


Click each image to enlarge it:
- To the left, you see the source image in PNG format. 254 KB filesize. No additional compression has been done, so it doesn’t take any resources to compress it.
- In the middle, there’s a low quality JGEP file. 22.5 KB filesize. Because it’s so rough, it barely takes any resources to compress it, and the result is a small file as well.
- To the right, there’s a high quality JPEG, with 5 progressive scans. 111 KB filesize. This is the optimal image – it has excellent quality while achieving lowest filesize possible, but it also takes the most resources to compress.
Encoding a video is a similar process. Resources, quality, filesize – choose two.
Efficiency and I-Frames
The process of recording videos is always a race for efficiency. The goal is to record in highest quality possible while spending as little resources as possible, and having an acceptable filesize.
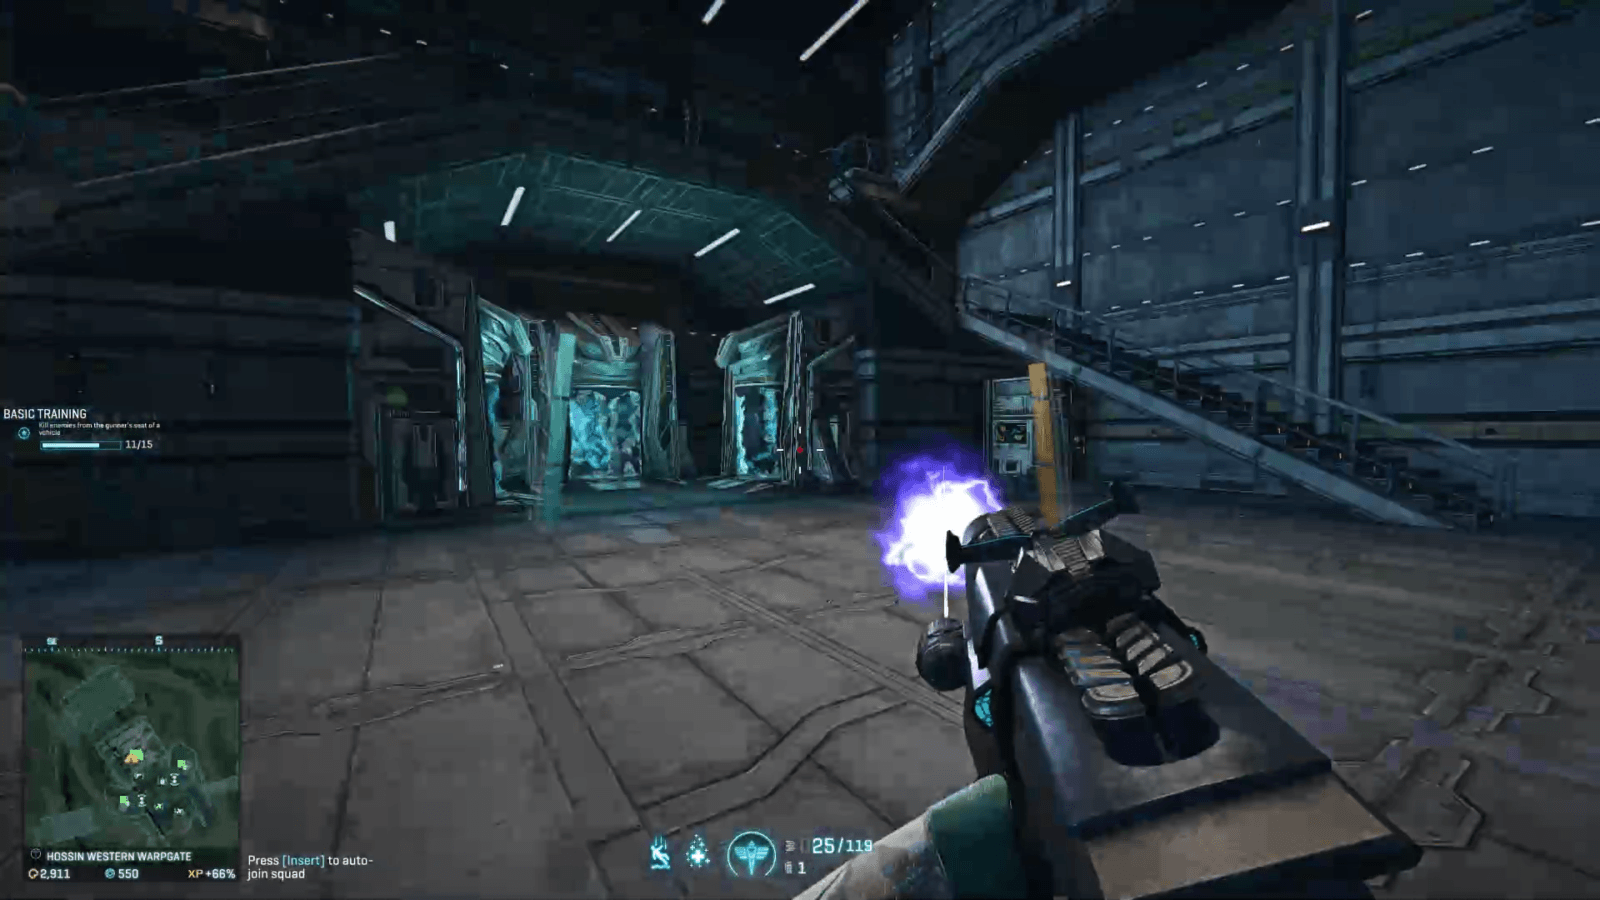
Modern encoders are highly advanced, and in order to increase efficiency, they can encode neighboring frames to reference each other. For example, let’s take these 4 frames:
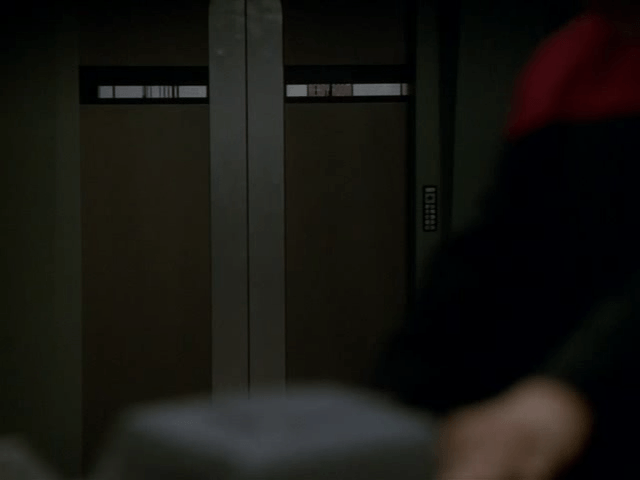
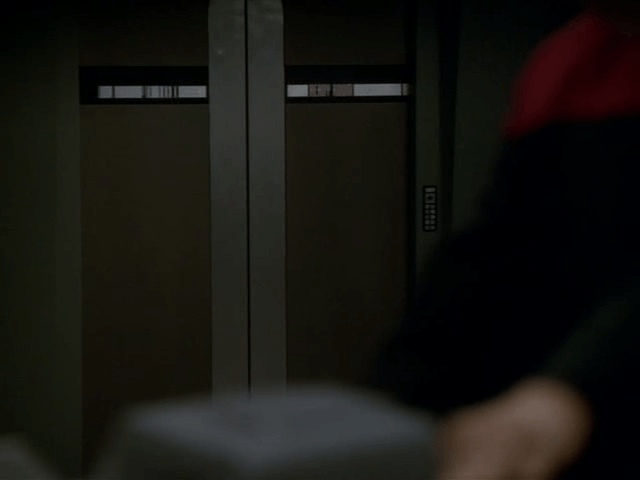
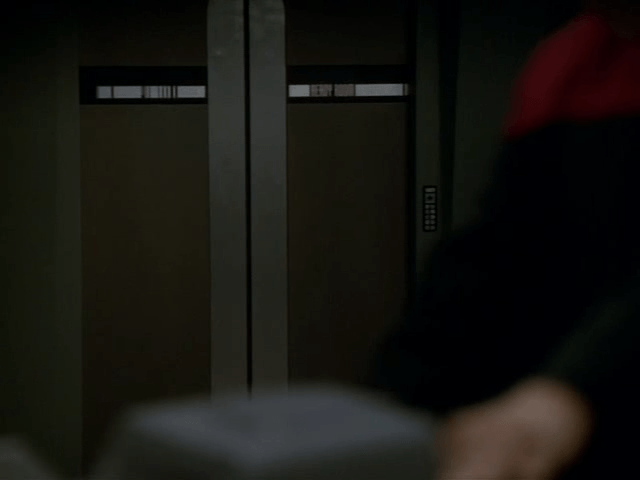
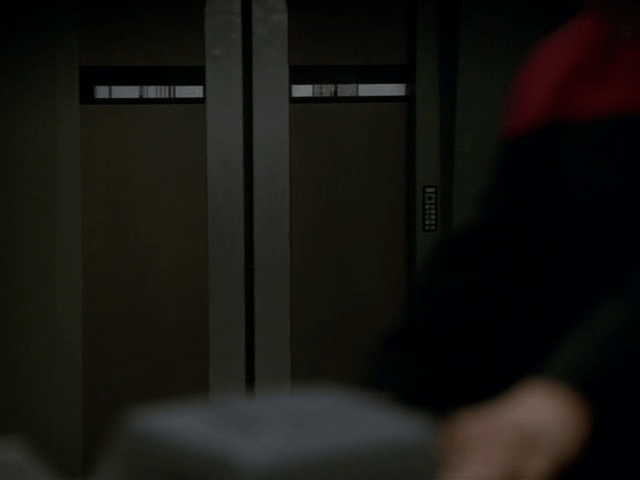
Here we can see a sliding door slightly opening. You will notice that these frames are actually almost identical, and a modern encoder will take full advantage of it.
It will be as if the encoder is telling your PC: “Okay, here’s this first frame, it has double doors and some guy’s hand on the foreground. And the next 3 frames – oh, they’re basically the same, just with doors opening slowly”.
So a videofragment with these 4 frames will take very little space. The original frame, used as a basis for the following frames, is called an I-Frame. If an I-Frame is corrupted or removed, several frames near it will also suffer from artifacts.
In contrast, the next 3 frames:


These frames are also similar, but there’s actually a lot of whole-screen movement going on, and it’s more random than sliding doors in the first example. The encoder still has some tricks to help with this, but the resulting videofragment will still be larger than in the first example.
Bitrate
Bitrate is the amount of data that describes one second of video. A larger, “heavier” video file will have higher bitrate. Higher bitrate does not necessarily translate to better quality:
- A good codec will provide a higher quality video with lower bitrate.
- The same codec, depending on encoding parameters, can produce files with same bitrate, but different quality, or same quality and different bitrates.
Bitrate is measured in bits per second. For example, an average youtube 1080p video will have the bitrate of ~5 megabits per second.
Do not confuse megabits and megabytes. The latter is approximately 8 times larger, depending on exact definition.
Bitrate can be constant or variable. It’s as simple as it sounds, a videofile with constant bitrate will have the same amount of data per second of the video, regardless of how much action is happening on the screen.
An optimized file will have variable bitrate. During rapid action scenes, the bitrate will rise, and it will be lowered during calm scenes with mostly same frames.
Obviously, you want to go for variable bitrate whenever possible. The problem is – encoding a video with a variable bitrate basically takes twice the effort. First you have to encode the video, and only then can you take a look where it is being inefficient, and trim the excess fat. This is known as two-pass encoding.
For simplicity’s sake, most hardware encoders only support initial encoding with constant bitrate. No matter how much action is happening – or not happening – on the screen, the resulting filesize will be the same.
Example
Let’s say you record a short PlanetSide 2 session.
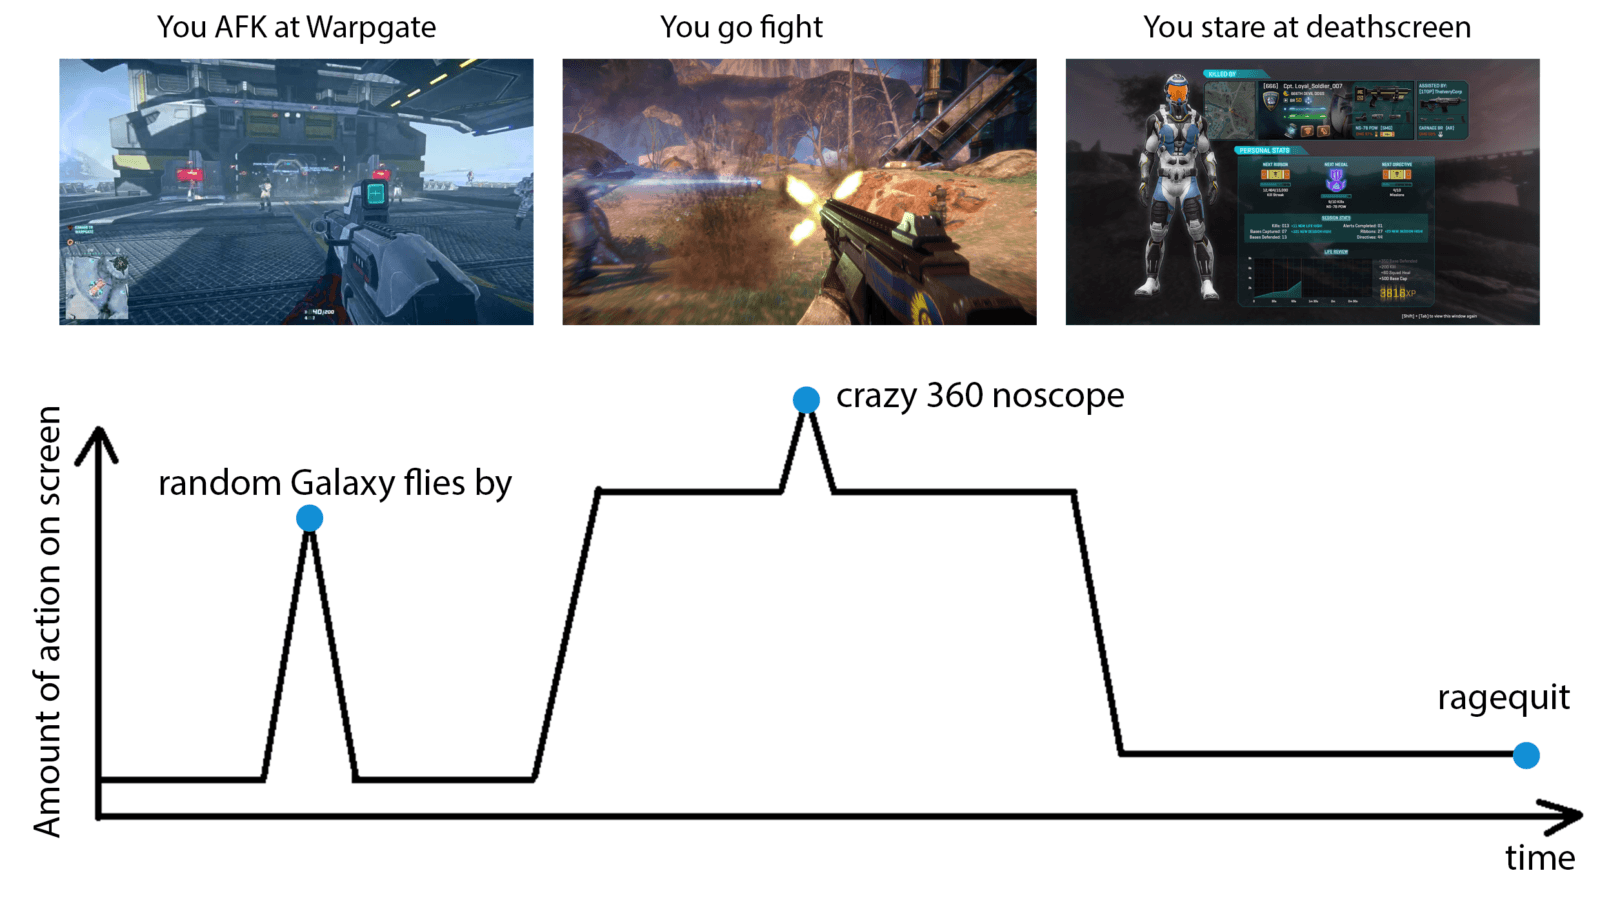
This graph represents the amount of action on the screen, and how it changes with time.
At first, there’s not that much action, because you left your character AFK at a warpgate, while you yourself went to make some tea. There was one spike of on-screen activity when some random Galaxy flew by.
Then you went to fight, and there was some decent amount of action going on. Why, you even pulled off a crazy noscope that nearly gave you vertigo. However, your killstreak was cut short by a bodyshot from BR1 bolt baby. For some time you pondered at meaning of life while starting at the deathscreen, and then ragequit, just after you clicked “save video”.
All this time your recording software was recording at a constant bitrate:
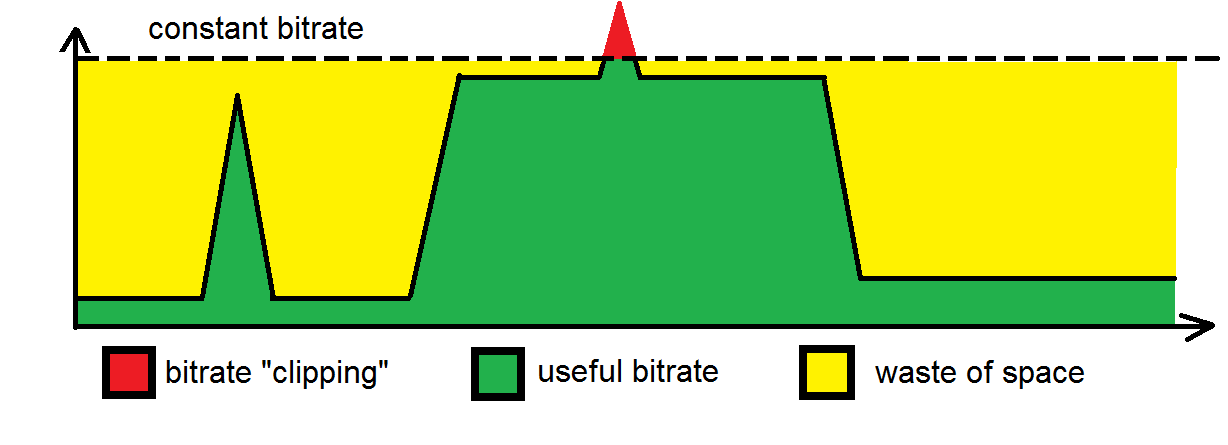
During times of low activity, that bitrate proved to be excessive, and a lot of it was wasted.
It was generally enough during high activity, and you recorded a nice and smooth, high quality video.
There was only one moment, during that crazy 360 noscope where that bitrate wasn’t enough, and there is some noticeable pixelation during a few frames.
In the end, we have:
- A file with generally acceptable quality, but about half of it is a waste of space, and there is one moment where bitrate wasn’t quite high enough to ensure good quality.
- To ensure good quality at all times, you could increase the constant bitrate, but that would mean wasting even more space.
- To save space, you could reduce constant bitrate, but then there would be a higher risk of running into quality issues.
One potential solution to this dilemma is transcoding.
Transcoding
Transcoding is a process of decoding a video, and then encoding it again. This encoding is usually done using a different codec, or different encoding settings.
Let’s assume that your goal is to record high quality video. Naturally, for highest quality you wish to record with highest bitrate possible. This gives the hardware encoder the necessary breathing room to record every single detail while not spending too much processing power, but it results in large, inefficient files.
So in order to save space, you can later transcode your videofiles, using different settings, such as higher profile and variable bitrate.
Encoding profile is a compilation of settings that determines how much processing power is being spent on each second of the video. Using a higher profile results in smaller files and better quality, but takes more processing power.
So after transcoding, that involved two-pass encoding, the resulting, optimized video file would look like this:
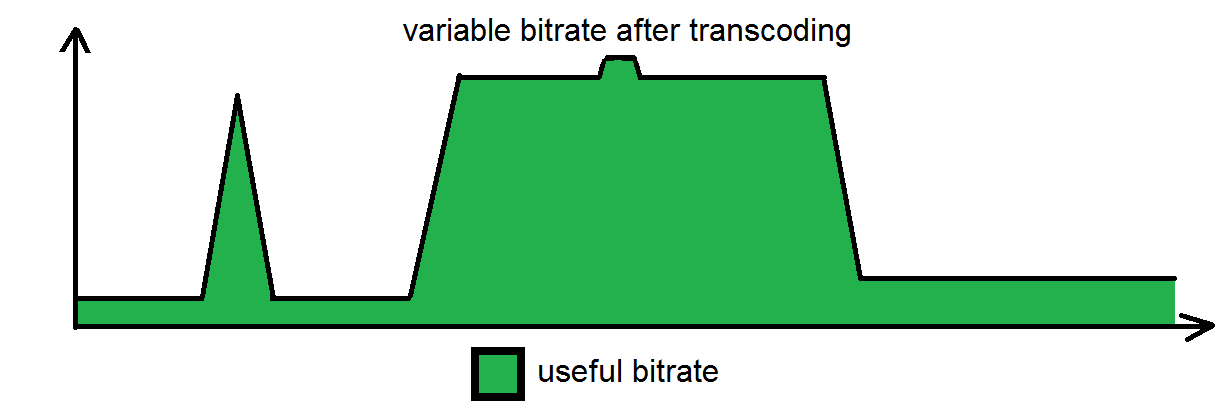
You’re also likely to benefit from a higher profile, saving even more space. The only problem is that would require time and processing power. Transcoding even a short video might potentially take hours.
Some video editing programs allow you to utilize Software GPU Encoding, so if you have a powerful Graphics Card, you can potentially accelerate the process of transcoding by using some of its power.
However, there won’t be a night and day difference. A much faster way to save space is to cut recorded videos without transcoding.
Recording Video
General Recommendations
Use native resolution. E.g. if you play on 1080p, then you want to be recording in 1080p as well, unless this gives you performance issues, in which case obviously you want to be recording at lower resolution.
Set bitrate as high as possible. 50 000 000 bits per second (50 mbps) is a good guideline for 1920 x 1080 recordings at 60 FPS. You can always shave off extra bitrate with transcoding later.
Hardware Accelerated Recording
AMD ReLive and nVidia Shadowplay

This is the best option for a simple consumer, assuming you have a compatible Graphics Card. You can check list of compatible cards here:
- nVidia – you’re interested in “Share and SHIELD PC Streaming” field.
- AMD – scroll down to “Encoding Support”.
Both tools take advantage of Hardware GPU Acceleration, utilizing a special chip in your Graphics Card to encode the video.
However, there is still a small impact to performance, due to how DirectX frame capture works. Fortunately, Shadowplay and – possibly – ReLive have access to proprietary technologies that reduce this performance hit.
These tools are extremely similar, and share these traits:
- The ability to toggle the recording on and off, so you can record whole play sessions.
- The ability to continuously record without permanently storing the recording. Last few minutes of the recording will be saved only when you press a certain key combination. This is really convenient, as you can play normally, and press “save” only when something interesting happens.
- The ability to take screenshots.
- Optional ability to record microphone audio and insert webcam video into the recording.
- The ability to stream video to twitch and similar services. That said, streaming usually has lower bitrate, and Shadowplay doesn’t seem to be able to produce acceptable video quality for this purpose. Not sure about ReLive.
- In-game overlay with configuration.
Installing, configuring and using these tools is more or less trivial. Follow general recommendations above.
If you’re given an option, use a more advanced codec: HEVC x265 > AVC x264. Unless this gives you technical difficulties or unsatisfying quality, obviously.
Intel QuickSync
Intel HD Graphics, integrated into Intel CPUs, too have a built-in hardware encoder, called Intel QuickSync.
If your dedicated Graphics Card is too old and does not support Shadowplay or ReLive, you may want to try and take advantage of QuickSync.
Normally, if you have a dedicated GPU installed, integrated GPU goes offline, but you can circumvent that by going into UEFI or BIOS settings and enabling “Integrated GPU multi-monitor” setup or something along those lines. The exact wording will change depending on your motherboard.
Load Windows and install Intel HD Graphics drivers. They should be easy to find on official Intel site if you just google for “<your CPU name> integrated graphics drivers”.
Restart after you install drivers and that should be enough for Intel QuickSync option to appear as encoding method in OBS Studio and probably other recording software as well.
If it doesn’t, you may need to configure a fake multi-monitor setup. This will make it so the output from your dedicated GPU is copied to the output of integrated GPU, and then you will be able to use QuickSync to capture and encode that video stream.
Keep in mind this can potentially reduce performance.
If you don’t have a dedicated Graphics Card, intel QuickSync should work without any additional fiddling with UEFI / BIOS.
QuickSync seems to be fully capable of recording in 1080p60, and with 50 mbps of bitrate provides excellent video quality.
Other options
Shadowplay and – possibly – ReLive have access to some proprietary technologies that reduce the performance impact of capturing video, so they are honestly your best bet. But, if for some reason you can’t or don’t want to use them, you can use other recording software.
The biggest potential differences between recording tools is video encoding method, and most gaming-related tools will be able to take advantage of Graphics Cards’ built-in hardware encoders. Assuming they use the same encoding settings, they will record video almost as well as Shadowplay or ReLive would.
So usually user interface will be the biggest difference. Some tools are also capable of software encoding in case hardware acceleration is not available.
It’s like choosing from several cars, which all have the same engine under the hood. Your choice will depend on whether you like convertible trunk or colored exhaust pipes.
Notable options:
- OBS Studio – gives you lots of settings to tweak, and records in good quality.
- Plays.tv – generally, should be almost as good as Shadowplay and ReLive.
- Overwolf‘s Game Capture and Replay HUD modules – doesn’t let you choose bitrate, so records in worse quality than any other tool I’ve tested, but has a cool “watch instant replay” feature, and comes with a robust overlay kit which you might find convenient. In this case, being able to record videos is more of an added feature rather than main focus.
All of these tools are capable of software encoding, though plays.tv will not let you choose it if you have hardware acceleration available.
Hardware Recording
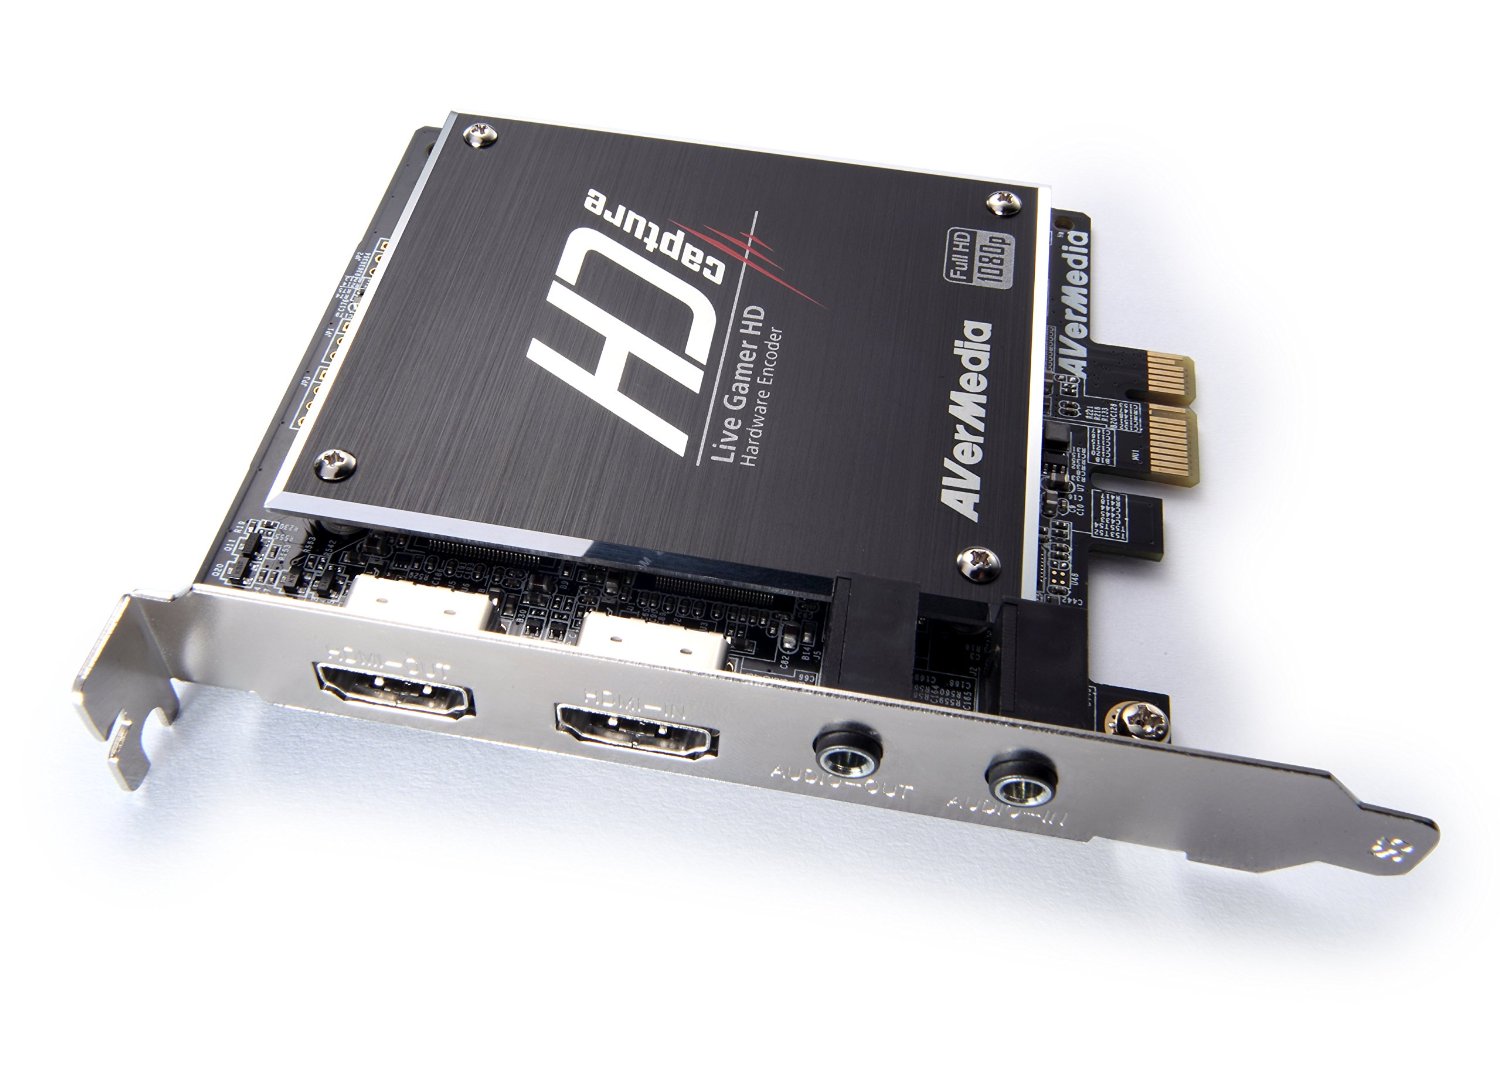
This would involve using a special video capture and encoding device. From my experience using such devices, if you want to record in high quality, you’re gonna have to spend a considerable sum of money.
I have experience using a relatively cheap device, back when Shadowplay didn’t work so good, and I was worried about performance loss. This specific device claims to be able to record in 1080p, and it can, but on closer inspection a lot of downsides come to light:
- It doesn’t allow more than 60 Hz through it, so I couldn’t enjoy my 120 Hz monitor while recording.
- It records 1080p footage only in 30 FPS.
- Even those 30 FPS are “fake”. It actually records in 15 FPS, and then interpolates every second frame, so the resulting video looks bad. This video was recorded by this device. It’s not that bad, but lacks smoothness of a 60 FPS video.
You could purchase a more expensive and potentially better device, but realistically you may find out that purchasing a Graphics Card capable of using ReLive or Shadowplay is cheaper.
Software Recording
This should be your last resort for recording while playing, as it would require your CPU to encode the video. You’re likely to experience a performance loss, and you would have to compromise video quality and filesize even more.
Plays.tv

Plays.tv is a collection of free software and hosting services for recording and sharing gaming videos. Similar to Shadowplay and Relive, it can work in continuous recording mode, and save only last few minutes of gameplay when you press a key.
Normally, Plays.tv automatically detects and uses Hardware Accelerated Encoding – it will use nVidia NVENC or AMD VCE, if available. However, as a fallback option, it can use software encoding as well. Expect worse quality and performance.
OBS Studio

OBS Studio is free software for streaming and recording. It too can take advantage of hardware accelerated encoding, but can also utilize software encoding if need be. You can also configure it to save last few minutes of video at a keypress.
After fiddling with its settings for hours, I was able to record in 1080p30 or 720p60. In either case there was no noticeable performance loss, but trying to record at 1080p60 with any settings invariably ended in laggy videos with skipped frames and desynchronized audio.
Software Recording with OBS Studio
When you first launch OBS Studio, it will look like this:
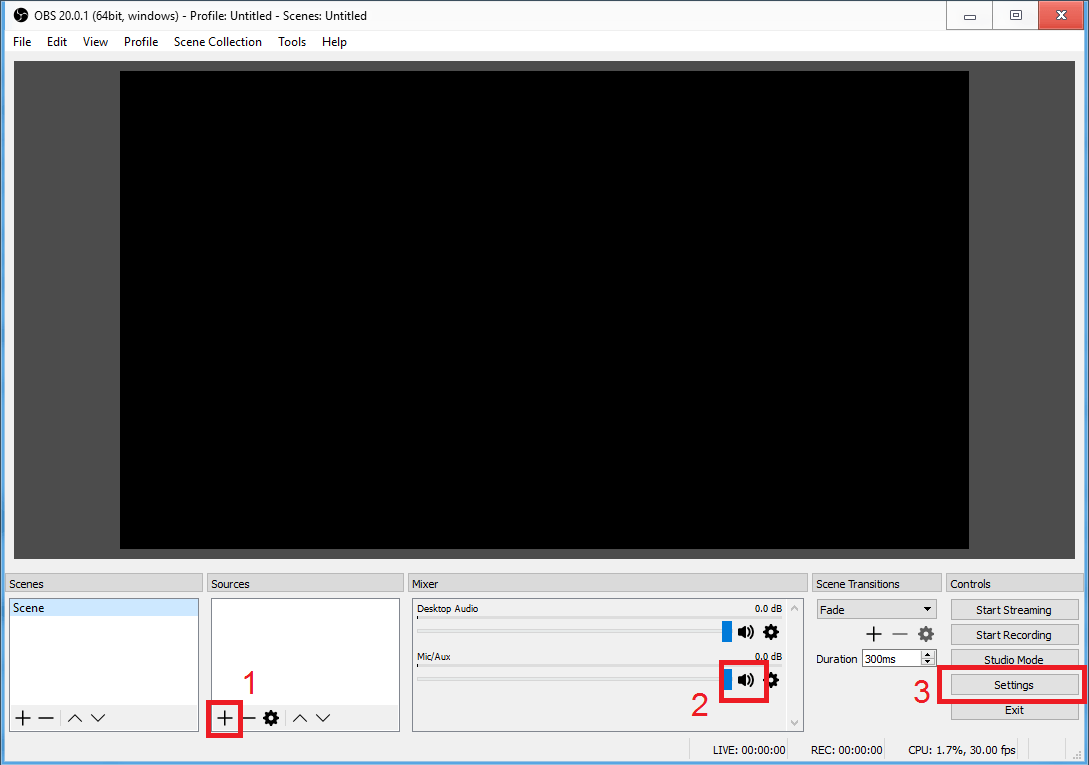
(1) OBS Studio can potentially capture information from several sources, and choose which one to connect to the output. This is mostly useful while streaming.
Since we want to record gameplay, click the plus sign and choose “Game Capture”. The default settings are fine.
(2) Mute the microphone if you don’t want it to be recorded.
(3) Click “Settings”.
First, go to “Advanced” and set “Process Priority” to “High”.
Then, go to “Video”.
- In “Base Resolution”, select your game’s resolution.
- In “Output Resolution”, select the resolution of your recording. Recording in resolution smaller than the game’s resolution takes less resources, and may be necessary if your CPU struggles to record in full resolution.
- Similarly, select an FPS value. Recording in higher FPS produces a more smooth video, but takes proportionally more resources.
- Same story with “Downscale Filter”. Lanzcos provides best results, but requires the most processing.
Finally, go to “Output”. These settings are good for recording in 1080p at 30 FPS:

Notes:
Bitrate – allows for greater quality, but increase recordings’ filesize. Outside of absurdly high values, there shouldn’t be an impact on performance.
Encoder Preset – this one is weird. Preset determines how much CPU time is allocated to encoding one frame of the recording. If you were transcoding a video, slower preset would simply increase the time it takes to encode, but reduce resulting file size.
But when dealing with real-time recording, you have to make sure that encoder finishes encoding one frame before it’s time to encode the next. If you don’t, there will be lags and skipped frames in the recording. So generally you want to set to fastest preset possible.
As long as you keep bitrate high enough, faster preset should not negatively affect the quality of the recording.
Recording path – if your system has several storage devices, it is preferable to save the recording on a separate drive from your system and game drives.
Recording format – normally, you’d want to choose .mp4 here, but it might give you issues when stopping the recording, which could corrupt everything you’ve recorded, so select .mkv instead.
All done! Launch the game, then Alt + TAB to the OBS Studio, click “Start Recording” and switch back to the game. You can also do it via hotkeys.
Save last X minutes of video
You can also configure OBS to continuously record everything you do in-game, but save the footage only on a keypress. To do so, go to “Settings” -> “Output” and enable “Replay Buffer”.
Keep in mind OBS Studio writes Replay Buffer into RAM, so unless you have a ton of it, go easy on “Maximum Replay Time”.
Then go to “Hotkeys” and find “Save Replay” field.
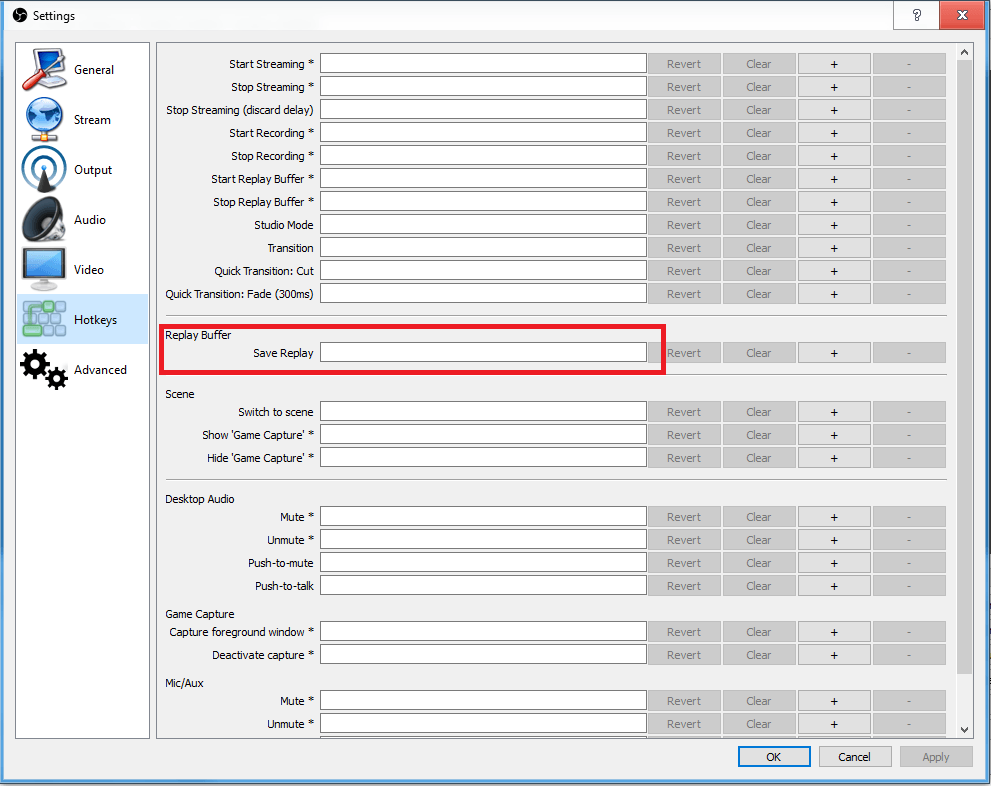
Set up a convenient key for yourself, but something that you won’t press accidentally. Something like Ctrl + F1 should work fine.
Keep in mind this mode works separately from the normal recording. When you wish for OBS to work in this mode, click “Start Replay Buffer” instead of “Start Recording”.
Troubleshooting
If your recordings are laggy and have skipped frames, decrease FPS and/or Output Resolution on “Video” tab of settings.
Recording Audio
(c) Wrel
Basic Editing
Avidemux
Avidemux is a piece of free software. It’s simple, yet robust. Its main features include basic cutting and transcoding videos.
Handbrake is a popular alternative to Avidemux, and it is also free.
Cutting without transcoding
This is a very fast way of cutting excess footage. It lets you save some space while spending minimal time and resources.
1) Start Avidemux.
2) Drag and drop the file you wish to cut.
You can use Avidemux to watch the videofile and decide which parts do you want to cut out.
You can drag and drop several files to join them together in one video.
3) Select areas you wish to delete by using “A” and “B” buttons.
- Clicking “A” sets the starting marker. If you have not placed an end marker yet, you will automatically select all of the remaining video.
- Clicking “B” sets the end marker. If you have not placed a starting marker yet, this will automatically select all of the video up until this moment.
- Selected segment of the video will be marked by a blue outline.
While doing cutting without transcoding, it is recommended to cut video only from an I-Frame to an I-Frame. This helps to avoid some potential issues. You can navigate between I-Frames by pressing Up and Down on the keyboard.
4) Delete selected areas by pressing “Del” on the keyboard, or clicking Edit -> Delete in program menu at the top.
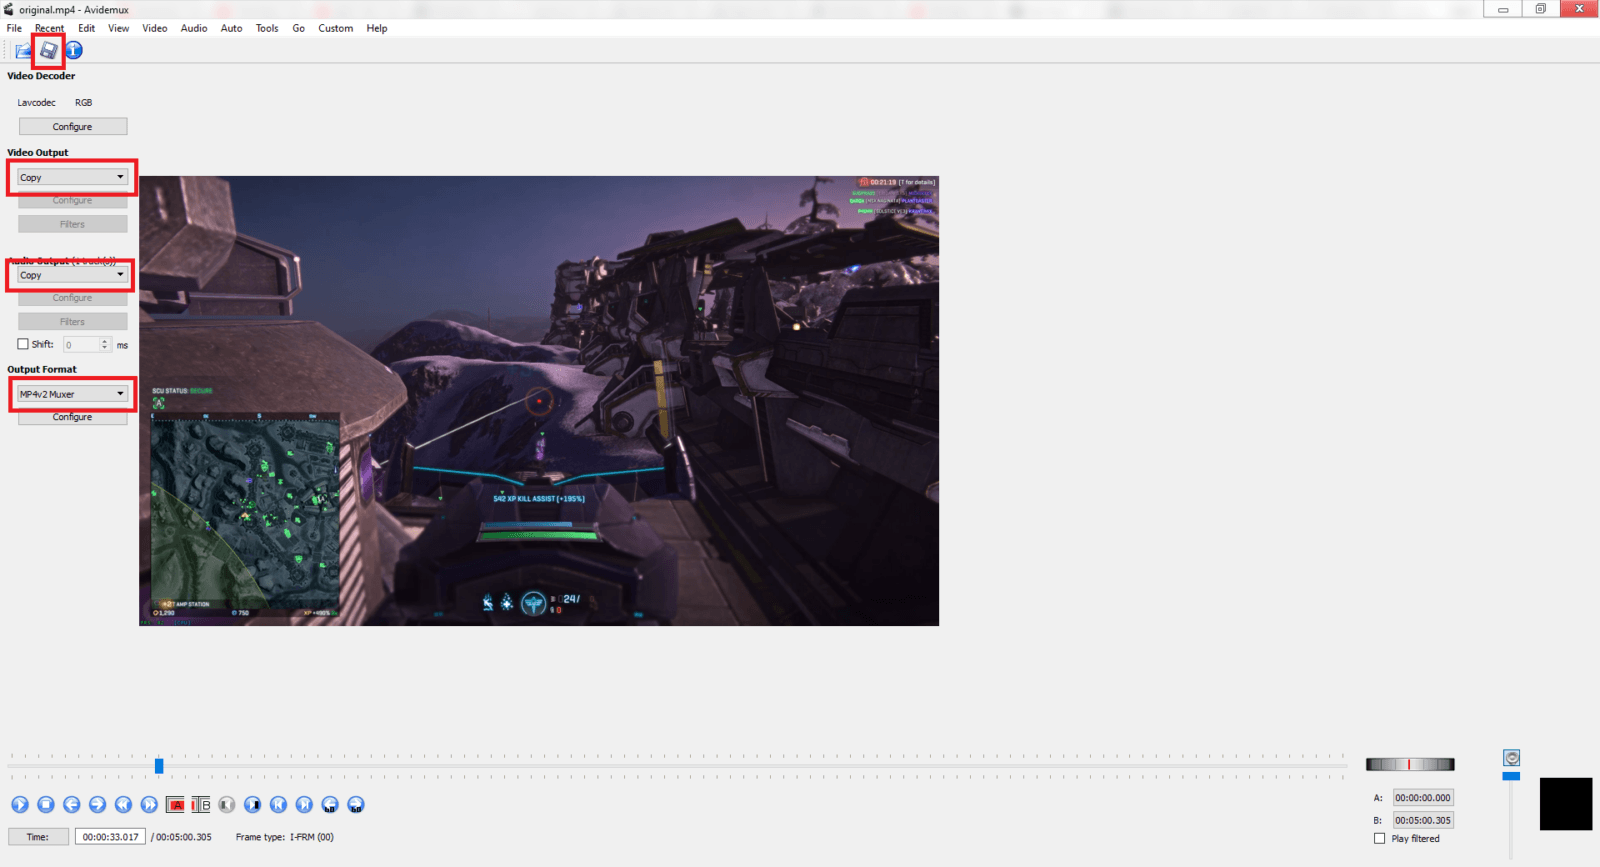
5) Select “Copy” at Video Output and Audio Output. Select “MP4v2 Muxer” in Output Format. If you get any errors, try “MP4 Muxer” instead.
6) Click “Save” and select a location for a cut version of the file.
All done! If you don’t intend to do any additional editing, you can upload the resulting video file right away.
Example
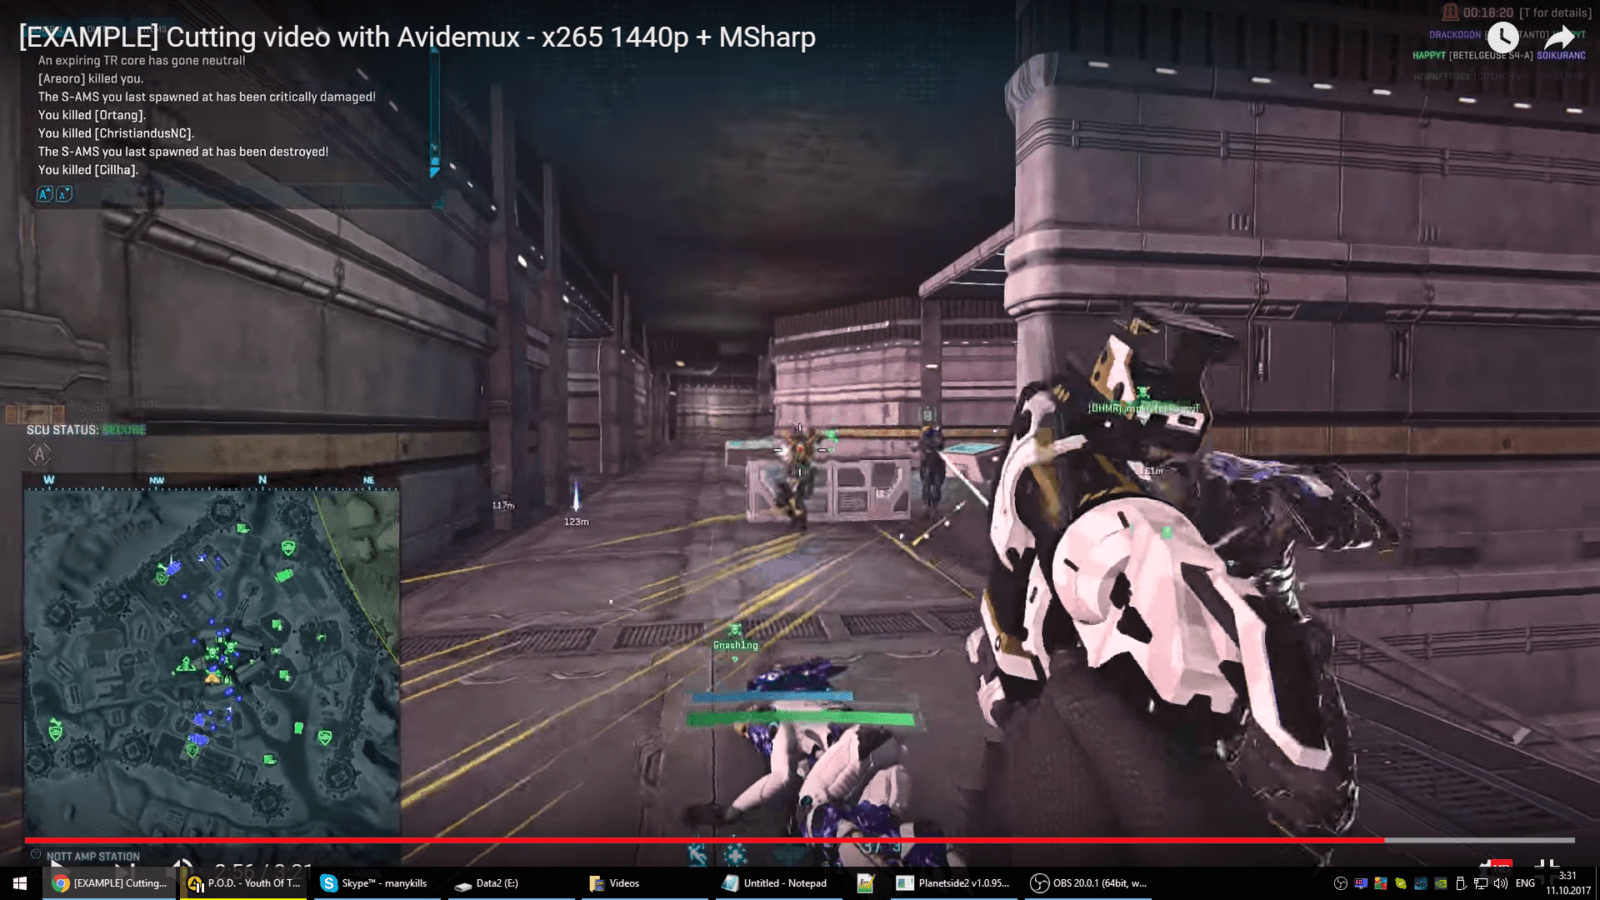
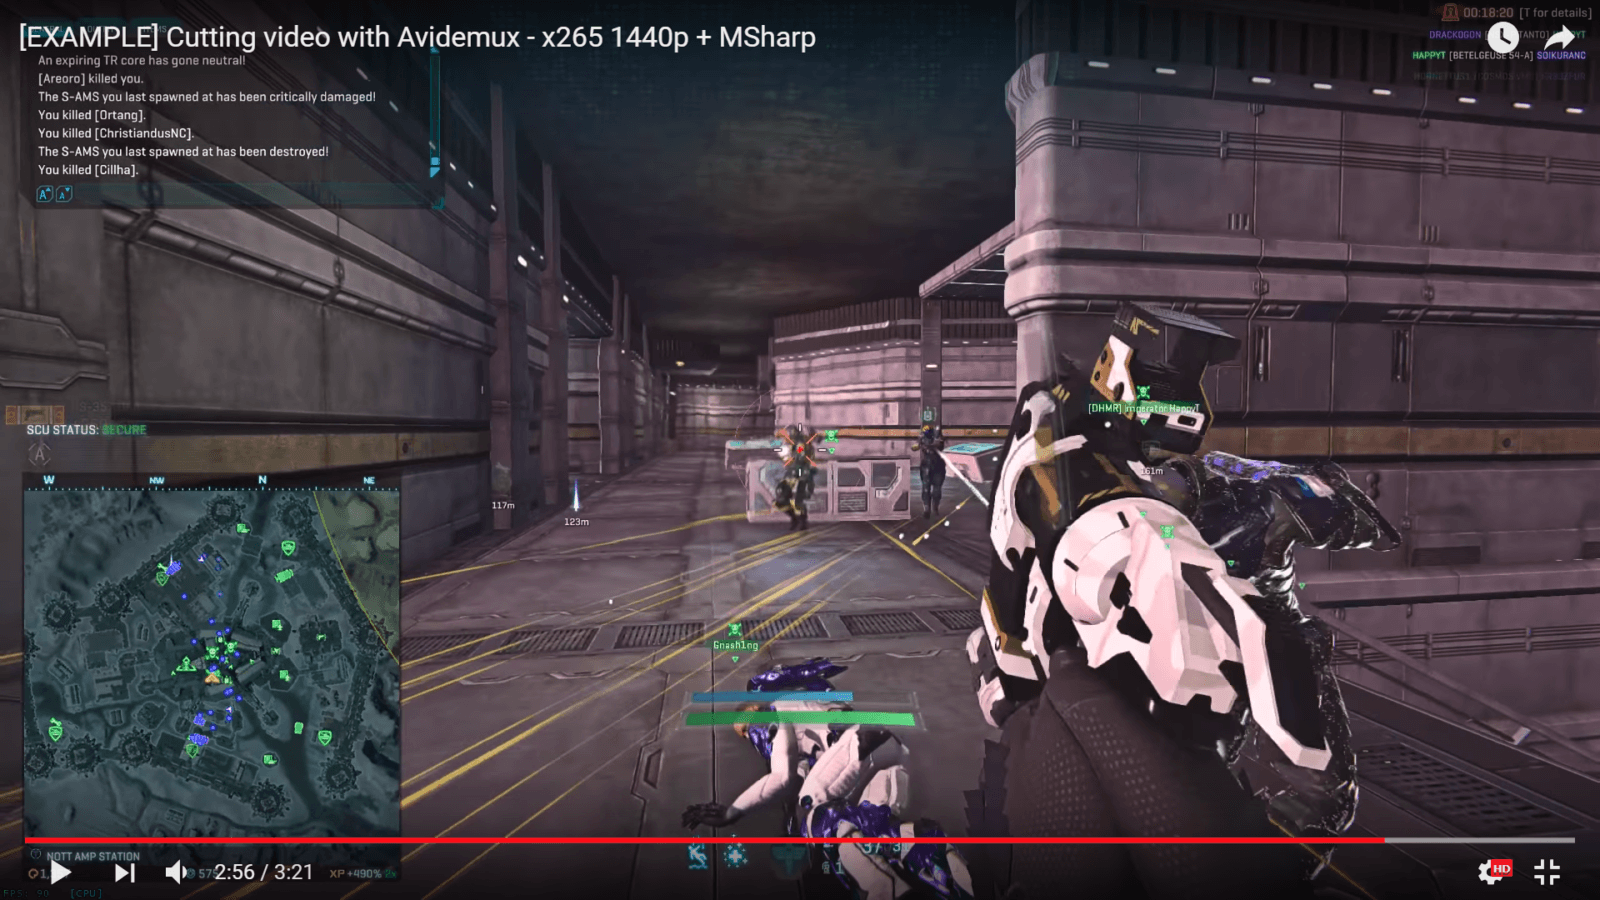
Here I have a 5 minute Shadowplay recording of me running around as VS LA.
The video starts with me running out of carbine ammo, and then sidearm ammo. Then I resupply, run around some more, and get killed by NC sniper. Then I respawn on a Sunderer and go on another short killstreak, and then die again. Then I redeploy to another fight entirely, but don’t accomplish anything before the video ends.
I decided to cut out some pointless running around in the middle, as well as cut away the whole ending part of the video. Here is how:
And here is the result. It is 3:21 in length. One minute and 39 seconds of the video was cut away, and the filesize was reduced from 1.59 GB to 1.16 GB.
Setting FPS
Recording software does not always strictly enforce FPS. Sometimes it can vary a bit, and that can be enough for yotube to screw you over, and prevent the uploaded video from having proper 60 FPS.
To make sure that does not happen, you can specify the desired FPS of your video:
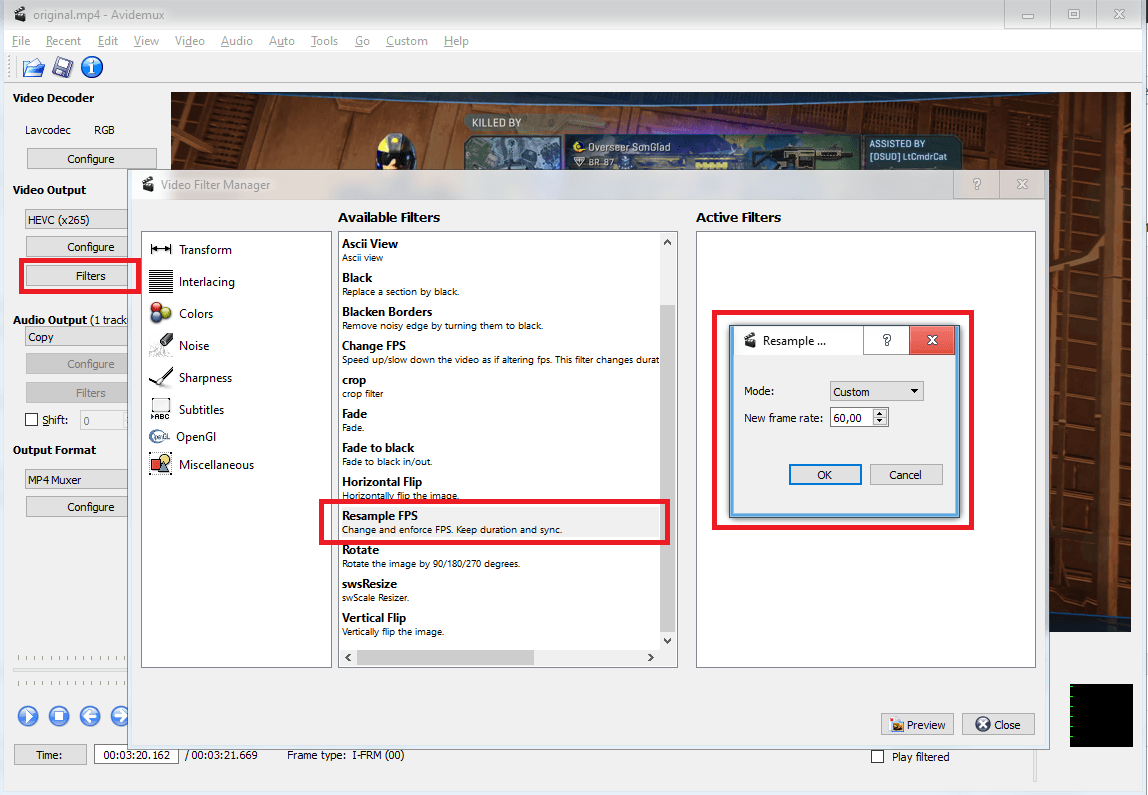
- Click Filters.
- In the list of Available Filters find Resample FPS and double click it.
- In the popup window, enter 60 FPS and click “Ok”.
- Save the video.
Transcoding
Transcoding a file will let you save even more space at no discernable quality loss, but it will take processing time.
Transcoding involves re-encoding the original Video Track with a different encoder, or at least with different parameters. This can get complicated, since there is a ton of different codecs available, with hundreds of different configurations. It will require a lot of experimentation until you can arrive at a good compromise between transcoding time, quality and filesize.
In the meantime, I’ve had good results with these settings:

- Select Video Ouput as HEVC (x265) and click “Configure”.
- In the opened window, select Encoding Mode as Constant Rate Factor (Single Pass), and move the “Quality” slider to “24”. Click “OK”.
- Select Output Format as “MP4 Muxer” and Save the video.
These settings basically tell the Encoder that you don’t care about filesize or bitrate, and that you wish to have consistently high quality throughout the video. And the encoder accomplishes just that – it keeps exactly as much bitrate as needed, while trimming down all of the excess fat.
Encoding process of the same same 3:21 video from the last example took ~11.5 minutes. The resulting videofile had size of 270 MB, which is more than 4 times smaller than the original 1.16 GB file. Constant bitrate of 50 mbps of the original was replaced with 11 mpbs of average bitrate. There was no discernable quality loss, even when I saved a frame from the same action scene of both videos and compared them under magnification.
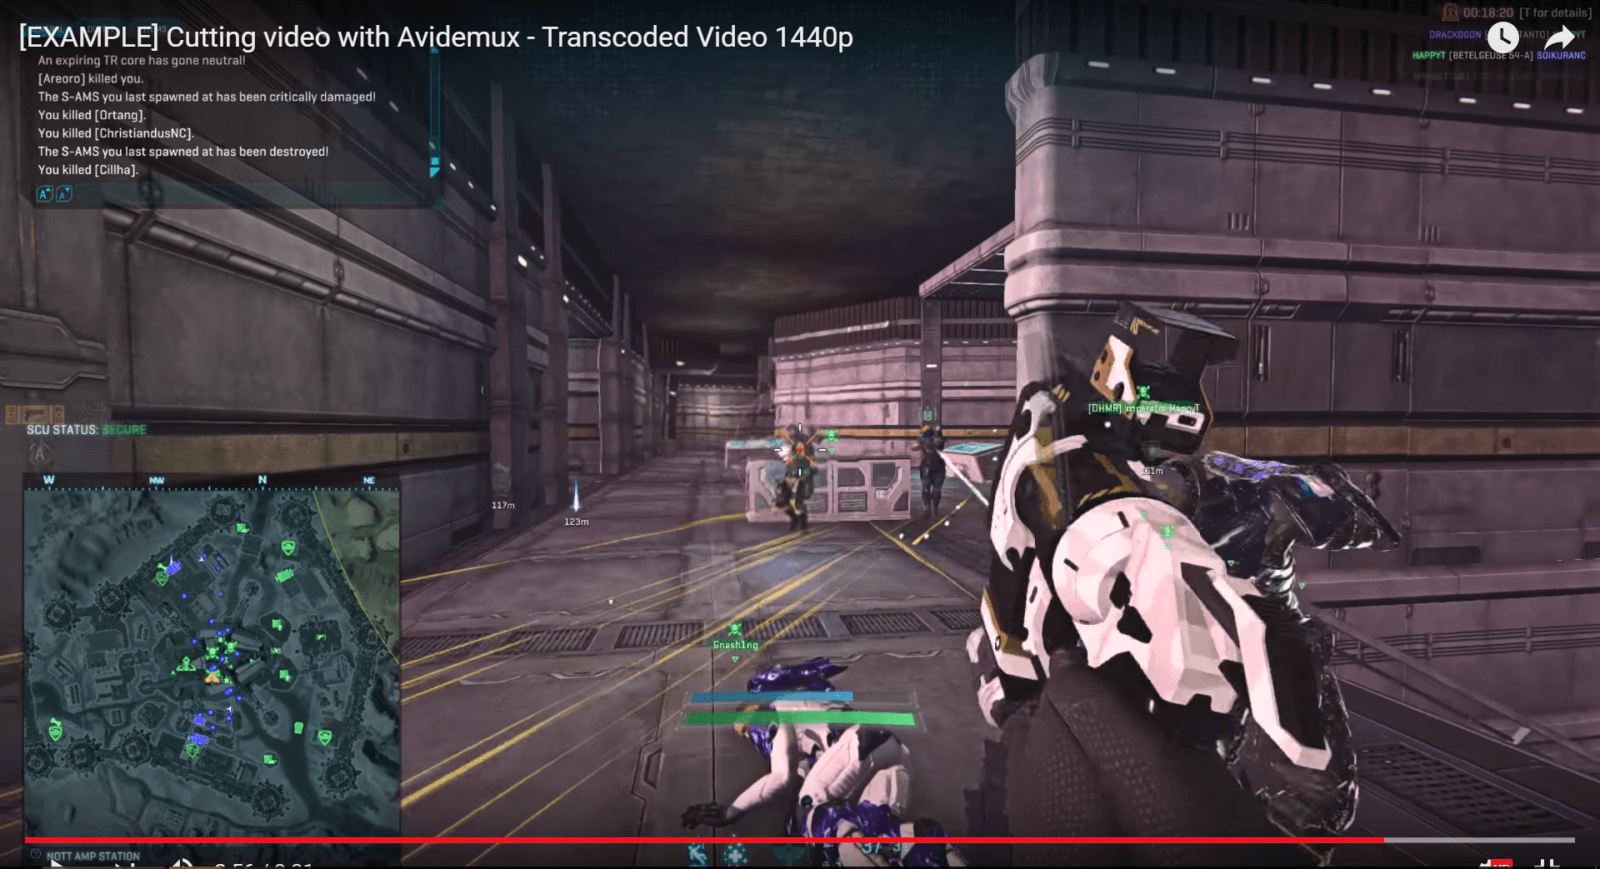
Automatic transcoding on Youtube
Youtube automatically transcodes all uploaded videos, and creates several versions of them, each with different resolution. And there is usually a significant quality loss along the way. Youtube recommends 15 mbps for 1080p60 video. However, you’ll be lucky if the video has half that bitrate after youtube re-encodes it.
That said, the bitrate and quality of the uploaded file do matter. Compare these videos:
- Original Shadowplay file with constant bitrate of 50 mbps.
- Transcoded and cut file with variable bitrate of 11 mbps on average, using x265 codec at high quality.
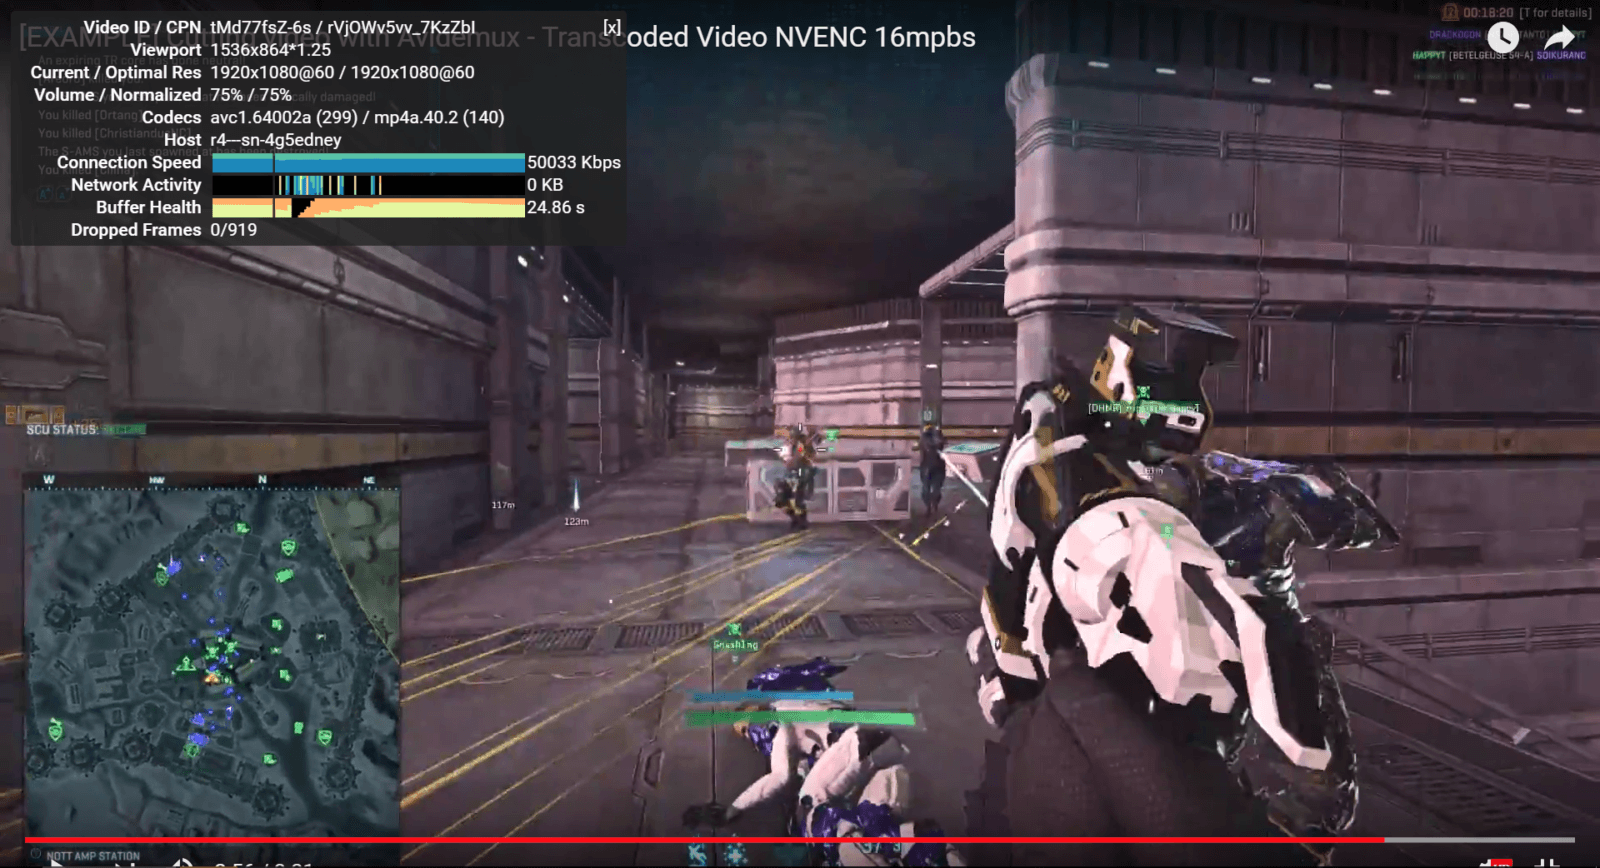
- Transcoded and cut file with constant bitrate of 16 mbps, using NVENC (nVidia Hardware Encoder); this should be an equivalent of making the original Shadowplay recording at 16 mbps instead of maximum 50.
If we compare the same frame from each video:


The leftmost frame is a screenshot from that video file on my hard drive, so it has “source” quality. A good basis for comparison; ideally, we would want to reach the same level of quality on youtube.
If you open these screenshots side by side and zoom in, you could reach these conclusions:
- All three videos have noticeably lower quality than source image.
- There’s no discernable difference between the original file, and the file transcoded using x265 codec. Maaaaaaybeeeee the latter is slightly better, and only if you look really hard.
- The video encoded with NV ENC at 16 mpbs clearly has the worst quality.
This demonstrates that if you wish to upload quality videos to youtube, you cannot be recording your videos at lower initial bitrate. If you really need storage space, recording at maximum bitrate, and then cutting and/or transcoding footage is a better option, though it requires more effort as well.
Fooling Youtube
There is a way you could trick youtube to give your video higher bitrate – resize it to a higher resolution:
- Higher resolution videos are allowed to have higher bitrate.
- In addition to higher bitrate allocation, 2560×1440 (2k) or 4120×2160 (4k) videos are transcoded using VP9 codec with a higher profile.
If you use 2k or 4k resolution, to fully benefit from increased quality your viewers will have to manually select 2k or 4k resolution, if it’s not native for their display. However, even at 1080p the quality should increase due to youtube using better encoding settings.
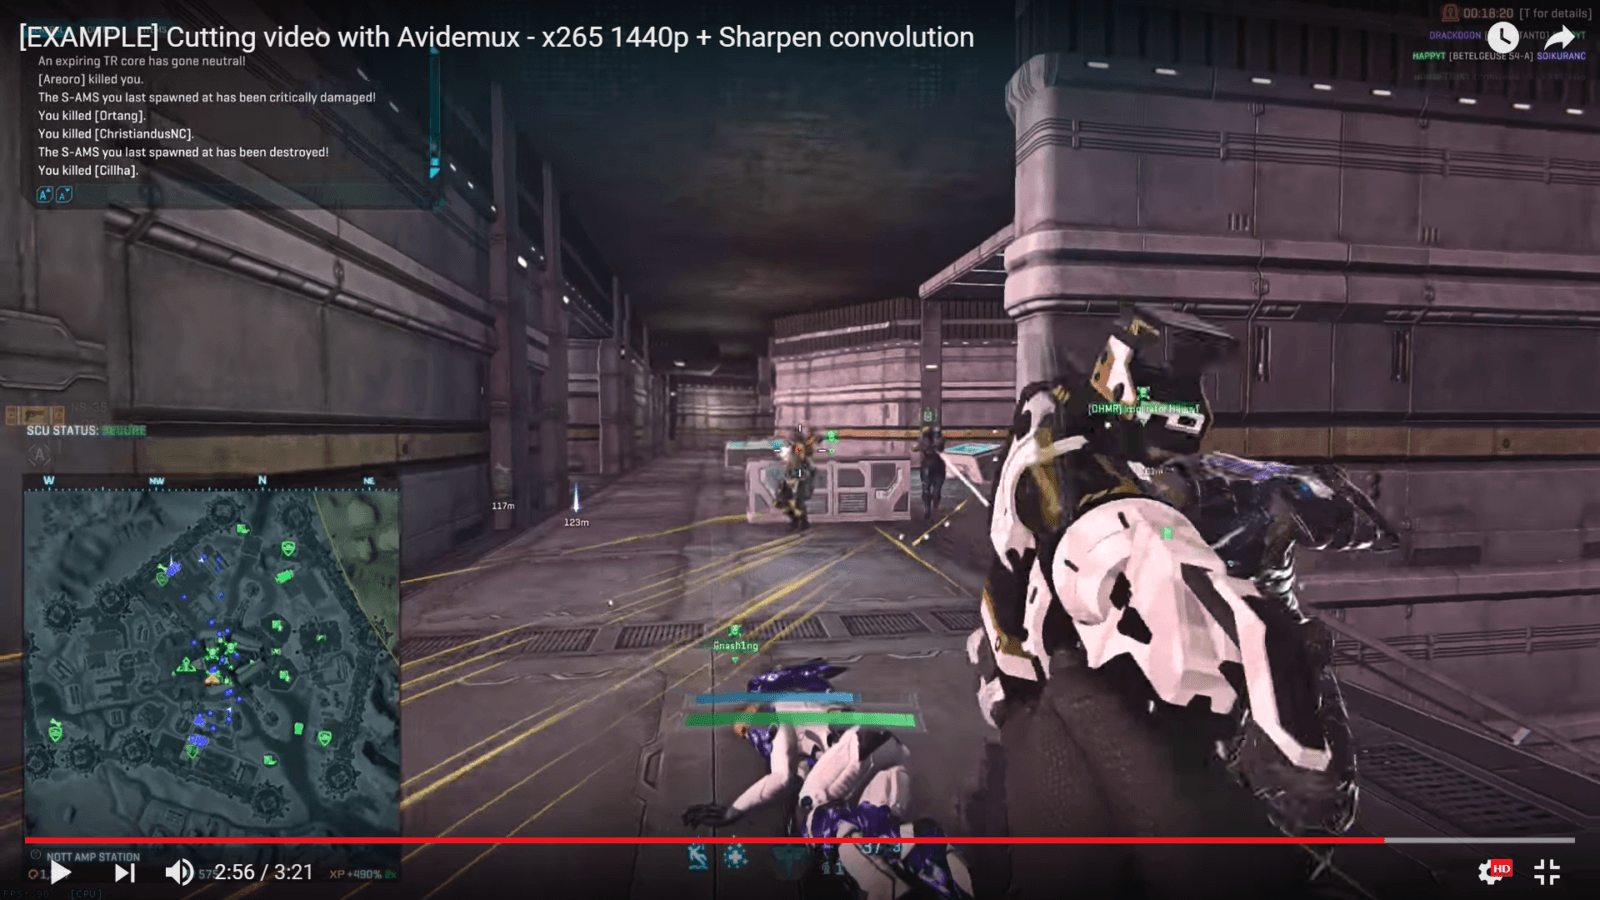
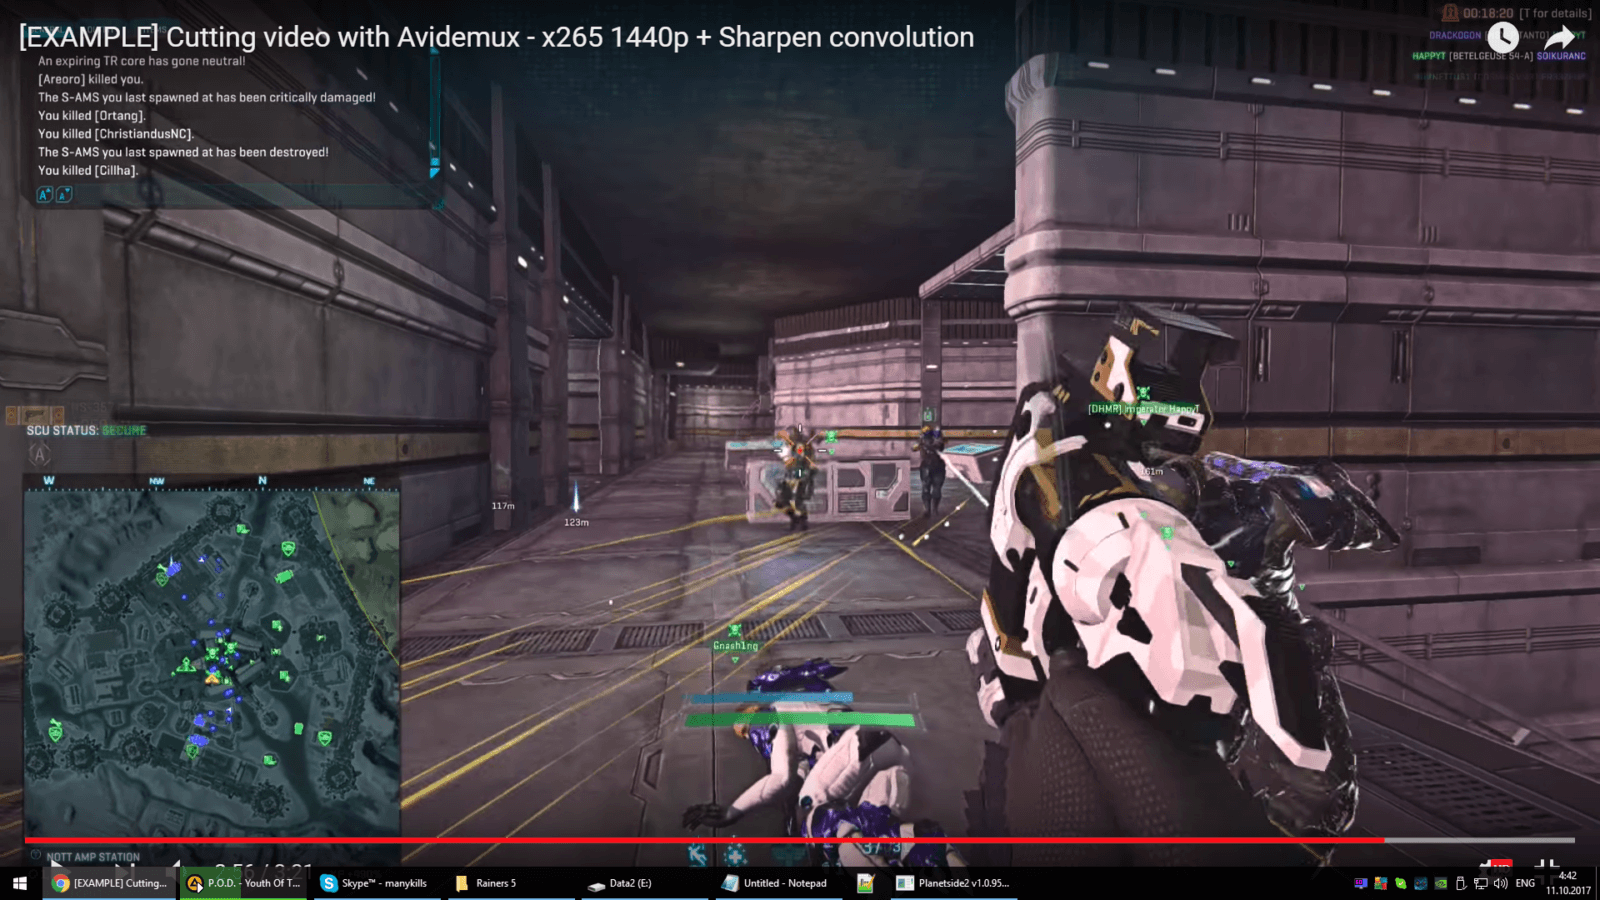
Here is the same video from previous examples, transcoded with x265 codec, but this time resized to 2k resolution. Let’s compare the same frame from each video:
- First screen is source quality on my PC.
- Second screen is x265 transcoded video from before.
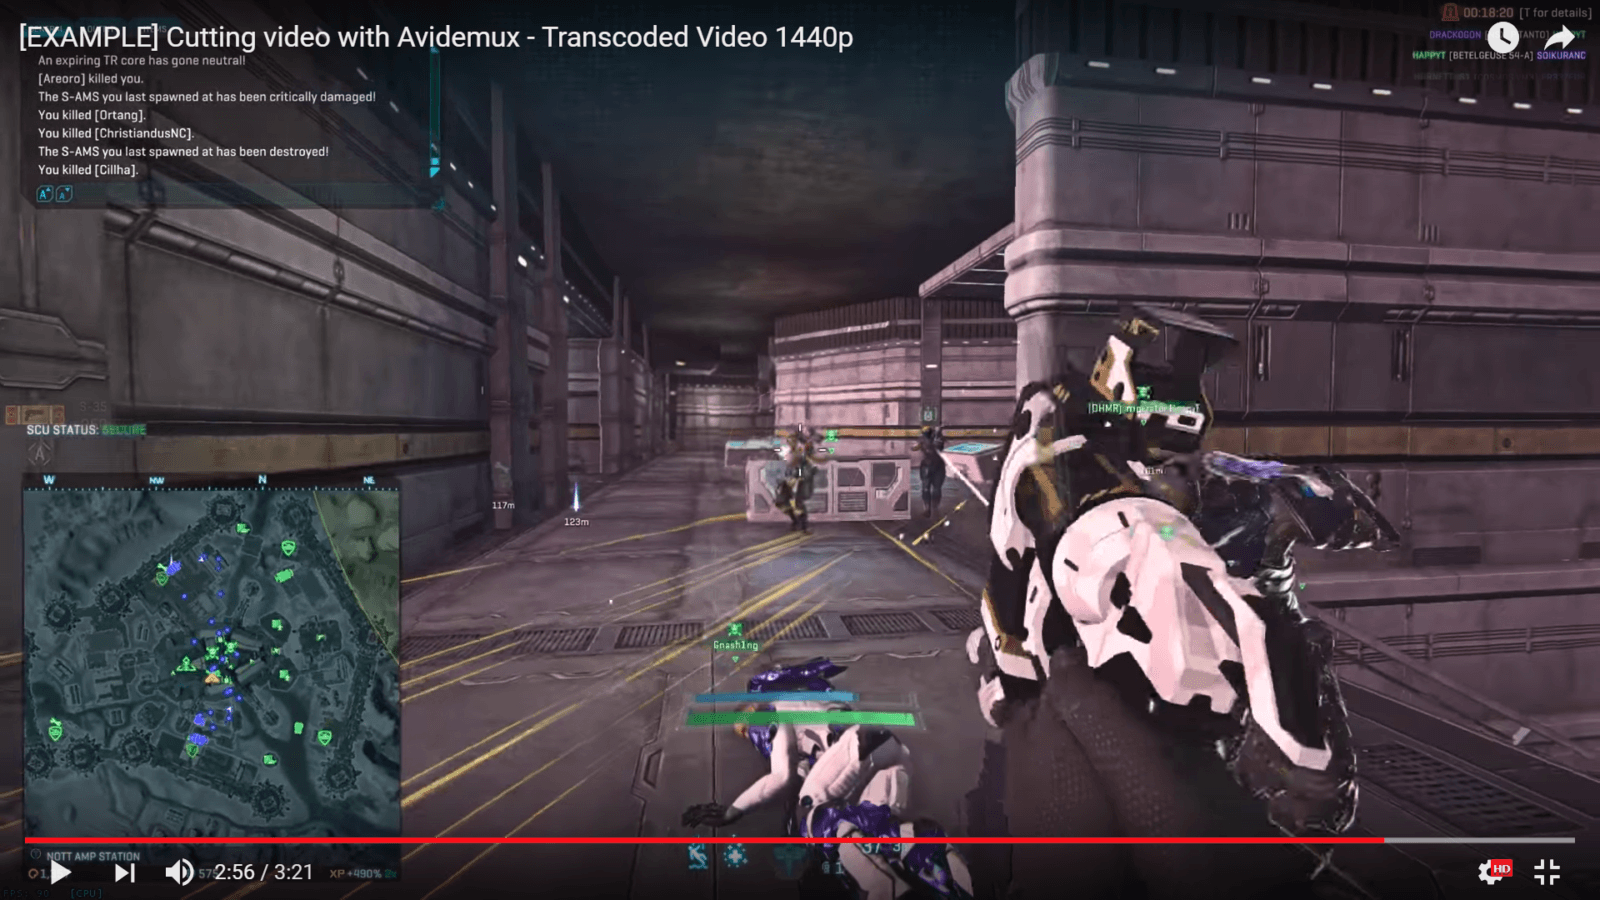
- Third screen is 1440p video, viewed at 1080p.
- Fourth screen is 1440p video, viewed at 1440p.
Conclusions:
- Even when viewed at same 1080p, the 1440p clearly has better quality than x265 transcoded 1080p video, which had the best quality in previous comparison.
- 1440p is also a bit more crispy than 1080p version of the same video.
- However, both still can’t quite reach the source quality. But hey, progress is progress.
Resizing the Video
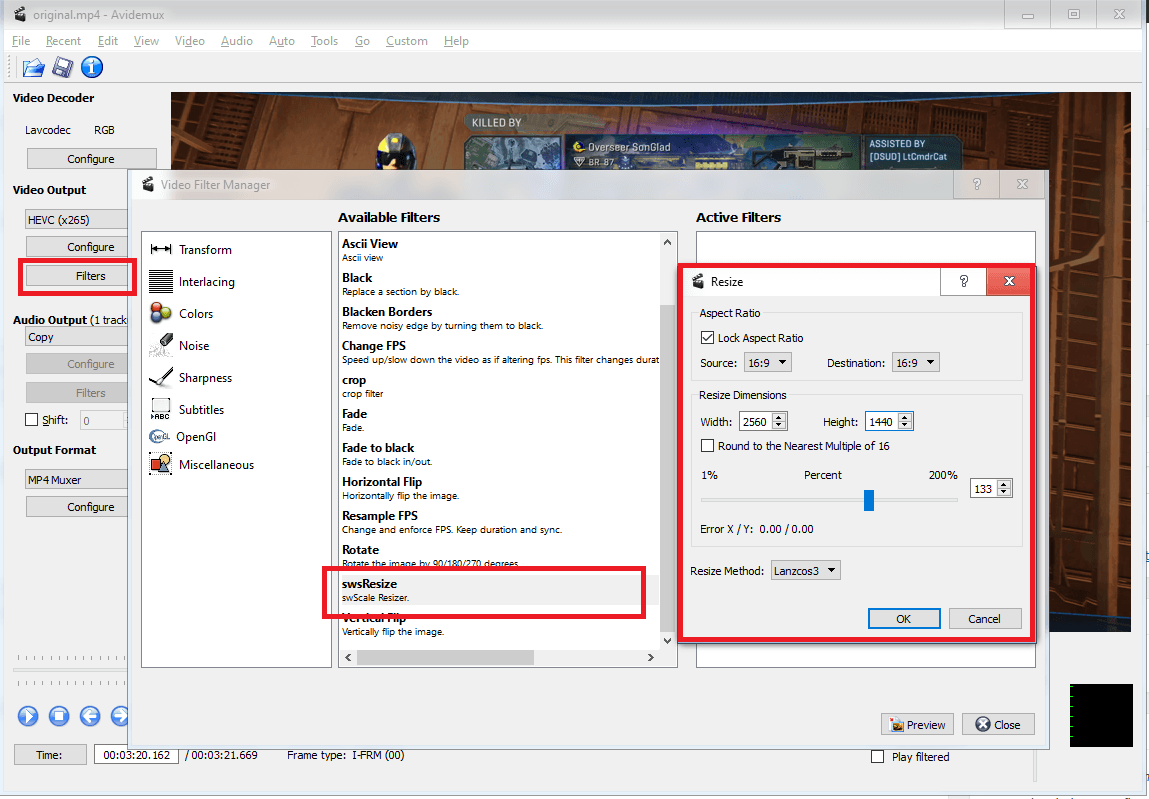
To resize a video:
- Click Filters
- In the list of Available Filters find swsResize, and double click it.
- In the popup window, set the Aspect Ratio and resolution that you wish to have.
- Going one step above should be enough. So if you recorded in 720p, go to 1080p, and if you recorded in 1080p, then increase to 1440p.
- Keep the Resizing Method as Lanzcos3
- Click “Ok”.
- Save the video.
swsResize does not seem to be capable of resizing to 3840 x 2160 (4k) resolution, so 1440p is as high as you can go with it.
A transcode with resizing takes slightly longer than simple transcoding. In this case, it took ~13 minutes, up from 11.5 minutes.
Sharpening
Sharpening is the opposite of blurring, it makes the picture more clear and crispy, but can potentially add “noise”, so balance is important.
Sharpening can slightly increase visual quality when dealing with bitrate constraints, such as Youtube’s. Especially when you’re uploading a resized video with upscaled resolution.
Avidemux gives you a choice of 3 different sharpening filters, each with its own configuration parameters:
- Asharp
- Mshapr
- Sharpen convolution
Ideally, you want to try all filters, with different configurations, and see which settings give you the best quality on youtube while taking the least processing time. I’ve done a quick test, using each sharpening filter with default settings. I didn’t precisely measure rendering time, but it felt more or less equal.
ASharp


Sharpen convolution

MSharp

In each of these galleries:
- First image is original source video, as it appears on the PC without any sharpening.
- Second image is sharpened video how it appears on PC.
- Third image is sharpened video how it appears on youtube at 1080p.
- Fourth image is sharpened video how it appears on youtube at 1440p.
Conclusions
To my eye, it seems that:
- Sharpen convolution has barely noticeable positive effect.
- ASharp makes some things more visible, but it also introduces ugly pixelated artifacts.
- MSharp seems to have the best effect, increasing image quality and detail in a subtle way.
Keep in mind that all of these tests have been done on default settings, which could potentially be far from optimal. But on default settings, MSharp seems to be the best.
Multitasking
Needless to say, you can perform all of these actions at once. You can add both swsResize and Resample FPS filters, as well as change Video Output codec before saving the video.
Obviously, the more actions you’re performing at the same time, the longer the process will take, often in a geometrical progression. That’s how we arrive from simple cutting taking a few second to rendering a 3-minute video for several hours.
Advanced Editing
This will require you to use more advanced software. Feel free to take advantage of any of the Free Video Editors, or consider purchasing or pirating a more professional tool, such as Adobe After Effects CC or Vegas Pro.
I’d like to give you a few examples on basic tasks you could do with a pro-grade video editing tool, and since the only one I use is Vegas Pro, we’ll have to use that.
Any pro-grade video editor should be able to handle these tasks, but they all work in different ways, and have different interfaces. It certainly takes a while to learn a “large” program like that. Fortunately, google is ripe with all kinds of tutorials.
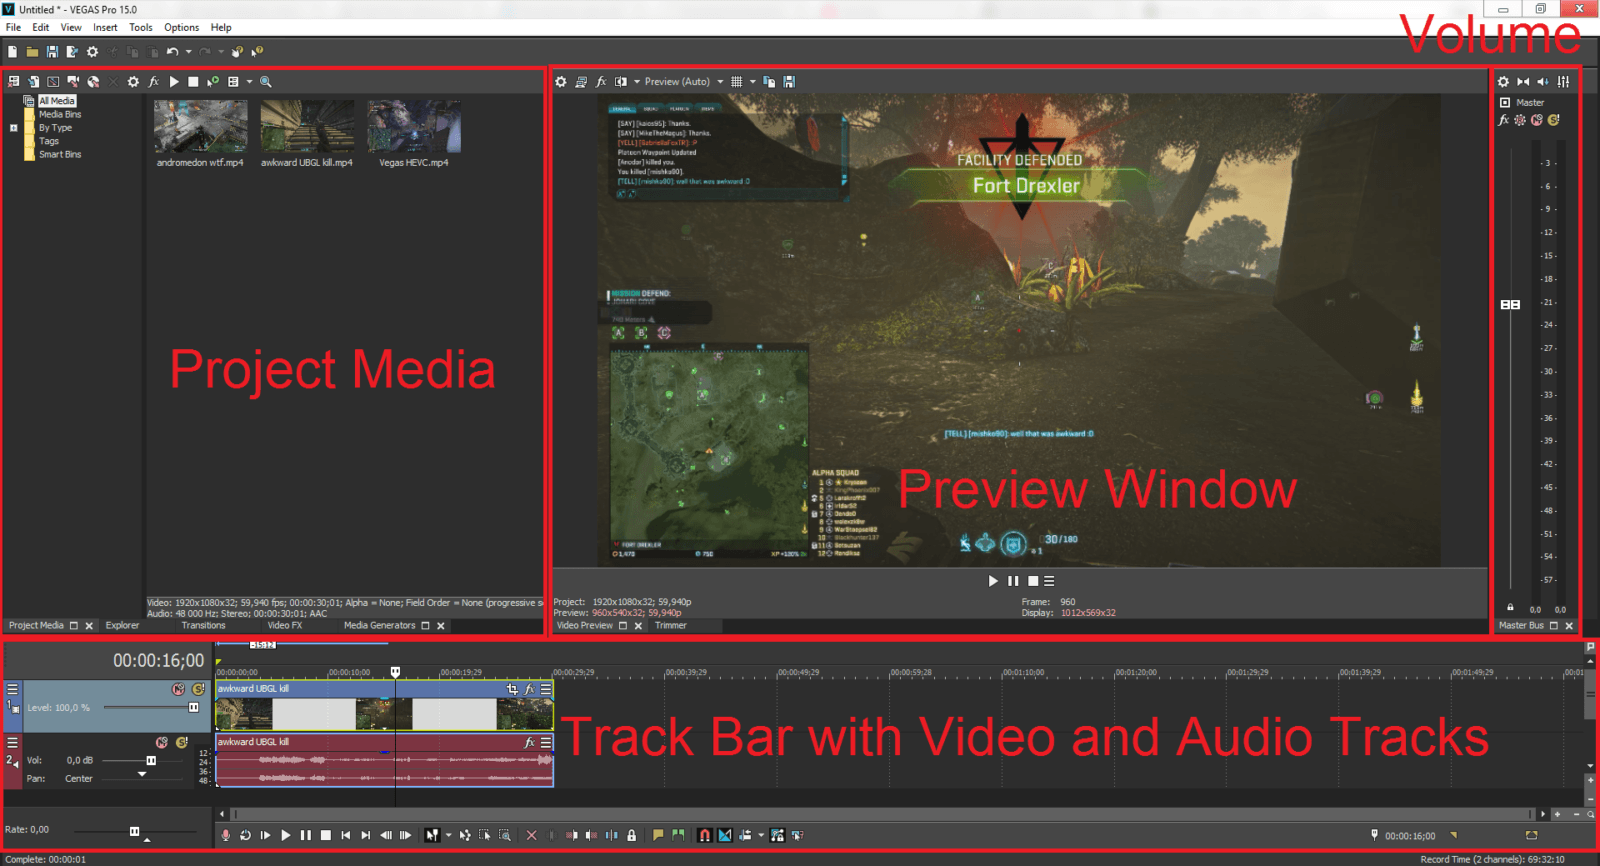
Interface and Basics
Quick tips for Vegas Pro:
- Press “U” to ungroup clips. By default, a video clip is grouped with its sound and you can’t delete one without the other.
- On an audio clip, right click -> Normalize. This will bump the volume to the usual 0db standard.
The basic algorithm of working with Vegas Pro is such:
- Import all of the media files you’re going to be working with. This includes video, audio and image files.
- Move media files to the Track Bar and arrange them as you like. Vegas Pro gives you the ability to create as many video and audio tracks as you need, which function like layers in a photo editor. For example, if you’d like to add some music to a recording of a gameplay session, you simply drag it on a separate audio track.
- Add filters and special effects, if you want.
- Render (transcode) the video.
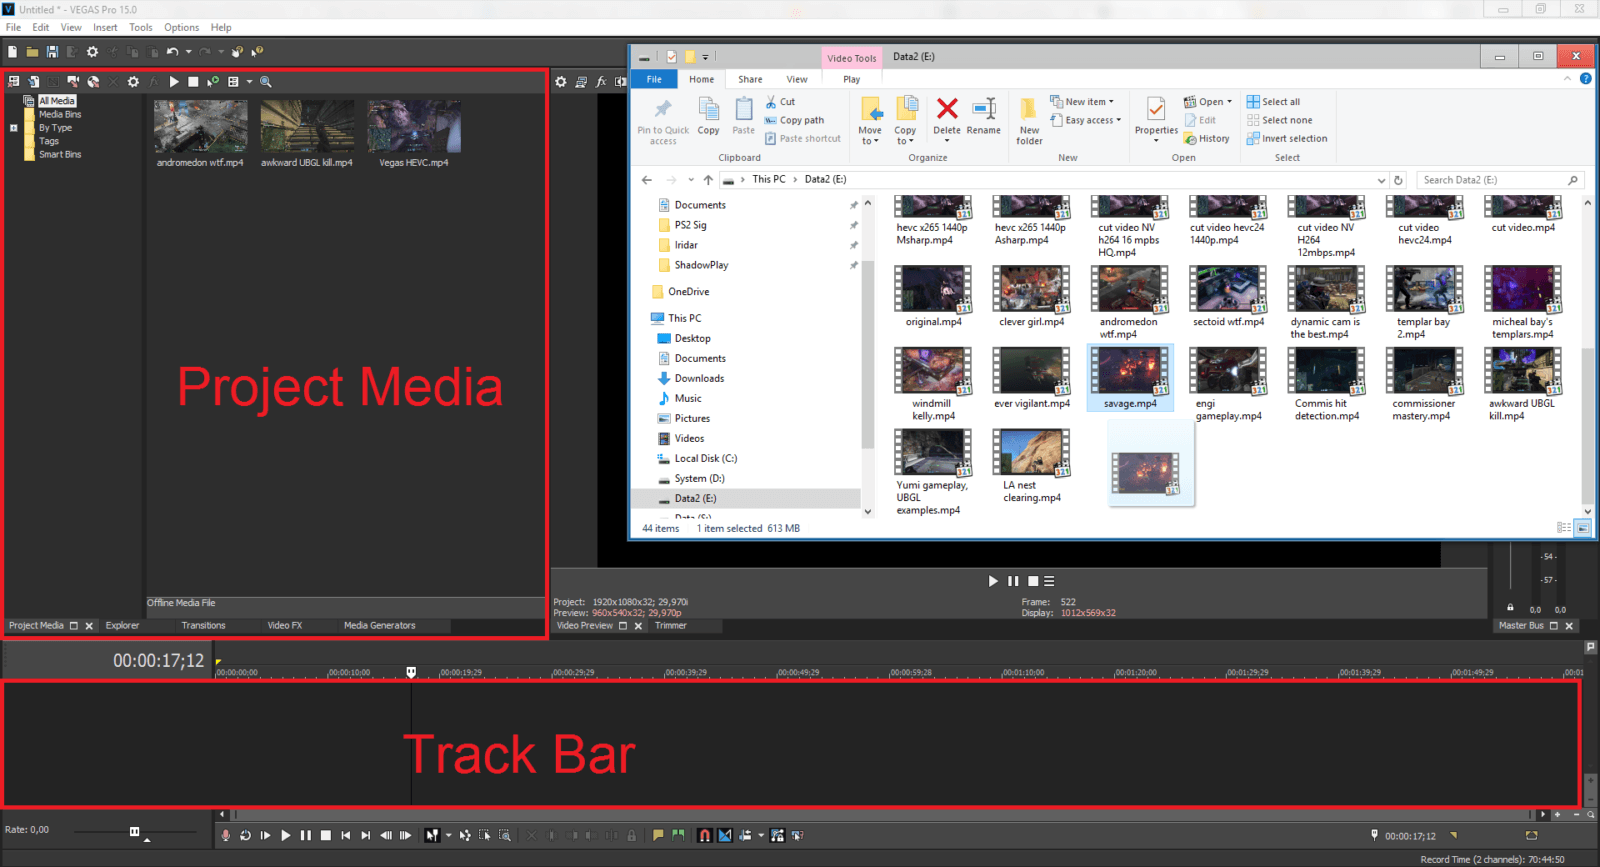
Creating a project
Start the program. Click File -> Import -> Media and select files you wish to import. This includes video files, audio files and images.
You can also drag and drop media items directly in the Project Media subwindow at the upper left, or the Track Bar on the bottom.
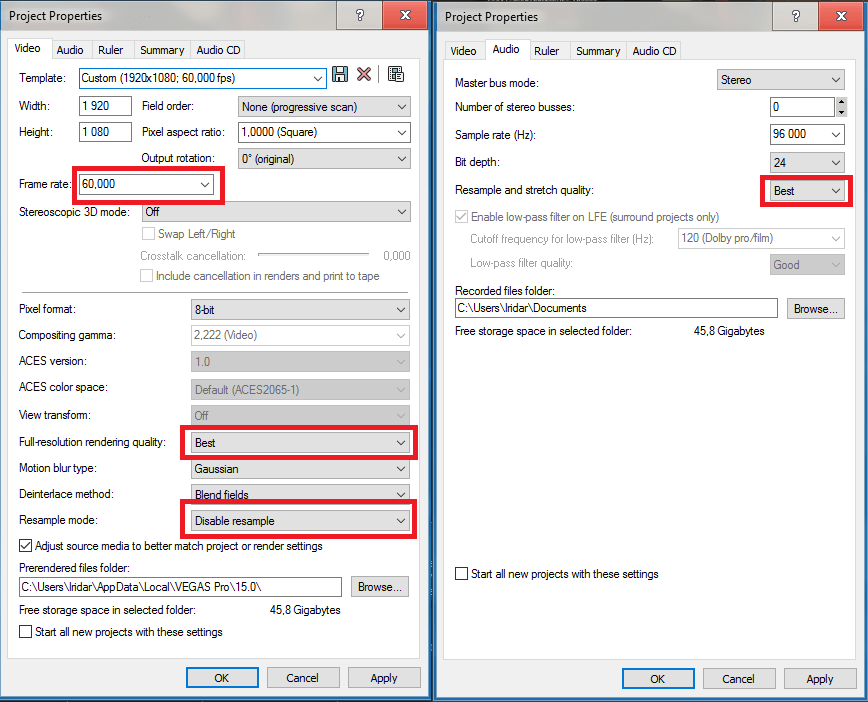
Click File -> Properties to configure your project:
- Set resolution of your future project.
- If you’re working with a 60 FPS recording, set FPS to directly 60 FPS.
- Set Full-resolution rendering quality to Best.
- Set Resample mode to Disable resample.
Switch to the Audio tab.
- Set Resample and stretch quality to Best.
- If you intend to work with audio files with higher Sample rate and Bit depth than default Vegas settings, increase them as well. It’s not a big deal if you’ve got no idea what this does, just leave the default settings then.
Cutting

I don’t know proper name for this interface element, so I’m gonna call it “Seeker Cursor“:
- Move seeker cursor to the moment in the video that you wish to cut from.
- Press “S” on the keyboard or click Edit -> Split. This will split the media element in two parts.
- Press”Del” or click Edit -> Delete to remove unneeded part.
Transitions
This refers to “transition” between two pieces of video or image media on a Track Bar.
![]()
- Drag two media pieces on top of each other so they overlap. This will create a basic transition when one video track gradually blends into another video track.
- You can right click the area where two videos overlap and click Transition properties to add a more flashy transition effect. This will open a list of transition plug-ins. Double click on a plug-in to choose it. Feel free to experiment with different plug-ins and settings.
Fade In / Fade Out effects
This refers to making a video gradually appear from darkness, or gradually disappear into darkness.

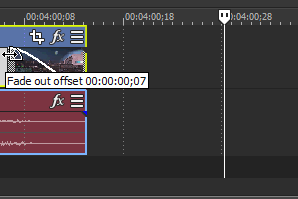
- Find the start or the end of a video track.
- Put your mouse over the small blue triangle in the corner. It will noticeably change cursor.
- Click and drag to create a Fade In or Fade Out effect. This is mutually exclusive with transitions.
- Same as with a transition, you can right click the Fade In or Fade Out area and click Transition Properties to add some special effects.
Adding Audio
Adding an additional audio track is as simple as adding any other media. Simply drag and drop the piece of audio media to the Track Bar.
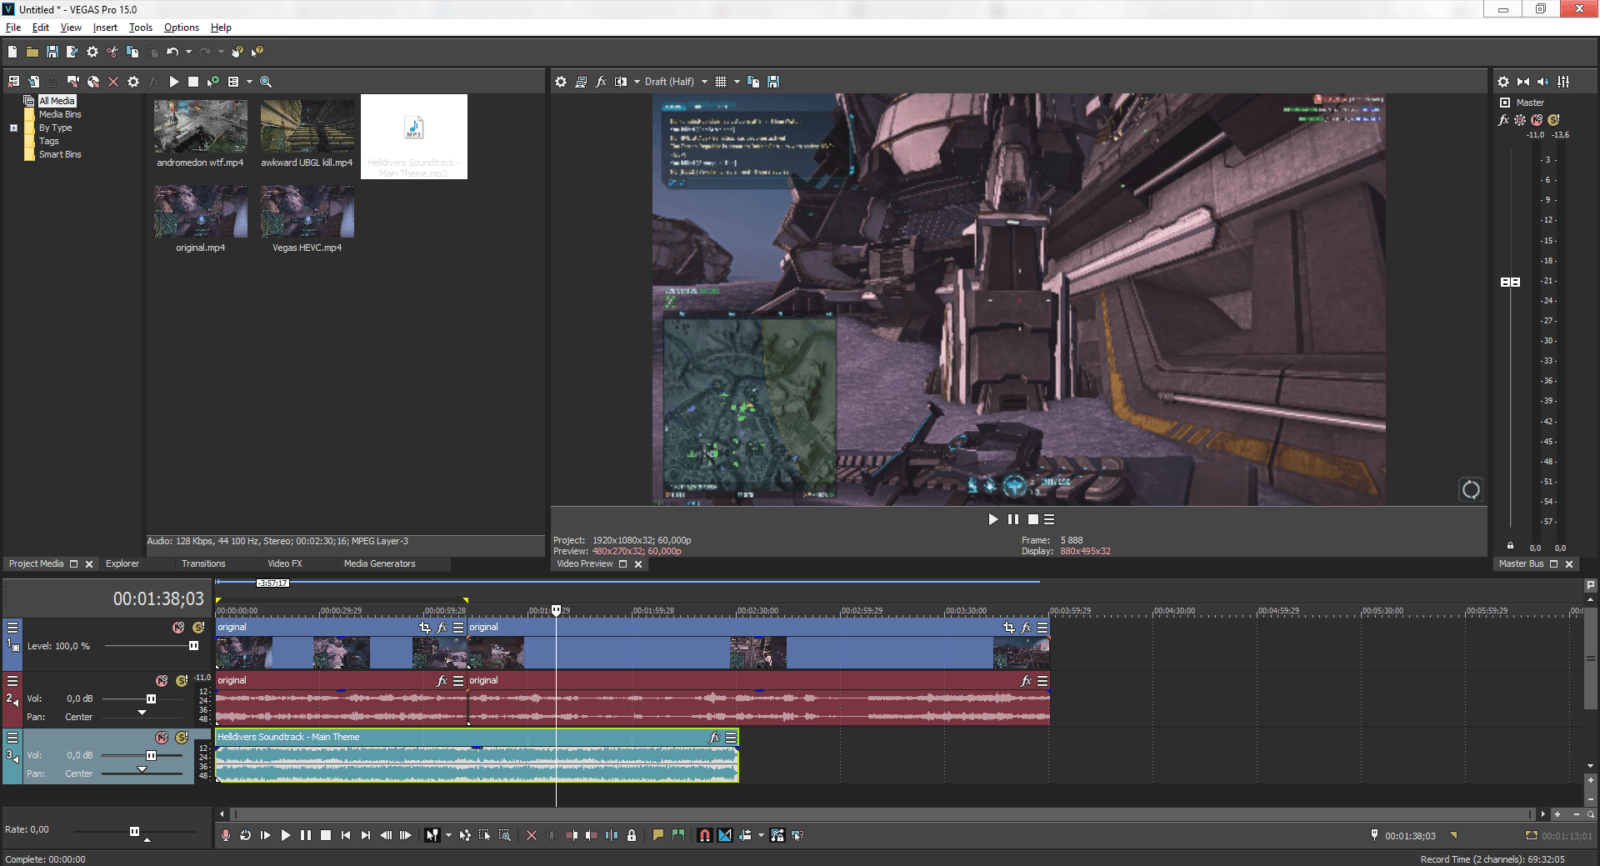
Zoom, pan and crop
In this example, I will show you how to zoom, pan and crop a media piece.
First, click Event Pan / Crop button at the top right corner of a media piece. Then, I show how to:
- zoom in or out of the whole media piece.
- pan the “camera” around the media piece.
- when you see the whole interface going crazy and jumping, it’s me pressing Ctrl + Z to undo the last action.
- zoom into a particular corner of a media piece, such as chat and minimap.
After that I show how to overlay an enlarged minimap over the video:
- First, I add a video track and copy paste the media piece to it.
- This will also copy the video’s audio track, which is not needed, so I delete the video track (from the second try, first I accidentally delete the media piece instead).
- Then I crop the overlaying video to make only the minimap visible.
- The next step is to pan and zoom out of the whole overlaying video track. To do that, we have to enter the Track Motion editing mode.
The same principle can be applied to overlaying a logo or image.
Adding Text
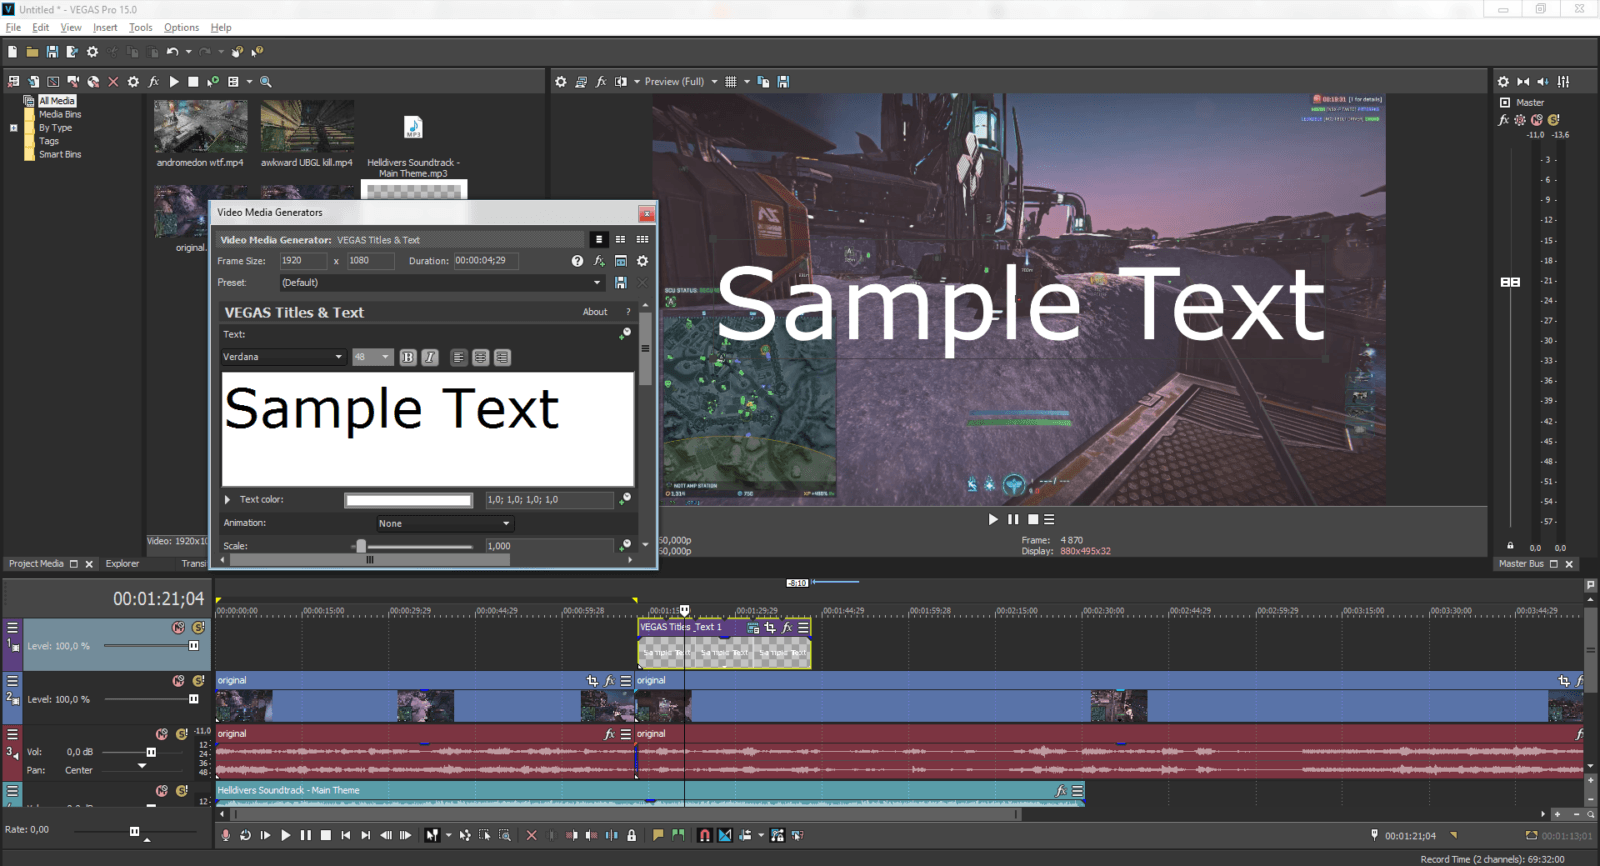
- If you don’t have an empty Video Track, click Insert -> Video Track.
- Click Insert -> Text, or right click on empty Video Track space and choose Insert Text Media.
- This will open the text editor.
- Avoid typical mistakes, such as making the text too large or linger for too long on the screen, or not long enough.
- Adding a colored or black outline to the text will make it more readable.
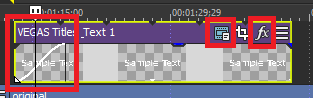
- In the future, you can return to the text editor by clicking the blue-ish film button at the top right corner.
- Text media is treated as any other piece of media, and can have a transition or fade in / fade out effect.
Filters
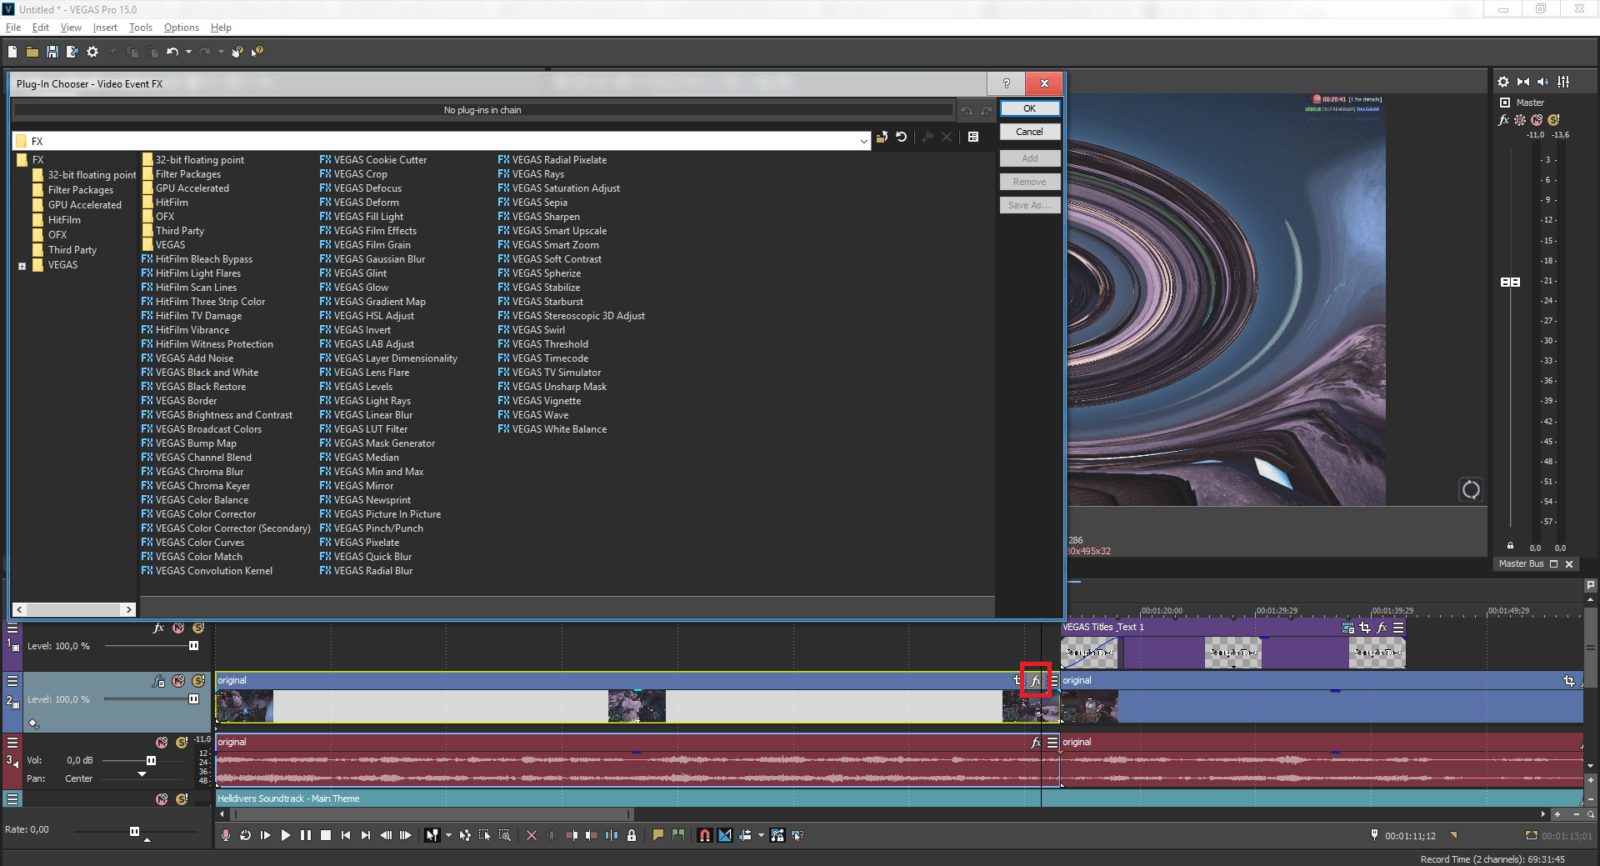
To add special effects to an individual piece of media, simply click the fx button at the top right corner of it. Double click on an effect to add it. You can add multiple effects.
You can also add effects to a whole video track. To do so, simply click a similar fx button on the video track. If you don’t see this button, you will have to add it:
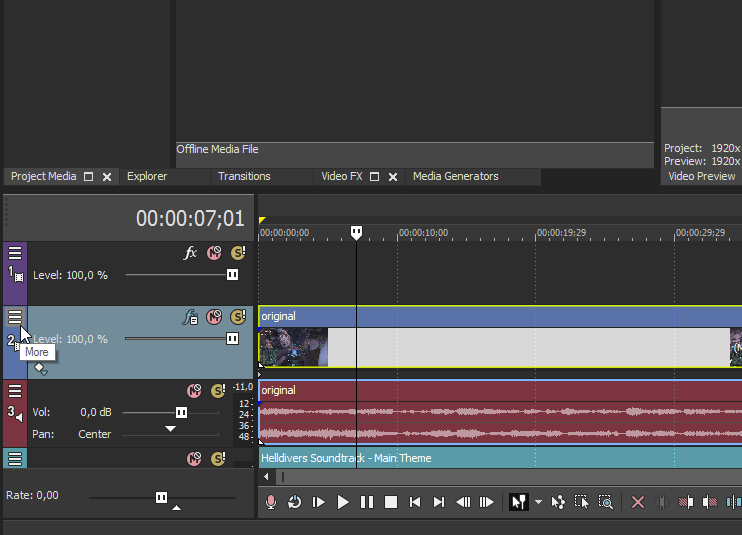
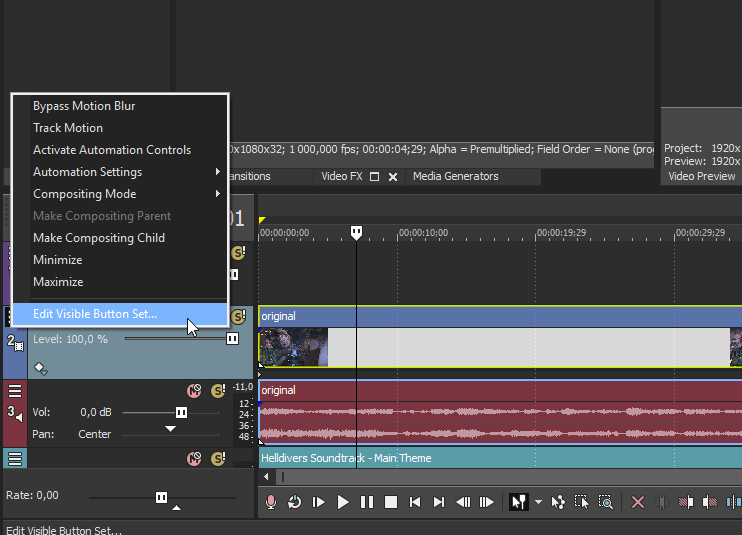
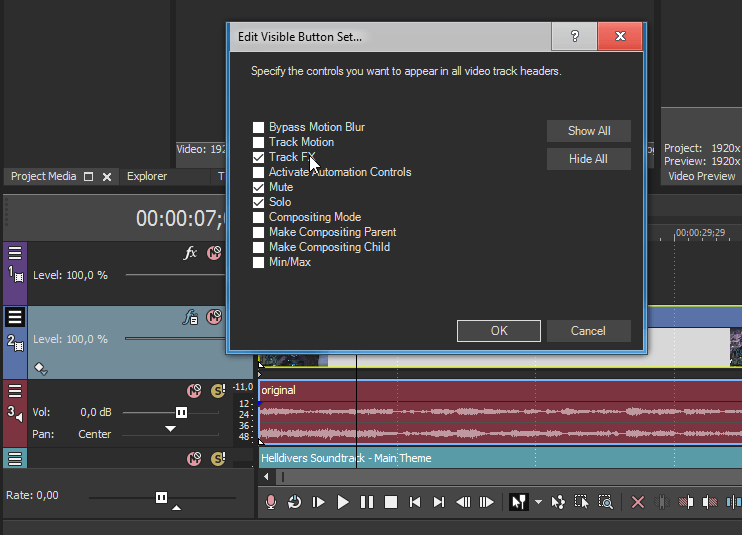
- Click the button with three horizontal bars at the top left corner of a video track.
- Click Edit Visible Button Set.
- Enable Track FX and click OK.
Notable filters
Timecode – adds a black bar with time. Mostly useful when trying to measure certain things. For example, I used Timecode to figure out precise time between two pump action shotgun shots before I was taught how to use DBG API to find that info. Make sure to select Timecode Format as Time.
Sharpen – same as Avidemux’s sharpen, although you get much fewer settings to fiddle with.
Brightness and Contrast – among other things, useful in making a night footage more visible. Keep in mind that youtube’s transcoding will affect video’s brightness and contrast as well, so first upload a few samples with different Brightness and Contrast settings to make sure you’re getting best quality.
Slow-mo or fast forward
In this video I show how to add a slow-mo or fast-forward effect.
- First, cut out the piece of media that you wish to slow down or accelerate.
- Then, hold Ctrl and click and drag the edge of the media piece. Simple as that.
- If you’re adding a slow-mo effect, make sure to right click media’s audio track, click “Properties”, select “Method” as “Classic” and check “Lock to stretch”. This will make your slowed audio sound much better.
Rendering
When you’re all done, it’s time to render (transcode) the video. This process is generally very simple to transcoding with Avidemux. Your concerns will be filesize, rendering time and resulting video quality.
Click File -> Render As.
To the left, you will see a list of formats, and to the right a list of templates for rendering in these formats.
You’re mostly interested in rendering in AVC (h264) or HEVC (h265). The latter results in smaller filesize at the cost of increased rendering time.
Depending on your version of Vegas, you may not have access to HEVC, and AVC could be called differently:
- MAGIX AVC/AAC MP4
- MainConcept AVC
- Sony AVC
- etc
It really doesn’t matter, the core principle is the same – transcoding using h264 codec.
Select format on the left, and any template on the right. Click “Customize Template” and, well, customize the template.
If you’re interested in retaining as much quality as possible, simply set “Average Bitrate” to the constant bitrate of your recorded footage. E.g. if you’re recording with Shadowplay at 50 mbps, then enter 50 000 000 into average bitrate here.
This already ensures you’re gonna get best possible quality, tuning other settings won’t affect much.
Unfortunately, Vegas doesn’t let you render with Constant Rate Factor instead of Average Bitrate. If you really want to get as small file as possible while keeping the best quality possible, you should simply render in Vegas with these settings, and then transcode the resulting video with Avidemux using Constant Rate Factor.
Closing
Hopefully, at the very least, this guide has shown you what it takes to make a video. Feel free to ask questions or correct me on any wrongful statements.
One thing I notice on your video, which happened with my ASUS is the screen lag in your video capture. Not only in screen capture, but just the regular video preview screen lags even when your not recording. Is that something you have ever had to deal with? I also was pissed at RealTek sound ,which is the default sound program on my ASUS laptop. Extremely low quality! And extremely flawed. Every time the computer updates or restarts I get this high pitched feedback that I’m pretty sure has destroyed my speakers by now. It keeps squealing until you have to manually go in and turn down the microphone. Idk man, my ASUS was a piece of shit.
Not sure what video lag you’re talking about, can you be more specific?
As for “squealing until you turn down the microphone”, looks like you have a feedback loop problem. In some system configurations, speakers will play whatever comes into the microphone, and if the microphone hears the produced sound, it will try to play that again, essentially creating an endless loop. You just need to remove the link between the microphone and speakers, which is done differently depending on your operating system.