What are implants?
Implants are a part of infantry loadout, much like a suit slot or a weapon. They provide passive bonuses and abilities to improve player’s utility and convenience.
You can equip two different implants at the same time. Equipped implants are displayed at the bottom of the screen.
Some of the implants do not work for MAXes or when piloting vehicles. Some implants can only be equipped by certain classes. Check implants’ in-game descriptions for specifics.
Implant Rarity
There are Common > Uncommon > Class-specific > Rare > Exceptional implants. Implant’s rarity determines how difficult it is to obtain, and how specific its effects are.
Note that Class-specific specifically relates to implant’s rarity. An implant doesn’t have to be in the Class-specific group to be usable only by one specific class.
ISO-4

ISO-4 is a special currency, related to implants. It is spent on upgrading owned implants, crafting one specific implant or recycled into a random implant. There are two ways to obtain ISO-4:
- Participating in a Meltdown Alert grants up to 300 ISO-4.
- Breaking down duplicate implants on the Nano-Cycler screen.
- Breaking down any Rank 1 implant provides 25 ISO-4.
- Breaking down an Exceptional implant provides 500 ISO-4.
In general, ISO-4 is hard to obtain and easy to waste, so it’s important to spend it very carefully.
You can have up to 100 000 ISO-4 at the same time.
Implant Upgrade Ranks
Non-exceptional implants start at Rank 1, and can be upgraded up to Rank 5 with ISO-4. Implants of higher ranks provide stronger bonuses, and the final rank often has an additional effect. Players can upgrade implants on the Nano Cycler tab of the main menu.
Exceptional implants have only one rank and cannot be upgraded.
Upgrade Cost
| Upgrade cost | ISO-4 |
| Rank 1 -> Rank 2 | 75 |
| Rank 2 -> Rank 3 | 225 |
| Rank 3 -> Rank 4 | 900 |
| Rank 4 -> Rank 5 | 2475 |
| Total: | 3675 |
Fully upgrading even one implant is expensive. You are not expected to unlock and fully upgrade every implant, or use only implants of maximum rank. You will have to be very picky about what you want to upgrade.
How to get implants?
Safeguard 1 and Target Focus 1 are granted for free. There are several ways to obtain more implants.
Event Rewards
Participating in Continental Events will grant you one or several random implants. It is currently unclear if you can receive an Exceptional Implant this way.
You can also receive several random implants as a loot reward for winning a Meltdown Alert.
Crafting
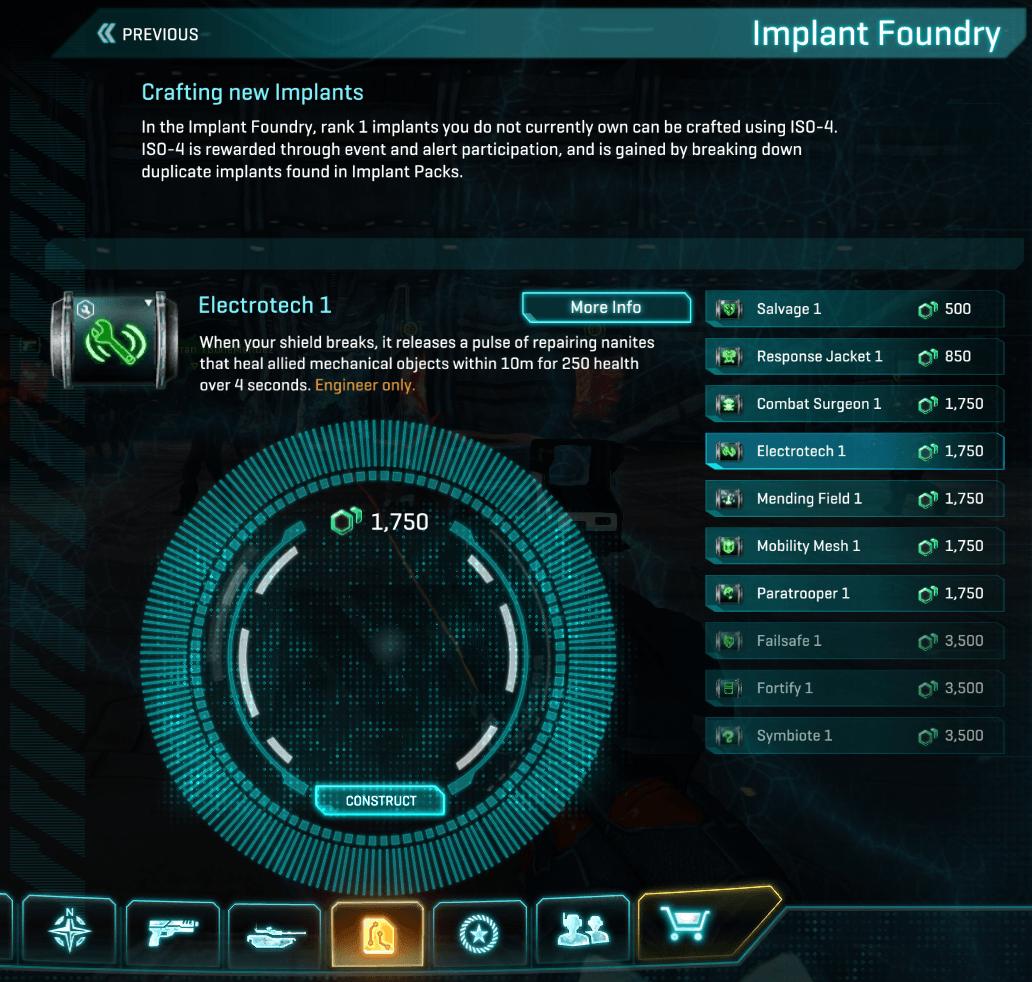
| Implant Craft Cost | |
| Common | 500 ISO-4 |
| Uncommon | 850 ISO-4 |
| Class-specific | 1750 ISO-4 |
| Rare | 3500 ISO-4 |
Players can spend ISO-4 to craft a specific non- Exceptional implant that they don’t own yet. Craft cost depends on implant rarity.
Implant Packs
Implant Packs are “chests” that contain several random implants. Each implant drop from a pack is completely random, you can get several identical implants from one pack, and you can get duplicates of the implants that you already own.
The only exceptions are Target Focus and Safeguard – those do not drop from Implant Packs, because every player already has them by default.
You don’t have to manually open Implant Packs – once obtained, they will open automatically.
There are several ways you can get Implant Packs:
Directives
 Completing the first tier of Class Directives for the Infiltrator, Light Assault, Combat Medic, Engineer or Heavy Assault grants a Novice Implant Pack, which contains two random non-exceptional implants.
Additionally, completing the first tier of Objectives and second tier of Leadership directives grants a Basic Implant Pack, which contains 3 random implants.
Getting a few of these implant packs from directives is a good way for new characters to get started with the implant system.
In-game Store
A common way to get new implants is to buy Implant Packs from in-game store.
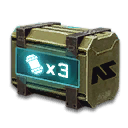
Basic Implant Pack
300 ![]() or 199
or 199 ![]()
Contains 3 random implants.
Deluxe Implant Pack
![]()
750 ![]() or 500
or 500 ![]()
Contains 9 random implants.
Purchasing Deluxe Implant Packs is ~20% more cert-efficient.
Recycling ISO-4
ISO-4 Recycler
![]() 500
500 ![]() or 249
or 249 ![]()
Purchasing one ISO-4 Recycler grants one random implant. Common Implants do not drop from Recyclers, and there is a higher chance to get an uncommon or exceptional implant than from normal packs.
The Recycler can be useful for players who don’t want to spend ISO-4 on upgrading any of the owned implants, and wish to trade it for a chance at getting an implant they don’t have yet. To be clear, you can still get a duplicate with the Recycler.
Recycler also provides a way to purchase one random implant with DBC.
Chances of getting an implant from one ISO-4 Recycler:
- Uncommon: ~62%
- Class-specific: ~17%
- Rare: ~10%
- Exceptional : ~11%
ISO-4 Value:
- 25 ISO-4 if the implant is Rank 1 duplicate.
- 79 ISO-4 on average, including duplicates of exceptional implants.
Implant Pack Drop Rates
Here are Implant Drop Rates according to testing on PTS by RegulusMagnus:

Each implant in a Deluxe Implant Pack has a chance to be:
- Exceptional : ~0.68% (hello, Lineage 2)
- Rare: ~1.54%
- Class-specific: ~3.0%
- Uncommon: ~26.6%
- Common: ~68.2%
Chances that a Deluxe Implant Pack contains at least one implant:
- Common: ~100%
- Uncommon: ~93.8%
- Class-specific: ~23.7%
- Rare: ~13%
- Exceptional : ~5.9%
ISO-4 Value:
- 225 ISO-4 if all 9 implants are Rank 1 duplicates.
- 254 ISO-4 on average, including duplicates of exceptional implants.
Spending Daybreak Cash
Based on this reddit post by /u/DrSwov.
In terms of Daybreak Cash, one Deluxe Pack costs the same as two Recyclers.
| Chances of getting at least one implant from: | ||
| Deluxe Pack | 2x Recyclers | |
| Common | ~100% | 0% |
| Uncommon | ~93.8% | ~85.2% |
| Class-specific | ~23.7% | ~31.2% |
| Rare | ~13.0% | ~19.0% |
| Exceptional | ~5.9% | ~21.5% |
() If your goal is to buy ISO-4 with Daybreak Cash:
- In worst case scenario, when you get only Rank 1 duplicates, Deluxe Packs offer 450% better value than Recyclers.
- If we take duplicates of exceptional implants into account, Deluxe Packs still offer 60% higher ISO-4 value.
() If you’re hunting for a certain class-specific, rare or exceptional implant, then Recyclers give you better chances.
Premium Membership provides a 10% discount to all DBC purchases, including Recyclers and Implant Packs. It’s worth to get membership if you intend to spend more than 10 000 DBC. Keep in mind that membership itself provides a ton of other useful perks. Don’t forget that you can buy 10 000 DBC for $85.
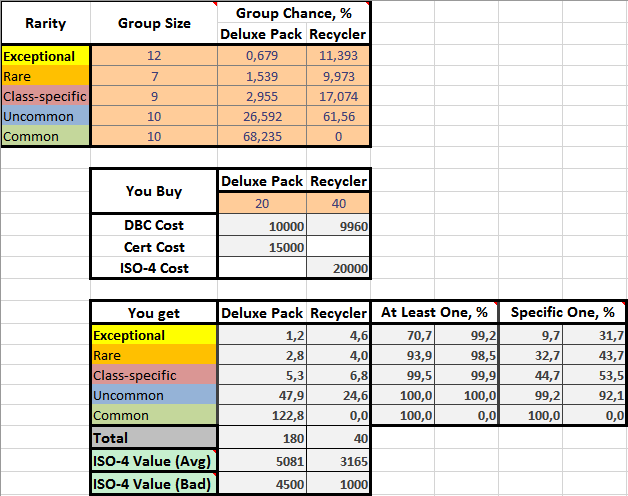
Here are your chances of getting a specific implant with 10 000 DBC (assuming no membership discount).
| Method | Exceptional | RARE | Class specific | Uncommon | ISO-4 Value |
|---|---|---|---|---|---|
| 20 x Deluxe Packs | 9.7% | 32.7% | 44.7% | 99.2% | 5 081 |
| 40 x Recyclers | 31.7% | 43.7% | 53.5% | 92.1% | 3165 |
Purchasing Recyclers over Deluxe Packs provides a significantly higher chance of getting the implant you want, especially an exceptional one. However, you get much less ISO-4 per DBC spent.
Toolbox
My Toolbox will calculate all of the implant-related statistics mentioned so far.
Implants in VR Training
You can equip and test all implants in VR Training. Implants in VR will have the highest rank possible. However, VR enemy dummies do not count as players, and most “on kill” mechanics will not trigger off them. E.g. Nightmare implant will not cloak you.
Implant List
Common Implants
These implants are easy to get and provide versatile bonuses that will remain useful across many different playstyles.
Target Focus
![]()
This implant is available to all characters from the start. Can be used by MAXes and works in vehicles.
1) Increases hip fire crosshair Friend-Foe-Identification range from 10m to 60m.
This is great for new players, as it helps them to identify enemies and distinguish them from allies. It can also help find enemies in darkness or smoke.
2) Displays health bars of spotted enemies and vehicles within 500m.
Displayed bar refers to specifically player’s health. It does not take infantry shields or HA overshields into account.
This effect is especially useful when fighting vehicles, so you can prioritize weakened targets and monitor your damage output, and judge if it is worth to continue engaging.
First two components are from the old Enhanced Targeting implant, and you can watch Wrel’s video review of that part here.
3) Increases hold breath duration by 150% / 160% / 175% / 200% / 300%.
“Holding breath” refers to the mechanic of suppressing scope sway by pressing [Sprint] key for HS/NV scope and high-magnification sniper rifle scopes. Learn more about Hold Breath Mechanics.
This is the only component of the implant that improves with upgrades, but the bonus to Hold Breath duration is huge even at Rank 1. It’s totally possible for high-level snipers to play without this implant, but it can be very helpful to casual snipers and beginners.
Higher ranks of the implant can be great when it is possible to chain several shots together while using Semi Auto sniper rifle, or a Bolt Action rifle with Straight Pull Bolt attachment.
Safeguard
![]()
This implant is available to all characters from the start. Can be used by MAXes.
Provides 20% damage resistance after accepting a revive for 1.5 / 1.75 / 2.5 / 3.5 seconds.
It’s possible that damage resistance is also provided after (re)spawning.
This is great for new players that tend to die in bad spots, and accept revives without regard for consequences. It also can be useful in organized squadplay in point hold scenarios.
Tip: before accepting a revive, you can use Toggle HUD key (default “Ctrl + F10”) to see your corpse from above and judge if it is safe to accept the revive.
Rank 5 bonus: being revived instantly restores 200 shields for infantry and 500 health for MAX units.
Ammo Printer
![]()
Can be used by MAXes and works in vehicles.
Generates ammunition for all weapons, tools and vehicle weapons once every 120 / 110 / 90 / 75 / 60 seconds.
The amount of generated ammunition is equal to the amount you get from one tick of Engineer’s ammo pack or vehicle ammo tower. For most infantry weapons, this is equal to 1 magazine. Most vehicle weapons get more, equal to several magazines.
Ammo Printer generates ammo while cloaked.
When near or inside a vehicle that you own, Ammo Printer will generate ammunition for all vehicle’s weapons. However, printer will not generate ammunition for infantry equipment inside a vehicle, unless the player is in a rumble seat. In that case, printer will work for both the vehicle, and the player.
Countdown timer resets, when you:
- spawn a vehicle (but not when you enter a vehicle)
- exit a vehicle
- respawn
- resupply or change loadouts at an infantry terminal
- accept a revive
Ammo Printer is great for lone wolf players and vehicle pilots. Tanks specifically tend to quickly run out of ammunition, and can take a while to get to an Ammo Tower.
Especially useful to Infiltrators, Light and Heavy Assaults to resupply ammunition for their tools.
Regeneration
Can’t be used by MAXes, works inside vehicles.
Restores 20 / 23 / 28 / 35 health per second. Regeneration starts 10 seconds after taking health damage. Rank 5 also instantly restores 50 health when you kill an enemy with a headshot.
- Taking shield damage or dealing damage does not interrupt regeneration process.
- Regeneration restores player’s health inside a vehicle, but it will do nothing for the vehicle itself (duh).
- Cloaked infiltrators cannot regenerate health.
- Regenerating full health takes 25 / 22 / 18 / 14 seconds.
A very popular convenience and longevity implant. It allows to forget about monitoring your health, and gives a way to restore health without relying on Med Kits or medics.
Especially great for lone wolf players, especially Light Assaults and Infiltrators that spend a lot of time away from their allies.
If you’re in a friendly territory that is lattice-connected to a captured Biolab, its health regeneration bonus will override Regeneration Implant of Rank 1 or 2, essentially making it useless.
Safe Fall
![]()
Can be used by MAXes.
Increases the distance you can fall without taking damage to 20 / 30 / 40 / 50 / 75 meters. Increases lethal fall distance to 60 / 90 / 120 / 150 / 230 meters. Rank 5 also reduces collision damage from vehicles by 50%.
There are other ways to avoid fall damage, like jumping down on sloped surfaces, or using a Jump Pad or a Gravity Lift.
Safe Fall is normally equipped to boost player’s mobility, so he can jump down from heights without fear of injury. In that regard, even the first rank is usually powerful enough to completely forget about fall damage.
Safe Fall can be useful to novice Light Assaults who haven’t learned to properly manage Jet Pack energy yet. It can also make a Light Assault more stealthy, as he can jump down from a height without engaging his Jet Packs, which could give away his position.
At the moment, Safe Fall is nearly mandatory to use Light Assault’s Ambusher Jets effectively.
Safe Fall can also be used by ESF pilots as a substitute for Ejection Seat.
It’s hard to quantify how useful Rank 5 is. It’s supposed to make you harder to run over for vehicles, but without some in-game testing it’s hard to tell how effective it is in that role. However, even if that would 100% protect you from any run-over attempts, it would hardly justify spending ISO-4 on it, since statistically it happens so rarely that it doesn’t even matter.
Sweeper HUD
Can be used by MAXes, works in vehicles.
1) Automatically spots mines and C4 within 16 / 18 / 21 / 25 / 35 meters.
This is great for flanking or breaching playstyles, as in both cases you will be more likely to encounter mines. Can help MAXes and vehicles avoid Tank Mines.
The implant is not a sure-fire way to never blow up on a mine, since the icon of a spotted explosive is small and easy to miss in the heat of combat.
At lower ranks, has limited usefulness to vehicles, as often your momentum will be too strong to stop or change direction in time, unless you consciously move slowly. Ranks 4-5 provide more than enough time, though.
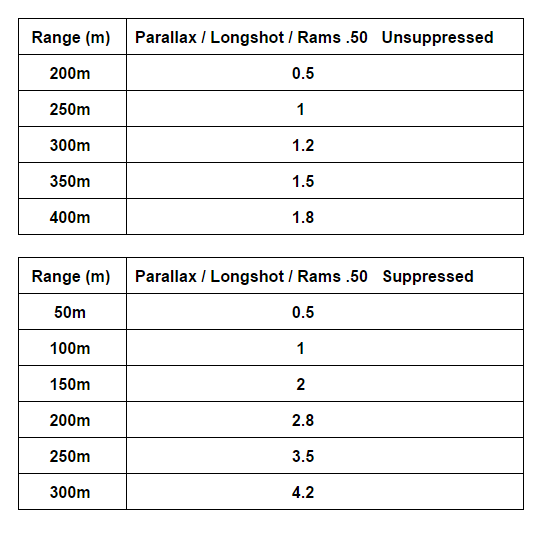
2) Displays distance to objects under your crosshair within 500m.
This effect seems to be broken in ESFs.
Can be used to judge how high you need to aim with a long range Sniper Rifle or a tank cannon, if you create your own ballistic table. First column is distance, second column is the number of mildots you have to raise your aim by.
It is also nearly a necessity for Ballistic Crosshairs for dumbfire launchers.
Can also be used to judge if target is within your weapon’s lethal distance. For example, close range bolt action sniper rifle one-hit-kills on a headshot within 200m.
Vampire
![]()
Can’t be used by MAXes.
Restores 175 / 200 / 250 / 325 health on a wielded melee kill. Rank 5 also restores 325 health on a sidearm kill.
- Your character model will have visible green effects when you receive healing.
- You have to actually kill the enemy with one of the specified items, just holding a knife your hands while enemy blows up on your mine will not trigger the healing.
- Vampire 5 will heal on a quick knife kill if you’re holding a sidearm (source).
- Doesn’t proc off teamkills.
- ASP interactions (source):
- Vampire 5 procs for sidearms equipped in primary weapon slot.
- Vampire 5 does not proc for primary weapons in secondary weapon slot.
This implant has an interesting synergy with Carapace implant, but without it, Vampire has questionable usefulness even for Stalker Infiltrators, kings of sidearm and melee kills. Most of the time, Regeneration implant will be better, as it doesn’t rely on kills to restore health, and doesn’t require you to go into combat without full health.
Crazy melee streaks with a wielded knife often end when you start taking damage anyway. You are simply unlikely to benefit from this implant.
Vampire only makes sense at maximum rank and in combination with other equipment (see: Gunslinger Loadout).
Athlete

Passively increases sprint acceleration, deceleration, and recovery speed by 10% / 12% / 15% / 20%, and your hold-breath time recharges 50% / 65% / 80% / 100% faster.
Rank 5 Bonus: Additionally, you gain 10% increased sprint speed whenever you’ve been moving for longer than 6 seconds. This bonus is removed if you stop moving or fire a weapon.
- Sprint Speed bonus doesn’t stack with Adrenaline Pump.
- It is currently unclear whether you specifically have to sprint for 6 seconds to gain bonus speed, or any kind of movement would count. To test.
- MAX units cannot equip.
Several in-game tests have been performed in VR to gauge implant’s usefulness:
Test 1: Short Sprint – 95m run
- Baseline: 14.7 seconds from start to finish
- Only Pump: ~13.3 seconds
- Only Athlete: 13.9 seconds
- Athlete + Pump: 13.3 seconds
Baseline sprint speed is 6.32 m/sec, without taking acceleration time into account, so while sprinting it takes Athlete 6 * 6.32 = ~38m for bonus sprint speed to kick in.
Test 2: Long March – 795m run
- Pump only: 1:51.8
- Athlete only: 1:52.4
- Pump and Athlete 1:51.1
Test 3 – Sprint Recovery Reduction
While sprinting, I measured time from the moment mouse click is registered and until ammo cost is applied due to a shot being fired.
Without Athlete, Jaguar fired in 0.317 seconds after the mouse click, while with Athlete it fired after 0.25 seconds.
Please note that 0.017 seconds is time between frames (I’m recording at 60 FPS), so this is the margin for error for my testing method. Overall, as description states, with Athlete you can fire out of sprint up to 20% earlier.
Test 4 – Sprint Acceleration
Judging from quick subjective observations, this effect is mostly placebo, and sprint acceleration itself lasts AT MOST less than a second, and the implant’s reduction – as stated – is only 20%.
It is my overall opinion that Athlete, like ASC, looks amazing on paper, but doesn’t actually do much in actual game situations, especially compared to competition, be it Pump or other implants.
Of course, you can combine Pump with Athlete, and get your “Nanoweave” from Symbiote, but arguably the price is too great.
Gunslinger
Kills while wielding a sidearm increase reload speed by 15% / 17% / 20% / 25% / for 2 / 2.25 / 2.75 / 3.5 seconds. Rank 5: your weapon swap times are reduced by 50% for the same duration.
The reload speed bonus lasts long enough for you to reload your sidearm after the kill, swap back to primary weapon, and start reloading it as well.
Most weapons take 2-4 seconds to reload, and less than a second to swap to, so on average this implant ill be saving you about a second worth of time each “activation”.
In general, this seems like a highly specific and situational implant. To benefit from it, not only you have to specifically kill an enemy with a sidearm, but actually engage the next enemy during a very specific timeframe.
Overall, it’s hard to recommend, even to stalkers who rely on sidearm kills. It’s just not worth the implant slot, since most sidearms take less than 2 seconds to reload anyway.
To test: does it make you throw grenades or quick knife faster?
Jockey
While riding in an exposed vehicle seat or using a MANA turret, you receive an additional 30% / 33% / 40% / 50% maximum shield health. Rank 5: additionally, squadmates in vehicles within 50 meters of you also receive this benefit at 20% shield strength.
- Useful for Wraith Flash, as engaging from rumble seats of other vehicles is usually not effective.
- Could have some potential usefulness for Harasser gunners switching to rumble seat for repairs.
Salvage
MAX only. Killing enemy MAX units will restore 500 / 550 / 650 / 800 health. Rank 5: killing a MAX within 5 meters of you will restore an additional 200 health.
Useful, but unreliable implant, since you have to specifically kill the enemy MAX yourself in order to trigger the bonus.
Survivalist
Your shield recharge delay is passively reduced by 0.5 / 0.6 / 0.75 / 1 seconds. In addition, whenever you are reduced below 40% health, your sprint speed is increased by 20% for 3 / 3.5 / 4.5 / 6 seconds. Rank 5: also increases Reload Speed by 15% for the same duration.
- It’s safe to assume sprint speed bonus doesn’t stack with Adrenaline Pump.
- “40% health” specifically refers to Health, the green bar, and does not take shields into account.
- There is a 12 second cooldown on this implant’s effects.
This implant provides a small, but universal boost, especially when used in combination with other mechanics that affect shields, such as:
- Playing Engineer
- Using Advanced Shield Capacitor
- Using Bionics implant
Uncommon Implants
These implants are harder to get, and they offer situational bonuses that are meant to strengthen specific playstyles.
Battle Hardened
![]()
Can be used by MAXes.
Reduces screen shake from nearby explosions and flinch from being hit by bullets by 30% / 33% / 40% / 50%. Rank 5 completely removes flinch and screen shake for 10 seconds after a kill.
Flinch from bullet hits scales with damage they deal. More damaging bullets and headshots cause more flinch.
This implant is useful whenever you get under fire while shooting someone, or something explodes nearby, which happens a lot while playing infantry. It makes it easier to hold the crosshair on the target and offers a competitive edge.
Battle Hardened is popular to the point that it’s considered mandatory by many players, claiming the game is unplayable without it. Especially popular among Heavy Assault mains and other competitive and frontline infantry players, such as CQC BASR players.
The maximum rank is especially powerful and makes an amazing combo with Assimilate implant and HA’s Adrenaline Shield.
Assimilate
![]()
Restores 120 / 140 / 165 / 200 shields on a headshot kill. Rank 5: also restores 10% of your maximum ability energy.
Your personal shields will briefly flash when you receive shield restoration.
This implant isn’t very useful without several upgrades, and it’s reserved for the elite infantry players that can consistently get headshot kills.
This implant is not as powerful as it seems. It does nothing for you at maximum shields. While the amount of restored shields is not huge, it can potentially get amplified by Nanoweave and HA’s Resist Shield, and makes a great combo with Adrenaline Shield.
Also, while getting headshots is obviously crucial for competitive infantry playstyle, trying to finish off every enemy with a headshot can be a bad habit. PlanetSide 2 weapons get more inaccurate the longer you shoot, so it’s a common technique to start with headshots, doing quick and strong burst of damage, and then drag the aim to center mass, finishing the enemy with body shots.
Trying to shoot at the head all the time may lead to actually dealing less damage. You will have to make a judgement call each time.
Catlike
![]()
Can’t be used by MAXes.
1) Reduces movement speed penalty for crouching by 40% / 45% / 55 %/ 75%.
Normally, crouching reduces movement speed by 50%. Catlike makes you move at 70% / 72.5% / 75% / 87.5% normal walking speed while crouching.
Increased crouching speed allows you to be more mobile during firefights, while having increased accuracy and presenting a smaller target. Especially great when paired with a 75% ADS weapon.
2) Rank 5 also increases jump height by 1m.
This provides a significant increase to player’s mobility and parkour capabilities, even at low FPS. Examples: one, two, three, four.
This implant is especially great for Infiltrators, as crouchwalking while cloaked makes them less noticeable.
It also allows any class to move faster while crouching to avoid being detected by Motion Detection tools.
Increased jumping height has its downsides, as it messes with a lot of accumulated muscle memory and movement habits, so it can be tough to transition to and from Catlike 5.
For example, when jumping into a low window, you have to take a running jump into the window from some distance, as opposed to moving the window and crouch jumping into it.
You can also jump up right in front of it and press forward and crouch while you fall down.
– Atemu
Ocular Shield
![]()
MAX units can equip.
Reduces strength and duration of Flash, EMP and Concussion grenades’ effects on you by 15% / 18% / 23% / 30%.
Rank 5 also provides complete immunity to these effects for 5 seconds after using a Med Kit or Restoration Kit (but does not clear effects that were already applied to you).
Sensor Shield
![]()
MAX units can’t equip.
Hides the player from motion detection tools further than 30m / 26m / 20m / 10m.
Rank 5: while walking (not sprinting) you cannot be detected at any distance.
Very useful implant for flanking and stealthy playstyles, especially for Light Assaults and Infiltrators.
Critical Chain
Headshot kills grant 20% / 25% / 35% / 50% / faster weapon rechamber speed for 3 seconds. Rank 5: all kills beyond 70 meters also trigger this benefit.
- This implant does not work with shotguns.
- The benefit stacks up to 8 seconds.
- This implant can be equipped by all classes, but only Infiltrator’s Bolt Action Rifles can benefit from it, not counting Archer Engineers.
- This implant effectively turns any sniper rifle into NSX Daimyo.
- It’s possible this implant is currently bugged and doesn’t work with Straight Pull Bolt attachment.
This implant seems to be mostly useful on “long range” bolt action rifles with long rechamber times, when used from a flanking position against unaware group of enemies.
“Close range” bolt action rifles already have very short rechamber time, and often you HAVE to take cover between shots anyway, as excellently demonstrated by the legendary Elusive here.
Heavyweight
MAX units can equip. Reduces the amount of flinch you receive when being struck by a projectile by 50% / 55% / 65% / 80%, but your maximum movement speed is passively reduced by 10% at all times. Rank 5: whenever you take fall damage, you will emit an impulse that knocks back enemy infantry.
Heavyweight provides stronger or equal flinch protection than Battle Hardened at any rank, but it does nothing against screen shake from explosions, which is a big reason to use Battle Hardened for many people. And then there’s movement speed penalty.
You would think that this implant makes a strong option for Light Assaults, but so far there have been no documented cases of effectively using the knockback feature, and in general “taking fall damage” is a very unreliable trigger.
Ransack
Works in vehicles. Killing a vehicle within 25 / 30 / 35 / 50 / meters restores one tick of ammunition for you or your vehicle. Rank 5: also heals your vehicle for 10% of its max health.
This implant triggers for the vehicle you own, and specifically when you kill an enemy vehicle. It doesn’t matter whether you are actually in the vehicle, and you don’t even have to be in the pilot’s seat.
This means, for example, if you are piloting a Harasser while using Ransack, it will not trigger when your gunner is making kills. It will not trigger either if your gunner is using Ransack, because he’s not the owner of the vehicle. So for Harassers – and other vehicles where the owner/pilot doesn’t have a weapon to make kills with – Ransack is effectively useless, unless you are in a squad with your gunner, and let your squadmate pilot the vehicle instead of yourself. Credit to /u/jackch3 for relevant testing.
Bonuses for Ranks 1-4 are absolutely uninteresting, since 1 tick of ammunition is a very small amount for most weapons, and Ammo Printer is a much better choice for that purpose. Overall, it’s hard to recommend using Ransack as it is right now.
Response Jacket
Receiving damage from a standard explosive or light anti-vehicle weapon will trigger a shield that reduces damage from both resistance types by 50% for 6 / 8 / 12 / 20 seconds. Rank 5: also provides same bonuses against C4 and Infantry Rockets.
- You can find lists of weapons using these Damage Resist Types here.
In general, this implant is basically a Flak Armor replacement that triggers only after you actually receive damage for the first time, which makes this implant completely useless in certain situations, and almost as useful as Flak Armor itself in other situations.
Naturally, this implant is mostly useful against weapons that rely on multiple hits, such as ESF Rocket Pods and PPA / Enforcer / Marauder. In fact, this implant is even more useful against them than Flak Armor, because Flak Armor only provides a 20% resistance against them.
Sidewinder

Your strafe speed is increased by 20% / 23% / 28% / 35%, but accelerating and decelerating while strafing takes twice as long. Rank 5: in addition, you no longer appear highlighted on IRNV optics.

This is a great implant for slicing corners. With this implant at Rank 4+:
- Normal strafing is just as fast as normal walking forward.
- Strafing while ADSing with a 0.5x ADS Multiplier weapon is only ~10% slower than with a 0.75x weapon without Sidewinder.
- Strafing while ADSing with a 0.75x weapon is as fast as normal strafing without ADSing and without Sidewinder.
Note that it’s not recommended to ADS until you actually see an enemy, or already know where they are.
The reduction to acceleration speed is noticeable in gameplay, but it’s questionable whether it plays a big difference, since infantry acceleration is fairly fast.
To test: post a screenshot with IRNV optics.
Class-specific Implants
These implants are hard to get and they can only be equipped by specific classes, and provide a bonus to strengthen that class’ main playstyle.
Aerial Combatant
Light Assault
![]()
Killing an enemy will restore 12% / 15% / 20% / 30% of Jet Pack energy.
Rank 5 provides additional 30% for destroying a vehicle.
- Killing enemy “units” such as deployables doesn’t trigger this implant anymore.
Paratrooper
Light Assault
Whenever you receive damage, 3% / 4% / 5.5% / 8% of your jump jet fuel is restored. Rank 5: Additionally, reloading your Rocklet Rifle will reduce fall damage for 6 seconds.
Useless.
Combat Surgeon
Combat Medic
![]()
Killing an enemy or reviving an ally restores 15% / 18% / 23% / 30% energy for your Nano Regen Device.
Rank 5 also increases your resistance to small arms damage by 25% for 3.5 seconds after reviving.
- Bullet resistance doesn’t stack with Nanoweave, highest resistance is used.
- Bullet resistance procs when reviving with a Revive Grenade.
- Ally has to specifically accept the revive in order for bullet resistance to proc.
Mending Field
Combat Medic
Allies who are below 100 / 150 / 225 / 300 health passively heal for 15 health per second while you are within 7 meters. Rank 5: your deployed Shield Recharging Fields now also carry this effect.
Seems very weak even at maximum rank. Consider that it takes 20 seconds (!) for this implant to restore 300 health. Ain’t nobody got time for dat.
If you’re doing Combat Medic directives, and you have some spare ISO, you could use this implant to farm a few Healing Ribbons alongside Shield Ribbons, but it seems too weak for actual combat effective applications.
Deep Operative
Infiltrator

Whenever you spend longer than a total of 30 / 26 / 20 / 12 seconds uncloaked without taking damage, your cloak’s visibility will be reduced by 75%. Dying or taking damage from enemy sources will reset the countdown. Rank 5: killing an enemy will reduce the countdown by 3 seconds.
This implant requires to be upgraded to at least Rank 4 before it becomes truly useful, and overall it remains to be seen how useful it is. To test.
Nanomesh Specialist
Heavy Assault
![]()
Reduces passive energy drain from active overshield by 50% / 55% / 65% / 80% while remaining stationary and by 25% / 28% / 33% / 40% while moving. Rank 5: also removes the 3 second delay before a fully depleted overshield begins recharging.
Overshield energy drain is fairly mild by default, which makes this implant not very desirable. One exception is that if you activate the overshield before hopping onto a Flash, the overshield will remain active, increasing player’s survavibility while using a combat Turbo Flash. A highly, highly niche use. To test.
Mobility Mesh
Heavy Assault

Reduces the movement speed penalty while your overshield is active by 15% / 17% / 20% / 25%. Rank 5: Additionally, while your overshield is active, your base sprint speed is increased by 10%.
The wording of this implant makes it unclear whether it fully compensates the 25% movement speed penalty applied by overshields, or whether it removes only a quarter of it. Latter is more likely.
According to my calculations, Rank 5 of this implant allows to sprint with overshields as fast as normal forward walking speed without Overshields and without the implant. To test.
This implant is especially useful to Resist Shield users, since they need to have overshields active while taking damage.
Robotics Technician
Engineer
![]()
Your non-mine deployables within 15m of you receive 10% / 13% / 18% / 25% damage resistance. Engineer using the turret also receives damage reduction.
- This damage reduction multiplicateively stacks with Nanoweave Armor.
- Damage reduction is applied to explosives.
- Full Nanoweave + Robotics Technician 4 or 5 = 60% of damage taken from bullets.
Rank 5 special ability: affected deployables will also automatically repair themselves for 25 health per second.
- Affected deployables and engineer manning a turret will have a bright visible effect over them.
- Doesn’t seem to affect Spawn Beacon.
Electrotech
Engineer
When your shield breaks, it releases a pulse of repairing nanites that heal allied mechanical objects within 10m for 250 / 263 / 275 / 300 health over 4 seconds. Rank 5: also de-spawns enemy deployables within range of the pulse.
- A fully upgraded Repair Tool would take ~1.8 seconds to repair 300 health.
- Affects allied MAXes.
- It is currently unclear whether this implant affects vehicles. To test.
Overall, seems completely useless outside of specifically being a MAXes’ repairbot.
Detonating enemy deployables is not always desirable, and could even lead to killing yourself or your allies standing near enemy Tank Mines.
Rare Implants
These implants are even rarer than uncommon implants and offer unique, but situational bonuses.
Nightmare
![]()
Killing an enemy with a wielded melee attack will special cloak you for 1 sec / 1.2 sec / 1.5 sec / 2 sec. Rank 5 also provides the special cloak when you kill an enemy within 5m of you with any weapon.
Special cloak does:
- Allow you to use your weapons and equipment. You can keep shooting while cloaked.
- Proc off ranged Amaterasu kills, even outside 5m.
- Trigger off quick melee attacks, but only at Rank 5.
Special cloak does not:
- Proc off mine kills, even within 5m.
- Remove “spotted” condition. Even while cloaked, you will have your name and a dorito above your head.
- Hide muzzle flash or jet pack flames.
- Hide Heavy Assault’s overshield effect.
- Nightmare’s cloak isn’t affected by NAC‘s damage resistance.
At early ranks this implant is incredibly powerful for anyone who can take advantage of wielded melee attacks, with the most obvious example being Stalker Infiltrators.
Maximum rank of this implant makes flanking attacks especially fearsome. Going on cloaked killing sprees is not very likely, but Nightmare can give you a second of breathing room to safely escape after an ambush.
When using this implant as an Infiltrator, and manually hitting cloak after a Nightmare proc will just recloak you, so everything works fine in that regard.
While this implant sounds incredibly powerful on paper, it’s worth noting that even maxed out it doesn’t do anything for you until you kill an enemy within 5m, which is hard to do consistently for most classes. Even someone like shotgun Light Assault cannot guarantee to kill most of his targets within 5m.
Overdrive
Getting roadkills while in the pilot’s seat of a Flash or Harasser will restore 25% / 28% / 33% / 40% turbo fuel. At Rank 5 implant’s effects are applied to Liberator and ESF.
No roadkill pls.
Assassin
Killing an enemy from 150/125/100/50m away will remove the “spotted” condition from yourself, as well as concealing you from spot attempts for one more second afterwards. This effect does not trigger while in a vehicle.
Rank 5 bonus: dealing damage to an enemy will automatically spot them.
- Any damage source will count, including mines and “non-lethal” grenades that still deal tiny amount of damage, such as Flash and EMP.
This implant is most useful for Light Assaults using a stealthy flanking playstyle.
It is a common situation where you get spotted by an enemy, and you react to his voice and kill him, but then get hunted down by other enemies. Assassin helps to remedy that specific situation, and in general helps to keep you off the map.
Combination with Sensor Shield 4+ and Suppressed weapon is highly recommended to further keep yourself from the minimap. Assassin 5 bonus helps to track enemies without giving away your position and faction with spotting voice.
Assassin is still probably less useful than Counter-Intelligence, as it gives you more control, unless you really value Assassin 5 bonus.
Assassin is practically useless for Infiltrators, as they already can remove “spotted” condition from themselves simply by cloaking.
Covert Drop
Taking fall damage will cloak you for 1 / 1.25 / 1.75 / 2.5 second. Firing a weapon will reveal you. Rank 5: bailing from an ejection seat aircraft will cloak you for 6 seconds upon hitting the ground.
- It is assumed that Rank 5 benefit will trigger when jumping out of Galaxies and Valkyries. To test.
- It is currently unclear whether there is any decloaking delay before you can fire. To test.
This implant seems fairly useless until Rank 5, and even then, it would be more useful if it would cloak you when jumping out, and not when hitting the ground.
Failsafe
When your shield is broken, you gain 10% / 12% / 15% / 20% of your maximum ability energy. This action can only occur once every 20 seconds. Rank 5: whenever Failsafe is on cooldown, receiving melee damage will shock the attacker for 150 non-lethal damage.
Could be useful for Heavy Assaults using NMG or Adrenaline Shield, especially in combination with Assimilate.
Rank 5 benefit is completely pointless since most popular melee weapons kill in one hit.
Fortify

Interacting with a control point will increase your maximum shield capacity by 100 / 120 / 150 / 200 points for 15 seconds. 15 second cooldown on interaction. Rank 5: for the duration of the buff, you regenerate 13.33 shields per second.
- The default key for interacting is [E].
- It is assumed that you don’t have to own the Control Point in order to interact with it.
- To test: how long does it have to interact.
Obviously, this is a great implant for fighting near Capture Points, and it should prove especially popular for coordinated squads doing point holds, as they often use Galaxy drops to bypass the rest of the fight.
Symbiote

Passively receive 20% small arms resistance. This does not stack with Nanoweave Armor. Any time you are alive for longer than 20 / 22 / 25 / 30 seconds without taking small arms damage, the symbiote will gnaw at your health pool. Rank 5: killing an enemy player resets the timer as well.
- To test: just how much damage Symbiote deals.
- Damage from the Symbiote will not kill you, but you can be reduced to 1 HP.
This implant is basically a conditional Nanoweave replacer, though it’s important to note that Nanoweave above Rank 1 also provides resistance to other damage types, unlike Symbiote.
Exceptional Implants
These implants are extremely rare, and provide powerful, but situational abilities.
Counter-Intelligence
![]()
Can be used by MAXes, and partially works in vehicles.
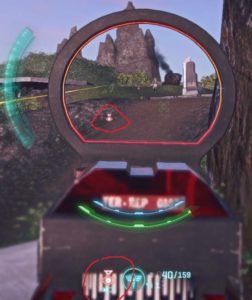
1) Informs when you’ve been spotted. This effect does not work in a vehicle.
|
Not Spotted |
Spotted |
When you’re spotted, a tiny red icon will briefly appear near your crosshair. The implant icon on the bottom of the screen will turn red whenever you’re spotted, and will stay red until “spotted” condition fades.
This is the same effect as the old Counter-Intelligence implant. You can watch Wrel’s reivew here.
2) Automatically spots enemies that damage or kill you, unless they’re using a suppressed weapon. Spots enemies that damage vehicle you’re in.
This is the same effect as the old Awareness implant. You can watch Wrel’s review here.
Overall, Counter-Intelligence is a great implant for non-infiltrator players trying to be stealthy, especially effective on Light Assaults. It will enable you to outplay through movement enemies that engage you, and let you know when it is safe to engage.
It is also great for vehicle play, especially for tanks, where positioning and surprise effect mean a lot.
Minor Cloak

Can’t be used by MAXes.
Staying still for 8 seconds will cloak the user. The player cannot use any tools or weapons while cloaked, or restore health or shields. Any movement will decloak the user.
- Reloading, taking damage or switching to crouching or standing will not decloak the user.
- Being hit by an EMP grenade will decloak the user.
- Cloaking takes 1.5 seconds and decloaking takes 1 second. Player cannot use tools or weapons during this time.
- Minor Cloak isn’t affected by NAC‘s damage resistance or Chameleon‘s shimmer removal.
- Moving will decloak you, but if you move only a short distance, you can slide back into cloak quicker.
This is a controversial implant, technically it can give cloaking capabilities to something like a Heavy Assault with an auto shotgun, but it forces the user to sit still for who knows how long, and long decloaking animation makes it hard to effectively ambush enemies.
Long delay before cloaking makes Minor Cloak impossible to use to escape when being chased by enemies.
The automatic trigger if you stay stationary can be annoying as well.
Overall, it’s a highly desired, yet fairly worthless implant, mildly useful only for cheesy camping or in some very specific circumstances.
For example, if a Sniper notices on a Motion Spotter that enemies are looking for him, he can use his Hunter Cloaking to put himself in a good position, and then sit indefinitely in Minor Cloak until enemies give up the search and go away. Minor Cloak activation will force a recloak and produce decloaking and cloaking sounds, potentially giving away sniper’s position.
Carapace

Special thanks to /u/StrayedStrayed for his observations on Carapace.
Replaces your shield bar with second health bar.
Having only health and no shields makes continuous healing much more useful:
- Restoration Kits
- Healing Grenades
- Nano-Regen Device (note: doesn’t stack with Restoration Kits)
- Being healed by a Combat Medic’s Med Tool and Triage
Same goes for “on-kill” healing:
- Vampire
- Regeneration 5 implants.
Carapace also has amazing synergy with Combat Medics’ Nano-Regen Device and maxed out Combat Surgeon implant.
Stacking several healing sources provides for amazing survival capabilities, as demonstrated in these videos: one, two, three. Note: over the years, Carapace has been hit with some nerfs, so not all videos are up to date.
Needless to say, it’s a good idea to also use Nanoweave Armor to increase the worth of every healed health point.
Carapace has some hidden benefits:
- No shield flicker when getting shot, or when shields are depleted (excluding cloaked infiltrators, see below).
- EMP Grenades have no effect on your effective HP.
- For Infiltrators without Nano Armor Cloaking, Carapace replaces their 400 shields with 500 HP.
Cons:
- No automatic recovery, unless you run Regeneration implant.
- If you do run Regeneration, and take a lot of damage, it’s gonna take you longer to get back to 100% than if you had used Regeneration without Carapace.
- Cloaked Infiltrators with Carapace will always produce shield shimmer when getting shot. Without Carapace, there shimmer would be produced only until shields are depleted.
- This can be circumvented by using Chameleon Module.
Notes:
- Carapace user is revived with no more than 50% health (1 full bar).
- Resupplying at an infantry terminal does not restore any health.
Med Kits vs Restoration Kits
Med Kits: Less downtime, but also lower longevity.
Restoration Kits: More downtime, but also more longevity.
Med Kits are preferable when you also run a Regeneration Implant, or have a medic nearby.
If you are not good at staying alive for a long time, then always use medkits to maximize the amount of damage you can do in that short amount of time.
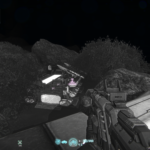
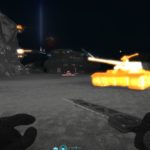
Infravision
![]()
MAXes can equip. Doesn’t work in vehicles.
Permanently changes your vision to infrared, automatically highlighting enemy units within ~130m. Cloaked units are not highlighted.
Video demonstration by Gray Paw.
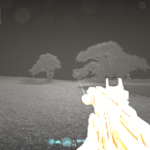
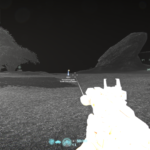


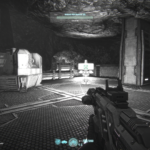
This implant has questionable usefulness. While highlighting enemy units regardless of camouflage is certainly useful, there are many downsides as well:
- it gets hard on the eyes, especially during the day
- makes friend-foe identification harder, as allies are highlighted in the same way as enemies
- makes harder to engage enemies at range
- cloaked enemies become nearly invisible
- being hit by an EMP grenade effectively blinds you
Setting your Graphics Quality to “Low” will make it easier to see with Infravision.
Phylactery
Receiving any amount of experience grants a charge. At 50 charges the implant is activated, and you will be able to automatically revive yourself after your next death. Chargers cannot be gained while dead or inside a vehicle. MAXes can self revive as well.
- Reviving happens at 50% health.
- It is affected by Safeguard (more proof).
- Self-revive interactions with Carapace are currently unclear.
- While the implant is active, green particle effects will surround your body, warning enemies that you can revive yourself.
While this implant may seem strong on the first glance, more often than not it just invites the enemy to kill you twice instead of once. So far, the only legitimate applications of this implant are:
- Medium or long range sniping, giving you an extra layer of protection from counter sniping. Recon Device is highly recommended over Motion Spotter to gain XP ticks faster.
- Self reviving as a MAX, especially when coupled with Safeguard.
Logistics Specialist

While you are piloting a vehicle, your squad members will be able to spawn directly into your vehicle, as long as there are open seats.
A truly unique implant, obviously most powerful for small coordinated squads that enjoy organized vehicle play. However, most of the time, it will not do anything Spawn Beacon or Valkyrie squad spawn would not do.
One can imagine a ton of fun moments with this implant, such as spawning squad members while circling enemy positions in a Harasser or cloaked Wraith Flash, but it remains to be seen whether this implant has any actually useful combat applications.
Firewall
Infiltrator
Interacting with allied base turrets or Spitfire turrets embed them with firewalls which must be disarmed by enemy infiltrators before hacking. Firewalls last 360 seconds and grant turrets an additional 25% maximum health.
- It is currently unclear whether you can apply Firewall to enemy base turrets hacked by you. To test.
- Interacting and Disarming the firewall takes a few seconds, just like normal hacking does. To test: how much time exactly.
Disengage
MAX

Activating Emergency Repair will also create an impulse wave that throws enemy infantry a short distance and increases your sprint acceleration speed by 25% for 3 seconds.
- Note that it affects only acceleration speed, not maximum speed. It’s a welcome bonus since MAXes have bad acceleration by default.
Avoidance
Your movements no longer trigger Claymores, Proximity Mines, or Bouncing Betty, and the range at which Spitfire Turrets can acquire you is reduced by 50%.
A very straightforward implant, most useful to flanking classes, such as Infiltrators and Light Assaults.
Bionics

Replaces 400 health with 400 shields.
- Carapace overrides this implant.
An interesting implant that significantly alters your playstyle, just like Carapace. Bionics make you significantly weaker against EMP grenades and all effects that restore health become almost useless, especially in direct combat. On the other hand, you gain ability to quickly restore your “health” pool after combat without having to rely on healing.
Naturally, has a great synergy with other personal shield effects, such as:
- Playing Engineer
- Using Advanced Shield Capacitor
- Using Survivalist implant
- Heavy Assaults’ Resist Shield and Medics’ Shield Recharging Field has no direct synergy, but they are generally oriented towards quick restoration to full capacity after combat, just like Bionics.
Cold Heart

Killing an enemy with a headshot will provide your heat weapons with 30% faster Heat Recovery Delay and Heat Recovery Rate for 3 seconds.
Naturally, this implant is mostly useful to Vanu Sovereignty, as they have the most weapons with heat mechanics, such as Phaseshift.
Experimental Stims
When using a Medical Kit or Restoration Kit, you receive a random increase to sprint speed, reload speed, or small arms resistance for a short time.
- Magnitude of these bonuses is currently unknown. To test.
- It’s probably safe to assume small arms resistance doesn’t stack with Nanoweave, but it’s not a guarantee.
Experimental Stims is the exact same thing as Survivalist, but worse. If you need to pop a medkit, Survivalist already gave you boosts to movement speed, reload speed and shield regen.
The carapace information seems ambiguous as to whether or not the implant is still good after the nerfs. Is it still worth farming for?
I’d say it’s not worth it anymore, as the main things that made it good got removed. But that’s just my opinion.
Small input: Covert Drop procs when you take a spawn beacon and hit the ground until your first action (e.g. placing C4).
Useful for dropping on battle sundies though
forgot to add: Tested with Level 5, 6 second cloak
Didn’t know you could display HP values, my bad.
For some reasons, bionics equiped or not, as a wraith flash infiltrator, you cannot get more than 1250 HP shields (auxiliary included) and health combined.
Turreted engineer can get up to 1300 HP with bionics (1200+100), and 500 H+800 S without bionics.
Does the Jockey implant synergize with Bionics?
Nowadays you can see shield health in numbers, no? Just go to VR, equip both implants, and see what happens.
Critical Chain’s description is out of date.
Current version still reduces chamber time by listed amount, but does not go away until time ends, and stacks up to 8 seconds.
Aight, thanks, I was out of loop.