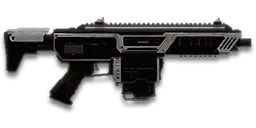
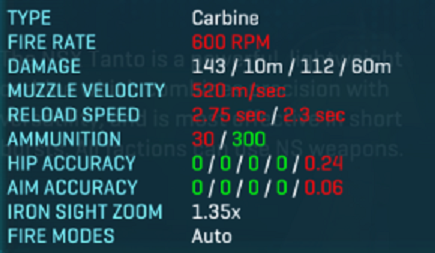
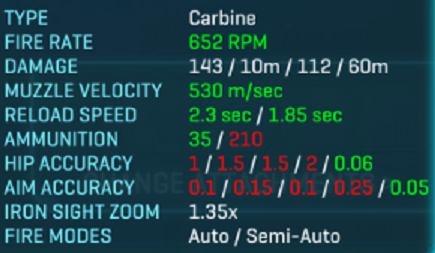
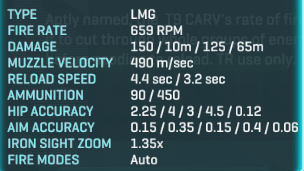
NSX Tanto is a recently released carbine in the Nanite Systems Exports weapon lineup. Its main feature is perfect accuracy of the first shot in any stance, and it also has a superfluous amount of spare ammo, but high Cone of Fire Bloom and strong Vertical Recoil create a high skill requirement, especially when considering its lowest in class damage output.
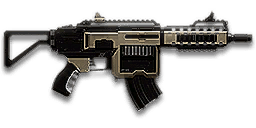
In some ways, NSX Tanto is similar to another NS carbine, NS-11C, which is more traditional and easier to use.
They both feature 75% ADS movement speed, good accuracy and low damage output. But there are noticeable differences between them as well. Let’s take a closer look at both weapons and figure out which one might suit you better.
Stats
Damage

Maximum potential benefit of:
- HVA: +7% damage at 60m
- SPA: +3% damage at 15m
Both carbines deal exact same damage, and have access to both SPA and HVA. However, NS-11C fires 8.6% faster, and has more ammo per magazine by default.
NS-11C gets a small edge for potential raw damage output.
Bullets-to-Kill and Time-to-Kill
Headshots
| BTK | Distance, meters | Time to Kill, seconds | |||
| Stock | SPA | HVA | NSX Tanto | NS-11C | |
| 4 | 0 – 39 | 0 – 41 | 0 – 49 | 0.3 | 0.28 |
| 5 | 40+ | 42+ | 50+ | 0.4 | 0.37 |
Standard Target
| BTK | Distance, meters | Time to Kill, seconds | |||
| Stock | SPA | HVA | NSX Tanto | NS-11C | |
| 7 | 0 – 10 | 0 – 15 | 0 – 8 | 0.6 | 0.55 |
| 8 | 11 – 39 | 16 – 41 | 9 – 49 | 0.7 | 0.64 |
| 9 | 40+ | 42+ | 50+ | 0.8 | 0.74 |
Nanoweave Armor 5
| BTK | Distance, meters | Time to Kill, seconds | |||
| Stock | SPA | HVA | NSX Tanto | NS-11C | |
| 9 | 0 – 16 | 0 – 20 | 0 – 17 | 0.8 | 0.74 |
| 10 | 17 – 39 | 21 – 41 | 18 – 49 | 0.9 | 0.83 |
| 11 | 40 – 56 | 42 – 57 | 50 – 75 | 1.0 | 0.92 |
| 12 | 57+ | 58+ | 76+ | 1.1 | 1.01 |
I don’t list BTK and TTK against Heavy Assaults for the sake of saving space. You can perform that analysis with the Toolbox yourself.
Numbers above show the general trend: both weapons take a lot of time to kill, but before factoring accuracy and recoil, NS-11C takes slightly less time due to higher Rate of Fire.
Hip Fire Performance
NS-11C
NS-11C has the usual carbine-tier starting Hip Fire accuracy, and very low Cone of Fire Bloom, which means it can sustain hip fire without losing much accuracy. This can be especially noticeable while flying or jumping.
NS-11C’s hip fire isn’t anything special, but still better than for most ARs and LMGs, and more than passable in a pinch, though low RoF and DPS limit your firepower versus hardened targets, especially if you’re not close enough to hip fire for headshots.
NS-11C takes the edge for ease of use when hip firing.
NSX Tanto
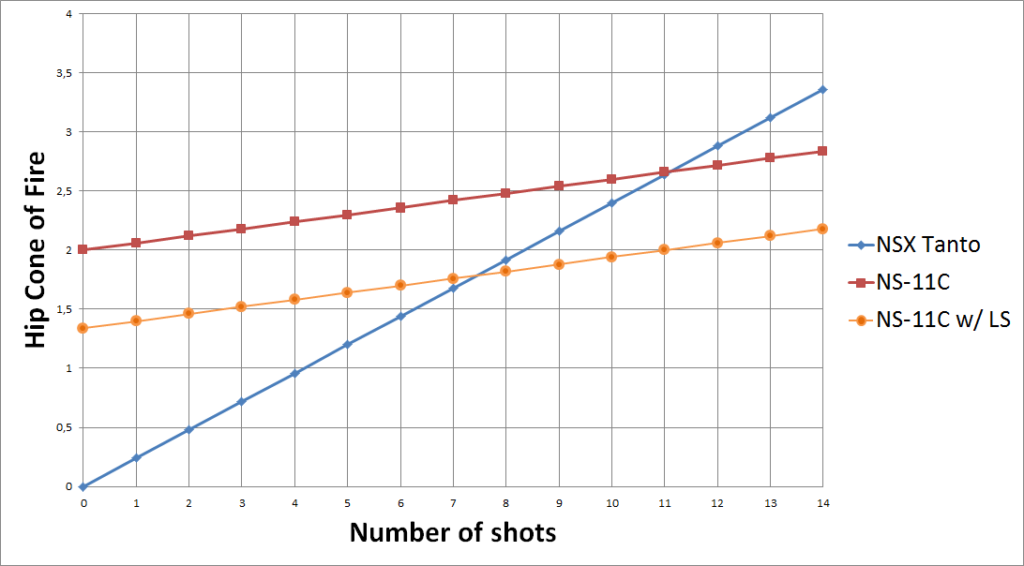
NSX Tanto offers perfect starting accuracy in any stance. It has high Hip CoF Bloom, but even then, it takes 7+ shots to exceed Hip CoF of NS-11C with Laser Sight, which isn’t even a standard attachment.
Tanto is potentially the most accurate hip fire weapon in the game. You can even countersnipe with it! But that potential isn’t easy to reach. You still have to contend with recoil and CoF Bloom.
NSX Tanto requires finesse. You can’t point it in general direction of the enemy and hope for RNG hits. You have to engage in bursts of 4-8 rounds, depending on distance and aiming point.
And because of the weapon’s low DPS, that aiming point better be the head, or you might find yourself outgunned.
Unlike with NS-11C, Tanto can realistically go for hip fire headshots at any distance, but naturally it will be challenging at 20m+.
In that regard, NSX Tanto can be interesting for people who played a lot of Counter-Strike, and used to hip firing and short bursting.
Additionally, you can tap hip fire the Tanto, and let Cone of Fire fully reset between shots. It would mean firing at 536 RPM or ~9 rounds per second.
Tanto’s hip fire is best suited for a high-aim player with low mouse sensitivity, large monitor, excellent PC performance and Vertical Field of View below maximum. All of it would increase the relative size of the target on your screen, and make it easier to get good hip fire hits from greater ranges, at the cost of reduced awareness and twitch aim effectiveness.
NSX Tanto gets the ultimate edge for high potential accuracy of hip fire.
Both
It’s worth noting that both weapons have low DPS and are not suited for CQC domination. Unless you can reliably hit headshots or engage with a complete surprise advantage, it is better to avoid hip firing, and keep your distance, especially with NSX Tanto’s super low DPS.
Ranged Performance
NSX Tanto and NS-11C have different Recoil and Cone of Fire characteristics, and can be easier or harder to use depending on player and situation.
However, both carbines are likely to be inferior at range to 167 damage carbines, such as Razor, Pulsar C and Cougar, and don’t stand a chance against the magnificent cannon of destruction – AC-X11.
ADS Accuracy
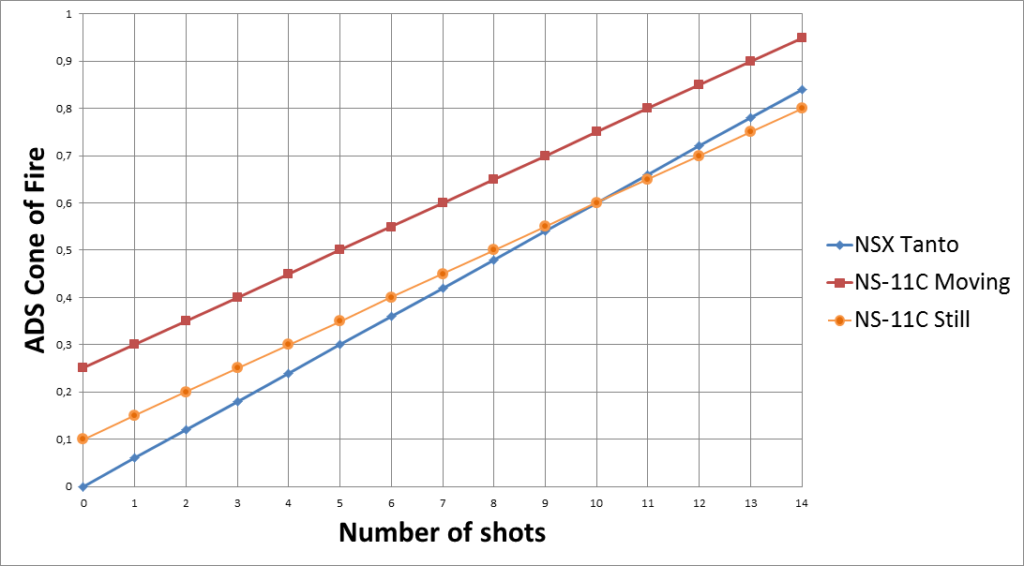
Again, NSX Tanto’s big selling point is that its first shot is perfectly accurate, even on the move. While its ADS CoF Bloom is higher than average (0.06 vs 0.05), it still takes 10 (!) shots before NS-11C becomes more accurate, even when fired from a completely still position.
On that note – it is beneficial to start the engagement with NS-11C while stationary, if you’re engaging an unaware enemy at range from a safe position. But you don’t have to be still throughout whole engagement, you can start moving after you fire 5 shots and receive no accuracy penalty – that’s just how CoF Mechanics work.
In that case, NS-11C will be almost as accurate as NSX Tanto, the worse starting CoF isn’t likely to play any role, unless we’re talking about extreme ranges of 150m+.
NSX Tanto gets the edge for ADS Accuracy.
Recoil
NS-11C
| Stock | With Attachment | ||
| Vertical Recoil, per sec | 2.39 | 2.03 | Compensator |
| First Shot Multiplier (Recoil) | 3x (0.66) | 0.56 | |
| Average Horizontal Deviation | 0.165 | 0.123 | Forward Grip |
| Maximum Horizontal Deviation | 0.4 | 0.3 | |
| Average Recoil Angle | -18.5 | -13.9 | |
| Recoil Angle Variance | 3 | 2.25 | |
| Recoil Recovery True Delay | 0.184 | – | |
| Recoil Recovery Time per shot | 0.0165 | 0.0133 | Both |
| Recoil settle after first shot | 0.233 | 0.224 | |
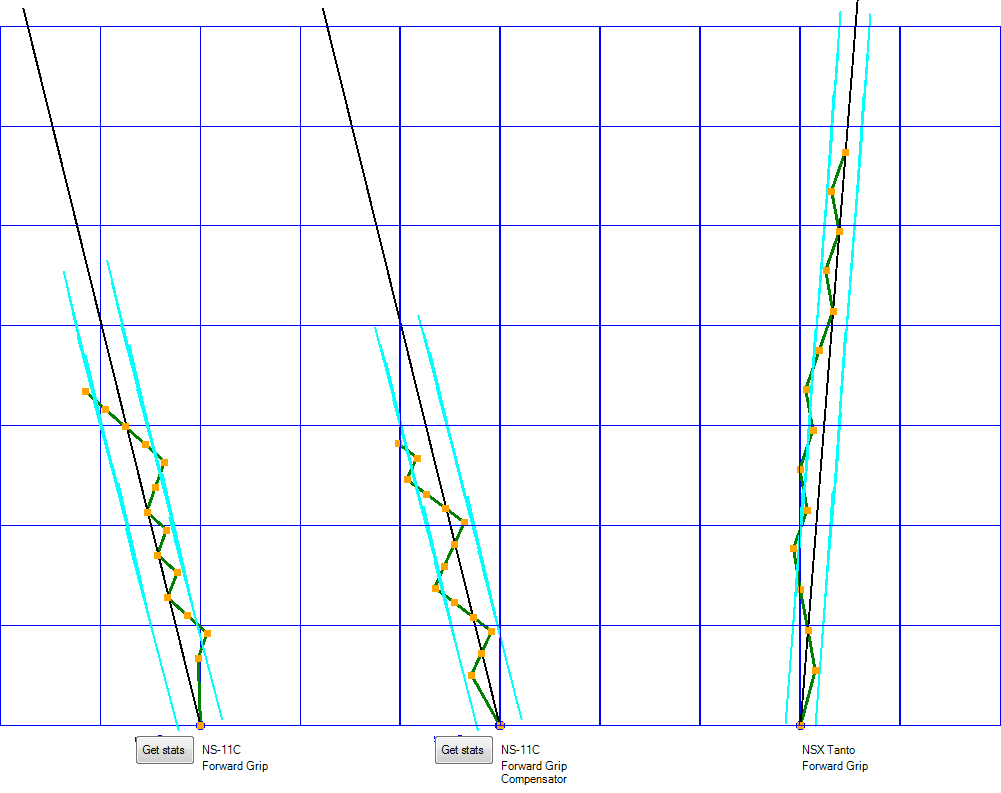
As far as conventional 143 damage carbines go, NS-11C’s accuracy and velocity are above average. The only carbine that has it better is T5 AMC, mostly thanks to access to Advanced Forward Grip.
NS-11C has the lowest vertical recoil among carbines, which makes it very easy to hold on target. High First Shot Recoil is a bit obnoxious when you’re trying to engage a small target in short bursts.
Overall, NS-11C isn’t something you would want for extreme range shooting or “sniping”, but it’s more than capable at range, and respectable for a carbine.
NS-11C gets a slight edge for ease of use at range.
NSX Tanto
| Stock | With Attachment | ||
| Vertical Recoil, per sec | 4 | – | – |
| First Shot Multiplier (Recoil) | 1.4x (0.56) | – | |
| Average Horizontal Deviation | 0.115 | 0.086 | Forward Grip |
| Maximum Horizontal Deviation | 0.28 | 0.21 | |
| Average Recoil Angle | 6 | 4.5 | |
| Recoil Angle Variance | 2 | 1.5 | |
| Recoil Recovery True Delay | 0.180 | – | |
| Recoil Recovery Time per shot | 0.0235 | 0.023 | Forward Grip |
| Recoil settle after first shot | 0.213 | 0.212 | |
The first obvious thing is high Vertical Recoil, and lack of Compensator to tone it down. Unlike NS-11C, you will have to consciously compensate for Vertical Recoil every time you engage with Tanto, and getting good hits at range may be challenging. The combination of low RoF and High Vertical Recoil is the opposite of convenient.
Lower FSRM makes short bursting a bit more convenient. Even though actual first shot recoil is the same as for NS-11C with Compensator, at least recoil is more consistent from shot to shot.
NSX Tanto has lower Horizontal Recoil, with 30% lower Average and Maximum Horizontal Deviations. It also has less pronounced Recoil Angle, and with less Variance.
All of this goes a long way of making Tanto’s recoil pattern more consistent and predictable, even if takes more effort to compensate for.
If you tap fire and let the crosshair fully settle between shots, you can take up to ~5 shots in 1 second, and each shot will have perfect accuracy. Potentially, you can kill a stationary player with 5 headshots within 0.85 seconds. Most players will not stand and get shot for that long, but you can potentially “snipe” an oblivious sniper or an engineer behind a turret.
You can also snipe deployables with it.
NSX Tanto gets the edge for potential accuracy at range. You can see where this is going.
Other Traits
Equip Time
Carbines in general have the shortest Equip Time among primary weapons, and NSX Tanto has the shortest Equip Time among carbines. Returning to NSX Tanto from most sidearms or tools is going to take only 0.75 seconds.
Combine that with perfect hip fire accuracy and you get the best quickdraw primary weapon. This can be especially important for Engineers, when they get caught with a Repair Tool out, or if you’re playing with Med Kit Primary.
That said, NS-11C is only a 0.05 seconds behind.
Ammo Pool
For some reason, NSX Tanto has a huge amount of reserve ammunition. A lot of the time that doesn’t matter, but it can occasionally make a crucial difference for a perching Light Assault, and NSX Tanto certainly benefits a rooftop camping playstyle.
NSX Tanto gets the edge for ammo pool.
Reload Speed
While NSX Tanto has pretty decent reload speed, it’s still 0,45 second slower than for NS-11C, which reloads faster than average.
NS-11C gets a slight edge for reload speed.
0.75x ADS Movement Speed Multiplier
Both carbines allow you to move 50% faster while Aiming Down Sights than with most other primary weapons. It’s a great trait for dancing in and out of cover, slicing corners and dodging enemy fire in a faceoff.
It can allow you to survive just enough time to get your aim where it needs to be and get those hits.
This trait is especially obnoxious in case of NSX Tanto, which is still pinpoint accurate on the move.
Cross-faction tracers and sound
Both carbines share this quality, and it can add precious milliseconds before enemies identify you as a threat. This is especially important considering how many shots you need just to down one target, and how long it takes to fire them all.
For psychological reasons, this trait is most useful for VS players, as most of their weapons go “pew-pew”.
Which one to use?
As you probably have picked up along this article, NSX Tanto has higher potential than NS-11C, but is harder to use. It can be treated as a more extremely tuned version of NS-11C, the next logical evolutionary step.
- If you already enjoy the playstyle of NS-11C, but wish you had more control – you’ll like what NSX Tanto has to offer.
- If you are just thinking about entering the realm of accurate, mobile carbines that reward good aim – it’s better to start with NS-11C and transition to NSX Tanto once you feel comfortable with the playstyle.
- If you value versatility and no-nonsense ease of use, and enjoy airborne combat – you’ll have better success with NS-11C.
- If you prefer a run & gun and in-your-face aggressive playstyle – you won’t like either of these weapons.
Gameplay Tips
Both carbines specialize at “medium range” of about 20m to 50m. They can engage outside these bounds, but it’s not really their forte. Keep your distance when you can, and don’t try to snipe with them, and you should be fine.
Light Assaults really benefit from their sustained accuracy, which makes them great weapons for perching and general rooftop shenanigans. Just do your best to resist the temptation of jumping down in the midst of enemies.
If you are assaulting a building, either try to stay away the furthest from enemies, engage them in their backs, or stay behind your allies.
When engaging an enemy in a 1v1 shootout, make full use of 75% ADS speed multiplier, and strafe erratically. If there is a piece of cover around – even better. Try to play the cover and catch the enemy sprinting or distracted. If you get under fire the moment you show your nose – just go back and wait for a more opportune moment.
Both carbines require a lot of hits to down a target, and sure take their sweet time firing them. This means that after 1-2 engagement attempts, enemies around will likely know your exact position. Try not to stay in one place for too long, and engage from different angles when possible.
Go for headshots when you can, but for both carbines there is a certain distance where they just can’t get them easily and reliably.
While theoretically NSX Tanto can shortburst or tapfire for headshots at any distance, it’s likely to take a disproportionate amount of time, giving an aware target an opportunity to hide in cover, and for other enemies to shoot you.
In those cases, it’s perfectly fine to for bodyshots. Both carbines have great sustained ADS accuracy, and you’re very likely to eventually kill the enemy, unless he hides into cover or you get sniped first.
Attachments
Both carbines have access to mostly same attachments.
Barrel
Lack of Compensator for NSX Tanto is hurtful, but high Vertical Recoil seems to be the intended downside. And if Tanto had access to Compensator, it would be considered mandatory, pushing out other Barrel Attachments as viable options, and Compensator’s penalties would affect the intended feature – perfect starting hip fire accuracy.
While NS-11C has access to Compensator, and a lot of successful players enjoy using it with one, it’s far from being mandatory. NS-11C has the lowest Vertical Recoil and Vertical Recoil per Second among all carbines, and its performance at range is mostly limited by Horizontal Recoil and low damage.
Suppressor works great on both carbines, as long as you keep in mind it comes at a cost to your maximum effective range. If you don’t want to deal with that, feel free to use Flash Suppressor instead.
This is a rare case where all available barrel attachments are viable and worth considering.
Rail
Forward Grip is recommended for NS-11C. The random nature of Horizontal Recoil limits your effective range in annoying and unpredictable way.
While you could go the direction of “compensating weapon’s weaknesses” and equipping a Laser Sight, you wouldn’t get much use of it. When possible, you should simply stay away from close quarters altogether. When not – you still get the benefit of 75% ADS, and still the drawback of low DPS.
With same reasoning, I recommend Forward Grip for NSX Tanto. It already has predictable and consistent recoil pattern, with one of the lowest Horizontal Recoils out there.
You could say “if my Horizontal Recoil is already so great, I’ll just use Extended Mags” – and it would be more or less fine for medium range. But in my experience, usually you cannot afford to stay exposed for so long to fire a whole magazine.
You already take a long time killing one enemy, you’re likely to get noticed and shot, and you’ll need to go to cover and change position. Might as well reload along the way.
And if 30 rounds isn’t enough for the user to kill even one target, they should work on their aim or engagement choices, not on attachment picks.
NSX Tanto is already very accurate based on Cone of Fire mechanics. It makes sense to tune the recoil up to par. Unlike NS-11C, NSX Tanto can really reach out.
Ammo
While both High Velocity Ammo and Soft Point Ammo offer small, barely noticeable bonuses, they always seem to cause the most amount of argument. It comes down to what you value more, performance within 10-27m or after 27m.
My personal recommendation is to go with HVA for both, as it can potentially offer higher damage increase, and increasing the velocity can’t hurt.
Optics
As always, optics are up to personal preference. You can use any optic and do good with it.
But since both weapons require good accuracy, going with higher magnification is common and advised.
For NS-11C, I recommend 2x Reflex.
3.4x or 4x scopes are viable, but you may find them unnecessary, as less consistent Horizontal Recoil makes your crosshair shake too much.
Weirdly enough, optics choices for NSX Tanto are much more limited, it has access to only one 3.4x Reflex Scope, and no 4x Scopes.
If you are using NSX Tanto with HVA and Forward Grip, I would recommend the 3.4x Reflex. Since Tanto has much lower Horizontal Recoil, your effective range isn’t as limited as for NS-11C. You can also tap fire or “snipe” at greater ranges. And in close quarters, where high magnification would be a burden, you still get the excellent hip fire accuracy. Win-win!
Be prepared to deal with annoying Vertical Recoil, though. If you find it too much, it’s fine to use 2x Reflex or even 1x Reflex.
Additional Material
- Weapon Mechanics Guide – to learn more about inner workings of PlanetSide 2 weapons.
- Gunplay Guide – a collection of detailed tips on using weapons, aiming and engaging.
- Weapon Analysis Toolbox – compare and analyze different weapons.
