NSX Tengu is an SMG, available to all classes. It is an unusual hybrid between a shotgun and an SMG: Tengu fires four pellets with each shot, each pellet dealing minor damage. Pellet spread is significantly reduced while aiming down sights to boost the effective range to reasonable levels.
Tengu excels at consistently dealing damage to enemies, even against mobile targets, or when the user makes aiming mistakes. This makes Tengu a perfect weapon for newbies and low-aim players.
Due to large pellet spread from the hip, Tengu has worse hip fire than other SMGs, almost always requiring the user to aim down sights.
Stats
Best of Both Worlds
Both SMGs and Shotguns have a number of problems that make them less effective than other CQC primary weapons.
Shotguns fire multiple pellets with each shot, so they can easily inflict some damage with each shot. However, their Time to Kill is balanced around hitting nearly every pellet, and large Pellet Spread limits their effective range. Unless you’re within a few meters and aim well, any automatic CQC weapon is likely to kill faster.
They also have relatively low Rate of Fire, so missing a whole shot is extremely punishing.
Shotguns also don’t have Cone of Fire Bloom, so you are expected to fire at maximum rate of fire to make your TTK more competitive.
To summarize, to be effective with a shotgun in hectic close range combat you are expected to hold your aim pinpoint at enemy’s center mass and click at a very specific rate. Needless to say, this is hard to accomplish even for good players.
The fact that shotguns easily inflict partial damage doesn’t mean much, because only partial damage will take ages to kill an enemy.
SMGs have a different set of problems. On average, they have lower DPS than other CQC primary weapons, lower Damage per Magazine, and shorter effective range. The only thing they gain is increased hip fire accuracy, and 75% ADS. And sometimes you can have too much accuracy.
You have to compensate reduced firepower with your own skill, going for headshots and hip fire headshots, and outmaneuver the enemy with your mobility. This creates a significant skill requirement just to make SMGs competitive in CQC.
NSX Tengu is a perfect balance between shotguns and SMGs. Tengu easily inflicts partial damage on targets, but it doesn’t suffer from shotguns’ low RoF and from SMGs’ “too much accuracy”. You can waive Tengu in general direction of the enemy and still kill him in a reasonable amount of time.
Tengu is inaccurate enough to be effectively used in hectic CQC setting, even by an average player. But it is accurate enough to have about the same effective range as other SMGs.
Couple that with some very short reloads and decent Damage Per Mag, and you get a rock solid SMG in the end.
Mechanics

Mechanically, Tengu is a shotgun. Feel free to familiarize yourself with Weapon Mechanics and Shotgun Mechanics.
Cone of Fire Bloom. Unlike Shotguns, Tengu does have some CoF Bloom, in line with other 200 damage per shot weapons. Similar to other SMGs, Tengu has the same CoF Bloom for both ADS and Hip Firing.
CoF Bloom Per Point of Damage Done: 3.5 * 10-4
In this regard, Tengu shares the first place with Eridani, which is known for sustained hip fire accuracy. Of course, Pellet Spread will interfere with that a lot, but as far as CoF Bloom mechanics are concerned, Tengu is excellent.
The fact that Tengu fires multiple projectiles with each shot is a double edged sword:
Pros:
- Makes it easier to consistently inflict some damage, even when target is actively dodging or the user makes aiming mistakes. This gives Tengu affinity for CQC and makes it friendly towards newbies and low-aim players.
- As an additional consequence, Tengu user is less affected by flinch from getting shot, and can be competitive in duels even without Battle Hardened implant.
Cons:
- Optimal DPS is harder to reach.
- Damage can be reduced if target is partially protected by cover.
- It is harder to focus your damage output at a particular point, such as enemy’s head. Or to single out a specific enemy in a group.
Damage
Damage per Pellet: 50 @ 6m - 36 @ 40m
Pellets per Shot: 4

Damage per Shot: 200 @ 6m = 144 @ 40m
Rate of Fire: 500

Damage Per Second: 1666 - 1200

Headshot Damage Multiplier: 2x
Within maximum damage range, Tengu’s DPS is equal to 200 @ 500 weapon, such as Gauss SAW, which is below average for an SMG. Considering that optimal DPS is harder to reach for Tengu, it has a comparatively low, but consistent damage output.
Despite that, in the hands of an average user, Tengu is likely to be more effective and kill faster, just because it is so consistent at dealing damage.
Similar to other 200 damage weapons, Tengu gets hard countered by Nanoweave Armor, which can increase Ideal TTK from 0.48 seconds to 0.72 seconds – that’s 50% TTK increase for 20% damage reduction!
However, Tengu can potentially deal 400 damage with a headshot, and kill an enemy with just three headshots, with a good overkill in case a few pellets miss or hit the body.
Tengu takes 4 body shots or 2 head shots before it can reliably melee combo enemies.
Ammunition
Ammo: 20 / 140
Damage Per Magazine: 50 * 4 * 20 = 4000

Extended Mags: +4 rounds per magazine (+800 DPM)

DPM w/ Ext Mags: 4800

Reload Time: 1.875 sec / 2.5 sec
Tengu has very decent Damage Per Magazine, close to Cyclone’s, which holds the first place among first gen SMGs. Extended Mags provide a noticeable boost, pushing magazine size from “adequate” to “comfortable”.
Tengu also has quick reloads; the long reload penalty is unusually mild for an SMG.
Hip Fire Accuracy
Hip Cones of Fire:1.75 / 1.75 / 1.75 / 2.0
(crouching still, crouching moving, standing still, standing moving)
Hip CoF Bloom: 0.07
Pellet Spread Hip: 3.0
Due to large hip fire Pellet Spread, and larger initial Hip Fire CoFs, Tengu has notably worse hip fire than other SMGs.
Tengu has access to a unique attachment – Hybrid Laser, which reduces Hip Fire CoFs and Hip Pellet Spread by 20%. It enables the user to hip fire with a bit more liberty, but other SMGs will still have much better Hip Fire accuracy.


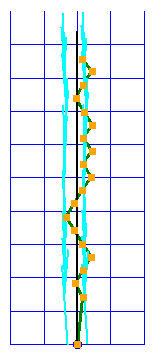
Click to enlarge.
On these pictures, each weapon fires 2000 damage. This is 10 shots for NSX Tengu, and 16 shots for GD-10 Blitz. Both weapons are fired from the hip while Standing Moving – the most likely hip firing stance. As you can see, Blitz – and by extension other SMGs – has much more accurate Hip Fire.
As mentioned, Tengu has below average DPS, and due to large pellet spread, it cannot focus its DPS when firing from the hip, and even with Hybrid Laser you can’t hip fire for headshots outside spitting range.
And with normal, partial body shots, Tengu simply takes too long to kill an enemy from the hip. If the enemy is on the beefy side, and slightly at range, you’re likely to run out of ammunition before killing the enemy, assuming you even live that long.
All of this boils down to – Tengu can be effectively hip fired, even without Hybrid Laser, but with much less freedom than other SMGs. Tengu requires more thoughtful approach. It is preferable to almost always Aim Down Sights, and hip fire only against squishy or weakened targets, or at very close ranges.
ADS Accuracy and Effective Range
ADS Cones of Fire: 0.15 / 0.17 / 0.15 / 0.32
(crouching still, crouching moving, standing still, standing moving)
ADS CoF Bloom: 0.07
Pellet Spread ADS: 0.75
Velocity: 380 m/s
Projectile Lifespan / Gravity: 1.5 / 11.25
Overall, you can expect Tengu to have about the same effective range as other SMGs, around 20-30m.
Remember two things:
- Tengu gets an accuracy boost for staying still or crouching.
- Tengu fires multiple projectiles, so it benefits from firing at completely exposed targets.
Given right conditions, Tengu can reach out to enemies at longer ranges, especially if they’re not Heavy Assaults.
However, the reverse is also true. When the target has partial cover, you will need to be closer before you can do any meaningful damage.
Due to relatively large initial Pellet Spread, burst firing is not as important with Tengu as with other weapons, so you can afford to fire in longer bursts. Extremely high First Shot Recoil Multiplier makes shortbursting even less desirable.
Tengu has slightly less Damage Degradation than other SMGs, losing 28% of damage over 29m. For comparison, 125 damage SMGs lose 33% of damage over 31m (assuming SPA on both).
Overall, Tengu has surprisingly decent effective range for an “automatic shotgun”.
Recoil
Vertical Recoil: 0.4

Vertical Recoil Per Second: 3.33
First Shot Recoil Multiplier: 3.5x
Recoil Angle: -5 / 5
Horizontal Recoil: 0.25 / 0.25
Horizontal Recoil Tolerance: 0.6
Average Horizontal Deviation: 0.205
Maximum Horizontal Deviation: 0.5
Recoil Recovery Delay: 120
Recoil Recovery Rate: 18
Tengu has high vertical recoil for an SMG, but it’s fairly average overall. However, Tengu has extremely high First Shot Recoil Multiplier, and this is something that you will need to adjust to when firing at enemies beyond ~25m.
Tengu has more stable horizontal recoil than most SMGs.
All that said, you will run into damage degradation and Pellet Spread issues long before recoil becomes a problem. So aside from the mentioned FSRM, recoil is not something you should overly concern yourself with when using Tengu.
Misc Stats
ADS Time To / From: 0.15 sec / 0.15 sec
ADS Movespeed Multiplier: 0.75x
Minimap Detect Range: 40m
Equip / Unequip Time: 0.65 sec / 0.25 sec
All of these are standard for an SMG.
Attachments
Optics
Tengu has access to a variety of 1x and 2x scopes, including HS/NV scope. As always, the choice will depend only on your personal preference, but generally speaking, there’s no reason to use anything other than 1x CCLR scope.
Barrel
Flash Suppressor
This is the standard recommended attachment for most weapons, as it provides a bit of concealment at nearly no cost. Increased minimap detection range can mess with you, giving away your position to enemies outside your effective range, so if you do a lot of solo flanking, you may prefer to run Suppressor or no barrel attachment instead.
Suppressor
Suppressor will reduce your ranged damage, reducing your Damage Per Second by up to 13%. Tengu sounds loud when you shoot it, but it sounds much quieter to other players around you. And the Suppressor makes Tengu nearly inaudible.
Suppressor is a great attachment for flanking SMG Infiltrators and Light Assaults, who usually have more thoughtful and deliberate engagements, against unaware or weakened enemies. Having more time to ADS and aim properly will further reduce the effects of damage penalty.
However, it doesn’t make much sense to use Suppressor for aggressive pushing and hectic CQC skirmishes, as you’re likely to be spotted or lit up by a Motion Spotter anyway.
Rail
Tengu has access to Extended Mags (+4 rounds per mag), Darklight Flashlight and Hybrid Laser attachment.
Hybrid Laser reduces hip Pellet Spread and Hip CoFs by 20%.
On paper, both Hybrid Laser and Extended Mags are viable. I’ve used both, and have been satisfied with their performance.
The problem with Hybrid Laser build, is that Tengu has worse hip fire performance than other SMGs, and Hybrid Laser is inferior to Advanced Laser Sight.
You would think that 20% reduction to Pellet Spread and 20% reduction to Hip Fire CoFs come together and equate to 40% reduction to Hip Fire CoFs of ALS, but it doesn’t actually work like that. Effectively, you still get a 20% reduction versus 40% reduction.
And given the fact that Tengu has worse hip fire capabilities than other SMGs even before the attachments, it doesn’t make much sense to go with Hybrid Laser.
It’s certainly a viable attachment, you can make it work, but objectively Extended Mags is better, especially when used by flanking classes – Light Assault and SMG Infiltrator.
Ammo
Tengu has access only to Soft Point Ammunition, and should always be used with it.
Recommended Attachments
This is a cookie cutter build if you don’t know which attachments to pick for your playstyle.
- 1x CCLR
- Flash Suppressor
- Soft Point Ammunition
- Extended Mags
Gameplay Tips
First and foremost, you must realize that Tengu’s hip fire is much worse than for other SMGs. You almost never want to hip fire, unless the enemy is just a few meters away. So in almost any engagement you want to be aiming down sights.
Other than that, Tengu plays a lot like other SMGs, so feel free to check out the corresponding sections of the SMG Guide and SMG Infiltrator Guide.
Remember to close the distance before engaging, when possible.
Take advantage of Tengu’s short reload. After killing one enemy, you almost always want to take a step back and reload, unless you’re flanking several enemies from a really good position, and can kill all of them at once.
Get a good sidearm, and get good with it. You’re gonna be relying on it a lot, similarly to other SMGs.
Be careful about engaging enemies in partial cover. You won’t be dealing much damage to them.
When engaging enemies at range, you can boost your accuracy by being still or crouching. Just be careful about being sniper bait.
Conclusion
Tengu is the most competitive weapon in the whole NSX lineup. It is very effective, and will serve most players much better than Cyclone ever will – and that weapon is universally regarded as the best SMG. Unlike other SMGs, Tengu is friendly to newbies and low-aim players. It has the best qualities of shotguns and SMGs, while doing away with their worst qualities.
Tengu is much easier to use than other 200+ damage weapons, while still letting you enjoy the feeling of impactful, high damage shots.
Worth buying?
Tengu is a must buy if you have any intention of using SMGs.
However, at the end of the day, all SMGs have limited firepower and effective range. Most classes will have a more versatile CQC primary weapon option. If you don’t have a reason to use an SMG, you don’t have a reason to use Tengu.


 A low magnification scope makes it feel like the weapon has no recoil at all, and it allows a wider field of view, which can be crucial while you are busy tunnel visioning in one direction and firing off several bursts – Yumi has a long exposure time.
  On the other hand, a higher magnification scope gives a clearer sight of the target, allowing for more deliberate accuracy. It can also help identify targets at longer ranges before you even open fire.