All posts by Iridar

Close Range Sniping Guide by Davregis

This article is based on the guide written by Davregis, originally posted on reddit.

Intro

Using a sniper-style weapon in CQC, like every other gun in the game,  takes a boatload of positioning and aim.

You don’t necessarily have to score headshots all the time, it’s possible to bodyshot your way to an auraxium pretty darn quickly with a CQC SASR, as long as you get a feel for what you can and can’t do with the weapon

But there are better guns out there if you want to dedicate. So let’s start from hardest to easiest weapons to use.

Choosing your weapon

Close Range Bolt Action

TSAR-42, SAS-RGhost

  • Recommended scope: 4x

  • Difficulty: pls no

CQC bolt is pretty simple in theory, because all you need is 1 headshot per target. You cloak in a reasonably safe spot, WHILE CLOAKED aim at someone you can headshot, decloak, fire, then either recloak and reaim, or chamber another round and try to grab somebody else.

The bolts instagib with a single headshot, making them extremely powerful, but you lose automatically if you miss your first shot and someone is shooting at you. 

That being said, remember your weapon does 700 damage at 10m and falls off pretty slowly. I recommend the Target Focus implant which displays a healthbar above spotted enemies. If they look like they might have less than 650 health, take the bodyshot and pat yourself on the back.

And if you’re close enough, 1 shot + quick knife swing will let you instakill almost any non-HA target.

CQC bolt is the hardest to use because you have an effective 47 rpm and a TTK of three hours. You can get away with double bodyshot kills, but that takes more than a full second to kill, won’t kill shielded heavies, and will never let you survive an encounter less than 50m away if you miss that first shot.

I would not use these weapons unless you’re extremely confident in your skills. However, once you are very good, CQC bolts are probably the best choice, being able to instakill with one shot. This is the stuff montages are made of.

Semi Auto Scout Rifles

Vandal, HSR-1, Shadow, Nyx

  • Recommended scope: 2x or 3.4x

  • Difficulty: headshot god

Scouts are close to CQC SASR, but have faster ROF and maintain accuracy while moving, in exchange for less damage.

You get guaranteed 2 headshot kill at all ranges (3 vs shielded heavies), or a four bodyshot kill after 15m, and sometimes at 15m too. What this means is that to use the weapon better than a CQC SASR, you need to be firing while moving, and maintaining a ludicrous headshot ratio. As soon as you miss a headshot, your TTK increases past a SASR’s.

In this way they’re a middle ground between bolts and SASRs. They have ROF like a SASR, but horrible bodyshot TTK like a BASR. Some people love these things, but I honestly think they’re worse than bolts for people who headshot consistently, and worse than SASRs for people who can’t.

They excel over a BASR when you chain 4+ headshots in a row to kill multiple people in a single clip faster than a bolt could, and excel over a SASR when you can reliably take advantage of the larger clip size, refire rate, and ADS move accuracy by chaining headshots until the clip is empty.

Their lower bullet damage means they’re much harder to do well with than a SASR, but also end up slightly better once you can pull this stuff off.

 Semi Auto Sniper Rifles

KSR-35, ImpetusPhantom

  • Recommended scope: 3.4x
  • Difficulty: you can pretend it’s a shotgun if you want

CQC SASR is your easiest sniper rifle to use. Featuring a 3 hit bodyshot kill until 6x+ scope ranges and 1 headshot + 1 bodyshot kill at the same ranges, your CQC SASR is extremely tolerant to user error.

Because of its 400 damage and moderate firerate + hipfire CoF, it functions extremely well as a hipfire shotgun whenever the opportunity presents itself. Shoot 3 times, or shoot twice + knife for a quick, disgusting CQC kill. Hip fire range extends to about 8 meters, after that scoping in and slamming the trigger is more accurate.

Although you have to stand still with these things to maintain your accuracy, you can fire an entire clip reasonably quickly(but slower than a scout’s), and you have a lot of room to mess up due to quick reload.

Unlike a scout, you can mix headshots and bodyshots very well, and bodyshot only TTK, while high, is pretty forgiving compared to a bolt’s or scout’s. Honestly, this thing is so much better than a scout or bolt for everyone but the gods of planetside sniping. That being said, it’s also probably the worst gun for someone who’s amazing at clicking heads. Try to transition off this gun once you’re comfortable with it, if possible.

MINDSET

Pick your weapon, they all play reasonably similarly. Ideally, you want to have cover or a flank on an enemy position while still pretty near to your allies. Cloak, target, uncloak, try to kill someone, and gauge response to your shooting.

Above all, never stand still except while shooting, and never kill from the same place twice.

Here’s a general example of how I play these weapons.

  1. Find a spot with okay cover(usually a dirt pile or base wall)
  2. Run to it cloaked or uncloaked depending on enemy line of sight.
  3. Cloak and ADS, seeing if I find a target.
  4. If I find a target, I squeeze off 4-5 shots then recloak and move a few feet around.
  5. If I get an enemy response, I either wait a bit or relocate, depending on strength of response.
  6. If I start getting a continued response, I move a good distance away, because I’m almost definitely being hunted.
  7. Repeat. If I get close enough to someone, I might shotgun them.

Ideal spots for these weapons are areas where you have lots of cover and the enemy is out in the open. Don’t try to run these guys inside of a base; that’s when you want an actual shotgun or SMG.

Knowing when to use a rifle is the difference between 4kpm/5kda and 0.5kpm/0.5kda, and you’ll learn this pretty quickly regardless. Biolab defenses, tower defenses (see a theme?), and HIVE combat tend to work really well for these things. Only take on opponents you know you can with your skill level, or people that look low enough for you to kill with 1-2 bodyshots or a headshot.

Lastly, a point to keep if you keep anything from this guide: KNOW WHEN TO MOVE.

If you stay still, or with no cover, you’re gonna die from some spawnroom hero halfway across the map with a 100 k/d and 0.01 kpm, or some HA who’s been walking to you for half his game session. Eventually you’ll know how many shots you can squeeze off before having to cloak and relocate; getting there is a huge part of the journey.
NSX Naginata

NSX Naginata: Highly Technical Weapon Guide

Wrel’s video review.

NSX Naginata is a new cross-faction LMG, and the first weapon in upcoming Nanite System Exports lineup of weapons, that are intended to be hard, but rewarding to use, and they will all probably have some sort of a unique mechanical quirk.

In case of NSX Naginata, the quirk is the accuracy of sustained fire, as long as you stand still.

It’s worth noting that Naginata doesn’t share the NS weapon trait of 75% ADS speed. Same as most other LMGs, Naginata has 0.5x ADS Movement Speed multiplier.

Stats

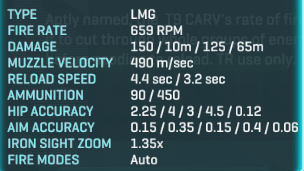
naginata-stats

Damage output

Naginata’s maximum bullet damage of 150 and Rate of Fire of 659 are slightly unorthodox, but still very similar to some other LMGs that do 143 damage at 652 RoF.

Naginata deals 1647 DPS within maximum damage range, and 1372 DPS at minimum damage range and further. 

This is slightly below average, but comparable to other weapons that rely on accurate shooting. 

With 90 rounds per magazine and fast reload, Naginata can just keep firing without much downtime.

Bullets to Kill and Time to Kill

As you would expect, an LMG with just one tier of damage degradation and a relatively high RoF will experience a smooth performance decline as range and enemy defenses increase.

Due to the fact that Naginata’s damage degradation starts at 150, and the closest bullet damage threshold is 143, Naginata’s bullet-to-kill values remain more consistent within 0 – 25m bracket. 

Tables below are mostly just for reference.

Description Effective Health Bullets to Kill (Time to Kill, seconds)
7 (0.55) 8 (0.64) 9 (0.73) 10 (0.82) 11 (0.91)
Default 1000 0 – 25 26+      
Aux. Shield 1050 0 – 10 11 – 51 52+    
Full Nano 1250     0 – 34 35+  
Full Nano + Aux.Shield 1300      0 – 19  20 – 51 52+

Naginata has standard Headshot Damage Multiplier of 2x and requires 4 headshots to kill within 51m. Aux. Shield adds an extra headshot at 52m+, but at that kind of range it’s irrelevant.

Heavy Assaults

Description Effective Health Bullets to Kill (Time to Kill, seconds)
10 (0.82) 11 (0.91) 12 (1.00) 13 (1.09) 14 (1.18) 15 (1.27)
NMG 1437 0 – 23 24 – 52 53+      
NMG + Aux.Shield 1487 0 – 12 13 – 42 43+      
Resist 1538    0 – 32 33 – 56 57+    
Resist + Aux.Shield 1616    0 – 16 17 – 43 44+    
NMG + Nanoweave 1796     0 – 10 11 – 36 37 – 57 58+
NMG + Nano + Aux.Shield 1858       0 – 25 26 – 48 49+

Naginata requires 5 – 7 headshots to kill a Heavy Assault, depending on distance and shield type. 

Cone of Fire and Bloom

naginata-stats

Hip Fire CoFs

Naginata has unremarkable hip fire accuracy. Relatively high RoF adds a bit of consistency, and Naginata will not perform absolutely horribly in a pinch, but you still should try to stay away from hip firing distances, and be careful when storming buildings in first lines.

ADS CoFs

Naginata’s starting ADS CoFs leave a lot to be desired. 

Standing moving accuracy of 0.4 is more or less normal for LMGs, especially on those that rely on volume of fire. 

But 0.15 stationary starting CoF is comparably bad.

Just a 0.05 degree difference from the common standard of 0.1 is not a big deal, but overall it means Naginata will have trouble reliably hitting far away or small targets even with the first few shots of the burst.

Advanced CoF Mechanics

This is where it gets interesting.

When standing still and aiming down sights, Naginata’s maximum CoF will be much smaller than usual.

Normally, maximum CoF is 3 degrees for ADS and 7 degrees for hip firing.

But Naginata is different:

Maximum ADS CoF while standing still: 0.6
Maximum ADS CoF while crouching still: 0.4
Maximum Hip Fire CoF while standing still: 4.25

In other words, Naginata will only bloom for the first 5 shots while staying still.

As a result, Naginata can provide relatively accurate sustained fire. 

But there is another effect.

As you may know from Rule 1 of Advanced CoF Mechanics, if you change stances and your Current CoF is larger than Maximum CoF for your new stance, your Current CoF will reduce to match the Maximum CoF.

So if you fire on the move and bloom your CoF too much, instead of stopping your burst you can stop moving for a moment to “reset” your CoF.

So with Naginata you could use stutter stepping instead of burst firing to boost accuracy on the move.  Or even crouch. 

Recoil

As pulled from DBG API by planetstats, here are Naginata’s recoil stats:

Vertical Recoil: 0.8
Recoil Angle: -1.5 / 1.5
Horizontal Recoil: 0.16 / 0.16
Horizontal Recoil Tolerance: 0.4 (max 2 bounces in one direction)
First Shot Recoil Multiplier: 1.8x
Recoil Decrease: 13

Naginata has very high vertical recoil, even larger than notorious Gauss SAW, which has Vertical Recoil of 0.55 and fires much slower. 

Recoil angle is largely irrelevant and horizontal recoil pattern is very tight. 

Recoil Decrease is slightly above average for LMGs, but coupled with very high Vertical Recoil Per Second, burst-firing Naginata can prove challenging. 

Battling the vertical recoil is pretty much the main thing you will be doing while using this weapon.

Effective range

Naginata has a carbine-tier Projectile Velocity. 490 m/s is very low for an LMG.

Coupled with below average ADS accuracy, relatively low bullet damage and very high vertical recoil, Naginata will have limited effective range, despite very tight horizontal recoil, and even if you stand still. 

Going outside effective range

As long as you can stand still and fire from safe cover, Naginata will remain relatively effective in engaging exposed enemies, even if they are too far for comfort. 

Since Naginata can unleash and sustain a large volume of fire, you are bound to kill the enemy, eventually. You will have to compensate for bullet drop and bullet travel time, though.

Attachments

Scope

Due to high vertical recoil and limited effective range, it is better to stick to 1x scopes.

2x should be usable, but unnecessary. If the target is too far away to be comfortably engaged with 1x scope, it is probably outside your effective range anyway.

Rail

The default choice here should be the Forward Grip. While Naginata already has great horizontal recoil by default, it is the only thing limiting your accuracy.

In theory, you can compensate for 100% of the vertical recoil, you have “locked” CoF while standing still, and there is no recoil angle variance. 

So using a Forward Grip will increase your maximum potential accuracy. 

Extended Mags only increase magazine size by 45 rounds (+50%), while most other LMGs get +100% bonus. 

With a very fast reload and risks associated with sustained fire, you are unlikely to need more than 90 rounds at a time, making Ex. Mags not valuable.

Naginata’s LMG-tier hip fire accuracy and increased hip fire bloom make Laser Sight and hip firing in general not very viable.

Barrel

Naginata has access to Flash Suppressor and Compensator.

Both are viable, but in this case Compensator is much more useful

While one could make an argument that removing muzzle flash would conceal your position and let you stand still and go full auto with more safety, it’s still dangerous and bound to attract attention of enemy snipers.

To avoid being killed too fast, you would want to activate overshield in advance, turning yourself into a big glowing target, and then removing the muzzle flash doesn’t do much.

Compensator will reduce the harsh vertical recoil, which is probably the most valuable effect you could get from an attachment for Naginata.

Ammo

Naginata has access to both SPA and HVA

Naginata Ammo Attachments
image is clickable

Due to unusual maximum damage of 150, Naginata doesn’t suffer an immediate penalty to bullets-to-kill when going outside maximum damage range.

As opposed to some other weapons, where increasing maximum damage range from 10m to 15m is a big deal, it is not for Naginata. 

As you can see on the graph, SPA will improve performance in 10m – 30m bracket, while HVA will improve performance in 30m – 85m bracket.

Both offer very small bonuses of up to 1.5% (SPA) and 5.2% (HVA) damage increase in best case scenario. Both are viable, but with Naginata being a relatively close range weapon, SPA will probably be more useful

Optimal engagement

The ideal engagement for NSX Naginata is somewhat reminiscent of MCG Mini-Chaingun, where you would want to spin it up, and then abuse the static ADS CoF to take out multiple enemies. 

The main difference is that NSX Naginata has to be stationary, but actually has accuracy to feasibly kill people at range. 

So with NSX Naginata you would want to find a position with good cover and minimal exposure, open only in a small arc in front of you, so you can sit still and fire with relative safety, and mow down exposed enemies as they come by.

Naginata makes a great defensive LMG, or when moving from cover to cover. But you absolutely don’t want to stand still and fire out in the open. Even with overshields, it’s just suicide. 

Don’t get stuck on “optimal”!

Don’t get dragged into line of thinking that you need to be always stationary while using Naginata. It is slightly not as good on the move as other LMGs, that’s it. And you can compensate for it with burst firing or stutter stepping.

Most of the time, especially when you’re under fire, you will still want to move while firing.

Only stand still to engage when you have full health and overshield energy, and only behind cover, and preferably when you engage first. 

Recommended Heavy Assault Loadout

In order to live up to Naginata’s high uptime, you will need a loadout that leaves you with the least downtime, and makes you tanky at the same time.

The cheapest, easiest to use and the most reliable combination would be Advanced Shield Capacitor with Resist Shield and Med Kits

With a combo like that, you spend the minimal amount of time recovering in cover, and the most effectively engaging enemy from cover, which is where both the Naginata and Resist Shield thrive the most.

Battle Hardened seems like a good implant to combine with all of that, to give you more potential to outshoot the enemy while tanking their fire. 

The rest of the loadout is up to situation and preference.

A minute of sad realism

Naginata is pretty much a heavily nerfed LMG with a ton of vertical recoil and a gimmick that you won’t be able to use in the majority of normal engagements. 

Like Phaseshift, it’s a cute little weapon, but alternatives are more reliable and much simpler to use. 

If you’re looking for effective, simple, tried and true, you should stay away from Naginata.

If you’re looking for high skill cap / high reward weapon, a weapon that could take months to master, but if mastered would slay legions before you…

… you should still stay away from Naginata.

If you’re a tired and bored veteran and a weapon mechanics nut, if just “killing” enemies heats your blood no longer, and now it’s more about “how” you kill enemies – then Naginata can add color to a few evenings. 

Nonetheless, it is a good attempt, and it is very inspiring to see developers bend the borders of conventional weapon mechanics like that, and I look forward to using the Naginata and other upcoming NSX weapons.

The guide is now concluded, feel free to comment or ask questions below.

Adding Naginata into Weapon Simulator

If you want to add NSX Naginata into my Weapon Simulator, add this string to the end of the Stats.csv file, which you can open with Windows Notepad:

804249,NSX Naginata,NS,LMG,150,10,125,65,1,91,1,0.55s / 0.64s / 0.64s,,-,90,450,4000,2800,0.5,0.12,0.06,3,2.25,4.5,5,4,0.15,0.15,0.4,0.35,-1.5,1.5,0.8,0.16,0.16,0.4,1.8,13,Auto,0

Keep in mind that it won’t properly simulate Naginata’s CoF mechanics, but you can still use it to check out TTK at various ranges or compare attachments.