Most people understand weapon statistics at a basic level, like “more damage is good”. But sometimes they look at the wrong statistics, or make wrong conclusions. With this guide I hope to explain which weapon stats you should look at if you want to properly analyze a weapon.
You’re going to need:
- Understanding of Weapon Mechanics.
- Knowledge of how to use the Daybreak Census API to access detailed weapon stats
- A set of tools, such as Weapon Simulator and Toolbox
- At least 100-200 kills with the weapon are highly recommended.
It’s worth noting that Weapon Analysis is essentially theorycrafting, and theory can and will differ from practice, and practice always takes priority. The main point of Weapon Analysis is to explain WHY a weapon behaves a certain way.
Damage
There are many ways you can look at weapon’s damage. First is damage itself:
Max Damage @ Max Damage Range - Min Damage @ Min Damage Range
You can read all about it here. To quickly recap:
Bullet Damage is more important for ranged combat, where individual hits are easier to get than sustained automatic fire. High bullet damage also makes it harder to regulate incoming damage on the receiving end.
In close quarters, DPS becomes a more important statistic.
DPS = Bullet Damage * Rate of Fire / 60
Overall, it’s preferalbe to use DPS rather than TTK to judge a weapon’s damage output, since DPS is always objective, and does not depend on the target having a certain amount of HP or resistances. PlanetSide 2 targets are diverse, and besides infantry can include a lot of other targets. Infantry health itself is highly variable as well.
We can’t talk about damage and DPS without mentioning Rate of Fire. High Rate of Fire is crucial for CQC, as it makes damage output more consistent, and makes it easier to always inflict at least some damage to the enemy.
Of course, we can’t completely ignore TTK. It is an important tool for analyzing weapon’s performance against typical targets. The most common scenarios are standard infantry (1000 effective HP) and full nanoweave infantry (1250). I prefer to go for “worst case scenario”, and mostly look at full nanoweave numbers.
Contextually, it may be important to take a look at TTK against Infiltrators (900 effective HP). A good example would be Commissioner, which has noticeably lower TTK against them.
For semi auto weapons, Bullets-to-Kill is arguably more important than TTK, as it determines how many “clicks” you need to kill the target.
BTK = Round_Up(Target Health / Bullet Damage)
TTK = (BTK - 1) * Refire Time
Refire Time = 60 / Rate of Fire
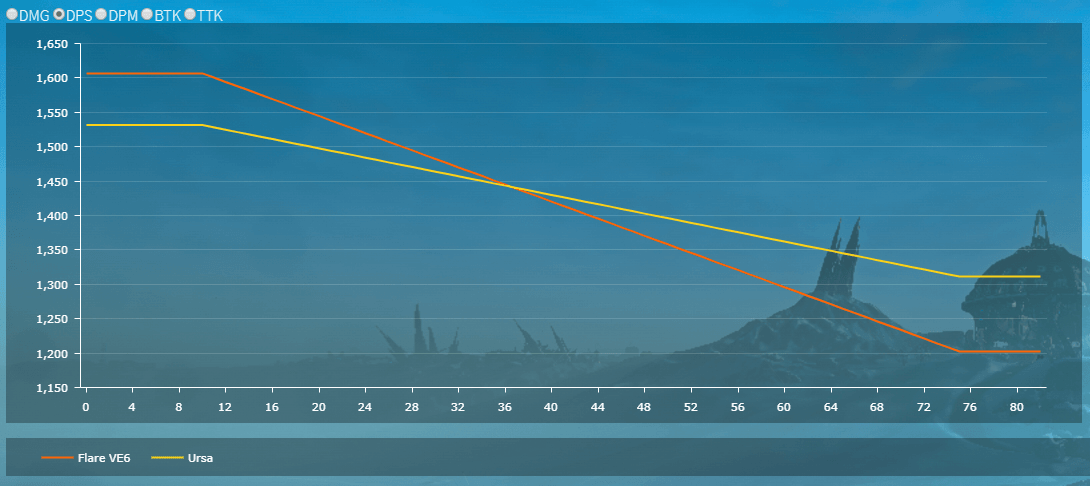
Weapon’s damage will change depending on range to the target, and so will DPS, TTK and BTK. It’s important to analyze the weapon fully, over its whole effective range. Many people make the mistake of taking a look only at maximum damage numbers.
Headshot and Legshot damage modifiers are important as well.
Magazine Size
This stat on its own is fairly useless, since it doesn’t take bullet damage into account. Damage Per Magazine is a more objective statistic, so that’s what you should be mainly looking at.
DPM = Damage * Clip Size
DPM affects how reliably a user can take out at least one target before needing to reload, and how many enemies can be killed in one magazine, which is useful in flanking situations.
Obviously, the more DPM- the better, but after a certain plateau of ~6000 DPM, it stops mattering in regards to reliably killing one target, and we enter the realm of the weapon being able to sustain through several engagement, or continuously damage MAXes or light vehicles.
There is also a certain plateau where DPM can get dangerously low. Eridani and Tomoe are such weapons. I’d say the weapon needs at least 4000 DPM to be wielded somewhat comfortably. Anything lower, and you get a strictly 1v1 ambush weapon.
Due to damage degradation, DPM will vary at different ranges, so you’ll have to take that into account as well.
More DPM reduces the chance of being forced into Long Reload.
Ammo Pool
This is the amount of ammunition a player carries with him. More ammo is always good, and it decides how independent a player can be; how much does he need to rely on things like Ammo Belt and Ammo Printer, and how tethered he is to engineers and terminals.
Ammo Pool isn’t a factor for most weapons, as they have more spare ammo than an average player can realistically spend in one life, but there are exceptions, such as Stalkers using burstfire sidearms.
Same as Clip Size, you should take bullet damage into account. Up to you which range you want to use.
Reload Time
Reload time mostly speaks to user comfort rather than combat effectiveness. Mostly you should be looking at Short Reload, since it’s much more likely to encounter, unless we’re talking about a weapon with low DPM.
Reload time is more important for CQC weapons. Ironically, they usually have longer reloads than ranged weapons. Reload time is less important for Infiltrator and Light Assault, since they often can find a safe haven to reload & recharge, or die during attempted ambush before having a chance to enter a reload.
Effective Range
Initial Accuracy
Hip Firing
For Hip Firing, you want to mainly be looking at Standing Moving CoF.
For high damaging semi-auto weapons, the smaller the CoF – the better. Commissioner is a great example – due to its great initial accuracy, it can land devastating headshots from the hip even if the enemy is a quite a few meters away.
For automatic and burst fire weapons, smaller CoFs are better only to a certain plateau of ~1.5 – 2.0 degrees. Smaller than that and Hip Fire becomes too accurate, and it becomes difficult to spray enemies in close quarters.
Aiming Down Sights
All CoFs are relevant, and you always want them to be as small as possible. However, you are still mainly looking at Standing Moving CoF, since it is the most common and safest stance.
Cone of Fire Bloom
There are several ways you can look at CoF Bloom.
1) CoF Bloom per shot itself. It’s more important for semi-auto weapons, especially those that don’t spam shots, like Semi Auto Sniper Rifles.
2) CoF Bloom Per Second = CoF Bloom * Rate of Fire / 60
This statistic matters only in one specific scenario: if the user goes full auto, but momentarily loses crosshair placement on the target. I.e. he’s shooting past the target for a few moments.
A weapon with low CoF Bloom Per Second can just return the crosshair placement on the enemy and keep firing.
A weapon with high CoF Bloom Per Second will likely have to restart the burst, losing a bit of TTK, and subjecting the user to FSRM and Recoil Recovery. If the user doesn’t restart the burst, he’s risking to lose even more TTK, because CoF blooms too much.
3) CoF Bloom Per Point of Damage Done = CoF Bloom / Bullet Damage
This statistic with an extra long name ties weapon’s damage output to accuracy loss. This allows you to objectively determine which weapon requires more burst firing, even with perfect accuracy, and regardless of weapon’s RoF or DPS.
CoF Recovery
It seems that all weapons follow the same principle: after a final shot in a burst, the weapon waits for a Refire Time, and then starts recovering CoF at a rate of 20 degrees per second.
PS2 weapon mechanics allow to have an additional CoF recovery delay, but none of the weapons use it.
Knowing this you could calculate ideal delay between bursts, based on accumulated CoF, but it would be next to impossible for a player to take advantage of it.
Burst Firing
Together, Initial Accuracy and CoF Bloom determine how much you need to burst fire a weapon. But how good is a weapon at burst firing is mostly determined by recoil statistics.
Angular Size Research
There is no single definition for weapon’s effective range. I prefer to use this one:
Effective range is range where an automatic weapon can reliably kill an enemy in one long burst, ignoring recoil and assuming perfect crosshair placement.
Normally, we would rely on Angular Size research to determine the effective range of the weapon, but unfortunately it was proven to be wrong, and at this time there is no way to even approximately calculate it.
Recoil Analysis
All of these recoil statistics can be calculated via Toolbox.
Stability
Average Horizontal Deviation
This is the average distance between the crosshair during firing and its original position. Small AHD statistically guarantees the weapon will not deviate from the center too much, and it’ll be easier to hold aim on target.
Maximum Horizontal Deviation
This statistic doesn’t matter very much, but abnormally big difference between MHD and AHD can indicate that the weapon can sometimes spin out of control, despite being fairly controllable otherwise. A Probability Distribution Graph should show how likely it is.
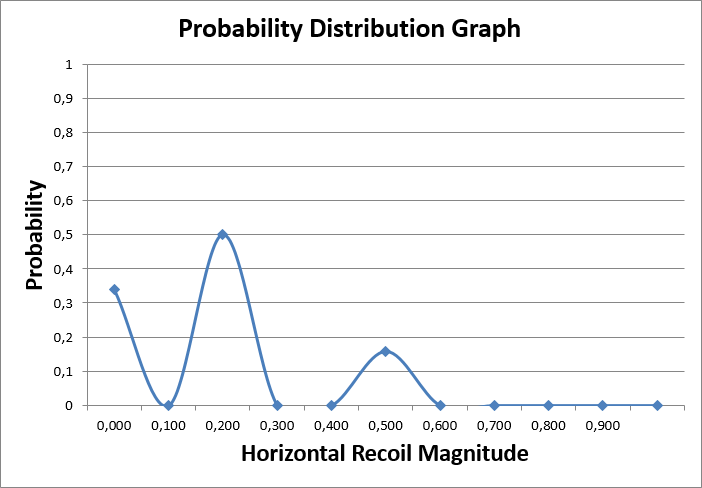
On average, MHD should be about 2.5 times larger than AHD. Lower is good.
Recoil Angle Variance
RAV = ABS(ABS(Maximum Recoil Angle) - ABS(Minimum Recoil Angle))
High RAV can mess with the whole Recoil Pattern, and it makes burst firing especially hard.
Rate of Fire
The faster a gun fires, the faster Horizontal Recoil can screw you over.
Ease of Handling
Vertical Recoil Per Second
VRPS = Vertical Recoil / Refire Time = Vertical Recoil * RoF / 60
VRPS is a more objective alternative to Vertical Recoil Per Shot, and it’s directly proportional to the speed at which you need to drag the mouse to compensate for Vertical Recoil.
Low VRPS makes a gun considerably more convenient, it increases weapon’s effective range, effectiveness of burst firing, and makes it easier to get multiple headshots with first few shots.
Rate of Fire
With VRPS being equal, it is preferable to have higher RoF. A combination of Low Vertical Recoil Per Shot and High RoF is more comfortable for the user than high Vertical Recoil Per Shot and Low RoF.
The best example would be the notorious Gauss SAW, which gets a lot of heat for its Vertical Recoil, despite the fact that it has lower VRPS than CARV and Orion even without the Compensator.
Average Recoil Angle
ARA = (Maximum Recoil Angle + Minimum Recoil Angle) / 2
In theory, it’s possible to fully compensate for the Recoil Angle, as long as there isn’t too much variance. In practice, same as with Vertical Recoil, lower angle is always good, and it is preferable to have the gun recoil straight up.
These statistics are important for tap firing and burst firing.
Projectile Speed
Determines how comfortable is the weapon at range, how much the user needs to compensate for bullet drop (if this weapon’s bullets are affected by Gravity at all), or lead a moving target, how fast can the user adapt to target’s movement.
High velocity increases weapon’s affinity to being Suppressed. It doesn’t matter that much on CQC weapons, but generally – the more, the better.
When coupled with Projectile Lifespan, determines weapon’s maximum range. Usually it’s not important, but can be crucial in certain edge cases, like super long range sniping:
Spectre’s bullets have lifespan of 1.25 seconds. Normal velocity is 570, suppressed velocity is 570 * 0.6 = 342. That would put theoretical maximum range at 712m normal and 427m suppressed.
Misc. Stats
These stats are of some importance, and should be considered and put on display.
Equip Time determines how good is a weapon for quickdrawing. For example, a Combat Medic might prefer a weapon with a shorter Equip Time to be able to faster switch to it if he gets caught with a Med Tool in hands. Same thing for other classes.
Equip Time also affects how fast a weapon recovers after a quick melee attack or a grenade throw.
Faction. Having a cross-faction weapon can be both a blessing and a curse, since it will make it impossible for both allies and enemies to identify the user as belonging to a certain faction, judging by the sound alone.
This is just something to keep in mind, since the overall impact of this factor cannot be measured objectively.
Scope-In Time. How long does it take to ADS. Normally, it would be a crucial stat, but it’s usually the same for weapons within their category, so it’s not an important point for weapon analysis.
Sprint Recovery. A delay before a weapon can be fired after you stop sprinting. Especially important for CQC weapons, though, once again, it’s the same for most weapons.
Fire Detect Range. Self-explanatory.
ADS Speed Multiplier. The higher, the better. A lot of people don’t understand relationships between percentages, and don’t realize that 75% ADS equates to 50% faster movement during ADS.
Higher ADS Speed is a survival trait, as it allows to dodge more of enemy fire while dishing out accurate shots yourself.
Specific Cases
Bolt Action and Pump Action
For these weapons, the most important statistic is Chamber Duration, as it determines their effective rate of fire.
Spool-Up Weapons
Some weapons, like T7 MCG, start firing at lower RoF, and then gradually spool up to their maximum rate of fire. So you have to look at three stats:
- Initial RoF
- Spool Up Time
- Maximum RoF
Shotgun
Total Damage Per Shot. Mostly important for quick-melee combos, and determines weapon’s performance in ideal situations, though it’s important to realize that shotguns very rarely meet them.
Damage Per Shot = Pellet Damage * Pellets
Pellets Per Shot. Speaks to weapon’s consistency. With all else being equal, it’s better to have as many pellets as possible, as it reduces the effects of RNG.
Pellet Spread. Affects weapon’s effective range. It’s always important to take into account Cone of Fire as well, and look at Pellet Coverage:
Pellet Coverage = Pellet Spread + Cone of Fire
This is shotguns’ version of “Initial CoF”.
Cone of Fire affects where Pellet Spread can land, and overall makes the weapon less consistent by double dipping into RNG. Ideally, you don’t want to have any CoF at all.
Pellet Spread is what makes a shotgun, so while smaller Pellet Spread makes the weapon more accurate and increases effective range, you still want to have some spread.
Ideally, you want Hip Pellet Spread to be somewhere around 1.5 – 2.0 degrees, and ADS Pellet Spread around 0.5 – 1.0 degrees.
Burst-Fire Weapon
Very similar to analyzing an automatic weapon, but with a concession that the weapon can be harder to use optimally.
The requirement to click at a very specific rate of fire can make it harder to reach maximum rate of fire, and it can be harder to keep the crosshair over the target, as the user also has to compensate for uneven recoil while clicking.
Complete lack of a semi-auto mode on a burst weapon should be counted as a disadvantage, as it means the gun can’t be tap-fired to snipe deployables or players massively out of weapon’s effective range, though obviously those are niche uses that are likely to be meaningless for most players.
In addition to shots to kill, it may be prudent to also look at “bursts to kill”.
Obviously, First Shot Recoil Multiplier plays a big role. It’s kind of controversial. On one hand, you want FSRM to be as small as possible, to ensure the first two shots in a burst land as closely as possible. On the other hand, you want FSRM to be close to 1x, so the recoil is evenly distributed during the burst, so it is easier for the user to emulate a fully automatic weapon. One thing is certain: you definitely don’t want FSRM to exceed 1x.
Vertical Recoil Per Shot is important as well. On weapons with long bursts, Vertical Recoil Per Second could be a more objective stat to look at.
Look up this on how to calculate damage per second and damage per minute of a fixed burst weapon, and keep in mind that burst weapons tend to have recoil scaling.
Semi Auto Weapon
For semi auto weapon, Vertical Recoil and Tap Firing Speed, as well as CoF Recovery are the most important statistics.
When looking at TTK and BTK, it could be prudent to look at how many bodyshots a weapon needs after a headshot opener. E.g. one of big advantages of Commissioner over Underboss is that Commissioner has much longer range of 1 headshot + 1 bodyshot combo.
Or the fact that Blackhand reliably kills an enemy with 1 headshot + 1 bodyshot within ~60m, makes it considerably more comfortable to use.