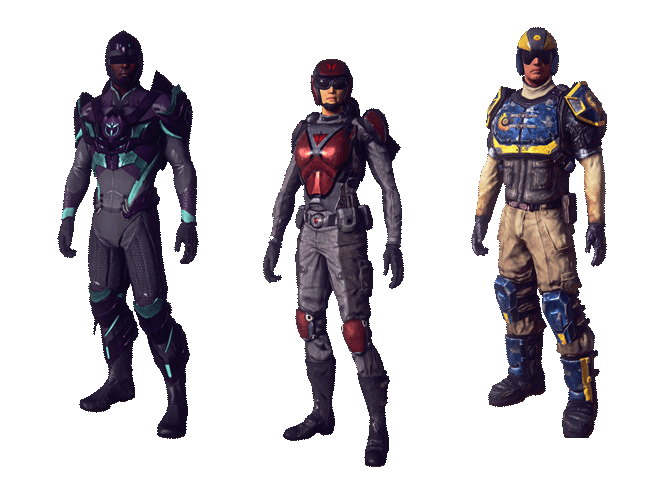
Light Assault is a mobile infantry unit, proficient in flanking and harassing. Equipped with a Jet Pack, Light Assaults can fly to bypass enemy defenses or scale natural obstacles, and attack enemies from unexpected angles, and in some cases even dodge enemy fire.
Light Assaults have a large arsenal of close and medium range weapons. Their tool is the Rocklet Rifle, a versatile rocket launcher that deals moderate damage to vehicles and hovering aircraft, and can be fired accurately while flying on the Jet Pack.
Light Assaults are infamous for using C4 to deal devastating damage to all targets at close range.
Light Assaults do not have the staying power of a Heavy Assault, but superior mobility ensures they can deliver a precise and powerful strike where it will hurt the most.
Due to their mobility, Light Assaults tend to move independently from their allies, and if not careful, can find themselves fighting solo against an army, and often risk dying in a position where allied medics will be unable to revive them. So Light Assaults usually have to rely on stationary spawns to stay in a fight.
Equipment
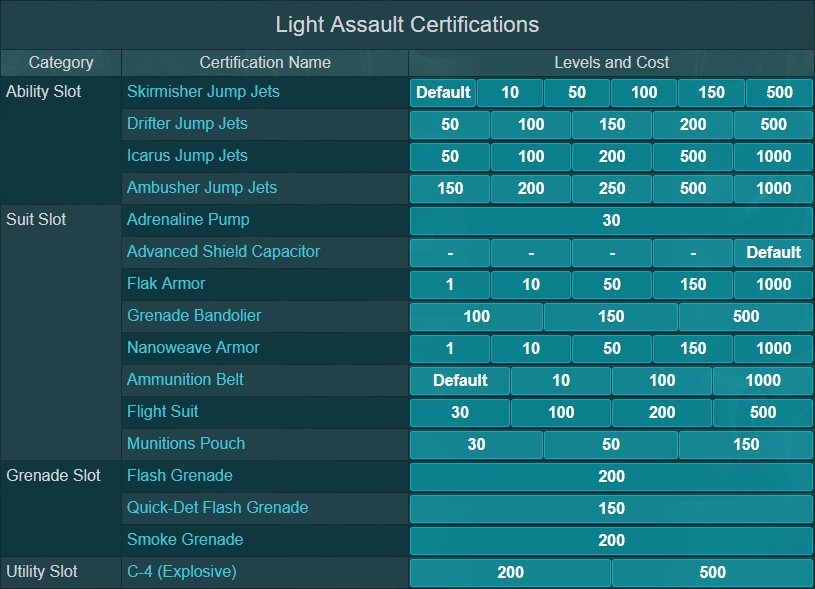
Starting Equipment
The following equipment is unlocked for Light Assault by default:
- Advanced Shield Capacitor 5 and Ammo Belt 1
- a starting carbine with Laser Sight and 1x Reflex Sight
- a starting shotgun with Extended Mags and 1x Reflex Sight
- Skirmisher Jets 1 and Drifter Jets 1
- Rocklet Rifle
- Frag Grenade
- Auxiliary Shield (+50 Shields)
This gear is perfectly competitive and more than enough to get you started. You shouldn’t feel hard pressed to unlock lots of new gear just so your Light Assault loadout becomes viable. That said, you definitely want to eventually path to Standard Loadout below.
Standard Loadout
Cookie-cutter Light Assault loadout looks like this:
- Primary Weapon: carbine
- Sidearm: Commissioner or up to preference
- Tool: Rocklet Rifle with default rocklets
- Ability: Skirmisher Jump Jets 4+
- Suit Slot: Nanoweave Armor 4+
- Grenade: Frag or up to preference
- Utility Slot: C4
- Implants: Regeneration + any other implant you prefer / have access to.
- Melee: Power Knife if you can handle it, standard knife otherwise.
These are most combat effective and versatile options. You still should adapt your loadout to situation, personal playstyle and directive hunting, but there isn’t much wiggle room, as other options are directly inferior or too specialized to be used all the time.
Adjust loadout for night time
Night makes some things harder to see, and some things easier to see. Muzzle flashes and flames from the Jet Pack become more noticeable, while immobile players can easily blend in with background.
Playing with Shadows enabled makes nights much more darker.
Look into using such attachments as Flash Suppressor, Suppressor and HS/NV scope.
Dark camouflage can be helpful if you take advantage of it, but even with default camouflage you will be harder to see in darkness. Enemies with HS/NV scopes will be able to see you no matter what camo you have, so try to stay out of their range and move to flanking positions only while being covered by terrain or buildings. This will also help conceal your Jet Pack flames.
Primary Weapons
Light Assaults have access to carbines, shotguns and SMGs.
Carbines are close to medium range automatic weapons. Compared to Assault Rifles, they deal slightly less damage at range, and tend to have more recoil, but better hip fire accuracy. There’s a great variety of carbines, some of them can be specialized towards CQC, others for ranged combat.
Most importantly, carbines retain walking hip fire accuracy while jumping and flying on a jet pack, allowing Light Assaults to effectively engage enemies mid-air. This quality is not shared by any other weapon class.
Affinity for aerial combat and sheer versatility and effectiveness of carbines makes them the best primary weapon choice for LA.
SMGs are short range automatic weapons with defensive traits – excellent hip fire accuracy and mobility. They have good DPS, but short effective range due to bad ADS accuracy and strong damage degradation, and most of them have enough ammo to deal with only one target at a time.
Shotguns are great at quickly killing vulnerable enemies at extremely short range, but get weaker as the distance grows. The big part of using a shotgun is the skill of getting close enough to the target before being spotted or killed. Naturally, for an LA it is much easier to safely get close to the target.
LA’s relationship with weapons
In outdoors combat, LA can often take cover in a position that’s unreachable to enemies, and can remain there for as long as needed, so reload and shield recharge times are not a problem.
As long as there is cover to maneuver around, Light Assault can gain an advantage by engaging on his terms, from a flanking position and controlling his exposure.
This helps to offset lack of effective long-range weaponry, but leaves LA weak in plain field without cover.
Indoors, Light Assaults maneuver in and out of the building, and fly above and behind enemies, unloading at exposed targets.
The ability to engage enemies with a carbine while flying creates a unique playstyle, with a heavy accent on maneuvering around enemies, and exploiting unexpected angles of attack.
Sidearms
Light Assaults use the same sidearms as everyone else.
Most often, sidearms are used when the player can’t escape to safely reload the primary weapon, and fighting is the only option. Breaching Light Assaults often bite off more than they can chew, and hip firing tends to waste a lot of ammo, both while flying and in general, so it’s important to have a reliable sidearm on hand.
Sidearms become especially important as a finisher if you use a primary with low damage per magazine.
For example, most VS carbines feature only 143 * 30 = 4290 damage per magazine, which can be not enough to deal with a shielded HA at medium range, or simply if the target is running away or otherwise actively dodging your fire.
Light Assaults can also often get into great positions for sniping, which makes NS-44L Blackhand sniper revolver of special interest, as it provides an effective way of killing enemies at long range, which is normally Light Assault’s weak point.
Even if you’re rocking such a ranged beast as AC-X11, Blackhand can be used to surgically remove a player at long range behind cover with double tap headshots.
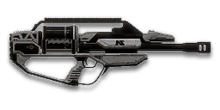
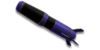
Rocklet Rifle
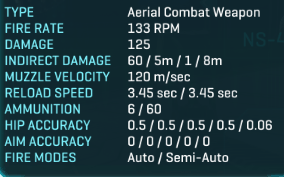
Item ID: 802768
Fire Rate in burst mode: 600
CoF Bloom in burst mode: 0.75
Rocklet Rifle is a drum-fed rocket launcher with two firemodes: Left Clicks fire single rockets with high accuracy, and Right Click will dump the remainder of a drum at a high rate of fire and decaying accuracy.
6 rocklets are roughly equal to 1 rocket from HA’s default dumbfire launcher. Rocklet Rifle isn’t very powerful against vehicles on its own, and in order to destroy vehicles quickly, requires either concentrated fire or using C4. However, just harassing an enemy vehicle can be enough to persuade it to leave.
Rocklet Rifle retains the same accuracy while flying on a Jet Pack.
Rocklet Rifle is weak against infantry, as even landing a whole burst, which is only possible at very close range, deals only 750 damage. Rocklet Rifle’s Indirect Damage is not applied to infantry, and refers to Flak capabilities of default ammunition.
You can calculate Rocklet Rifle damage to various vehicles using the Toolbox. You will find the Rocklet Rifle under Aerial Combat Weapon category.
Rocklet Rifle has 3 ammo types:
Default

Default ammunition deals moderate damage to ground targets, and has a Flak effect: rocklets will automatically detonate within 5m of an aircraft and deal splash damage. However, low rocklet velocity makes it hard to hit an aircraft, unless it’s hovering at low altitude.
Typhoon Rocklets
249 ![]() or 500
or 500 ![]()
Typhoon Rocklets deal ~12% more direct damage, and they replace the Flak effect of standard rocklets with a tiny amount of splash damage against infantry and MAXes. Typhoon Rocklets have slightly reduced rate of fire and significantly more projectile drop, and a shorter effective range overall.
Currently there is no particular scenario where Typhoon Rocklets would be mandatory or important. Consider using them if you don’t plan on using the Rocklet Rifle against distant targets and aircraft.
Direct Damage: 140
Direct Damage Type: 34 – “Infantry Rockets”
Indirect Damage: 25 @ ?m – ? @ ?m
Indirect Damage Type: 6 – “Common Explosion”
Locklets
249 ![]() or 500
or 500 ![]()
 This ammunition will change how Rocklet Rifle functions: it will be able to lock on to vehicles and aircraft within 150m, but makes it unable to fire without a lock, and removes burst mode entirely.
Lock Range: 150m
Lock Hold Range: 200m
Lock-on Time: 1 sec
Lock Loss Time: 0.75 sec.
Locklets keep the Flak effect versus aircraft. There are no documented cases of Locklets being used effectively.
Tips
Rocklet Rifle isn’t very strong on its own. Don’t expect to kill droves of vehicles without some outside help. But it’s a valuable source of additional damage against vehicles that are already being engaged by your allies.
Use different firemodes depending on range to the enemy vehicle:
- Close range – right click to quickly fire a burst, and use cover to safely reload.
- Medium range – fire 3-4 Rocklets in single shot mode, and then rapidly dump the remaining 2-3 Rocklets, which should remain accurate enough to hit a large target like a vehicle.
- Long range – only use the single shot mode.
It’s a common technique to sneak behind an enemy vehicle, deploy C4, and then combo it with a burst from the Rocklet Rifle.
When you do this, always detonate C4 manually. While you can detonate it with Rocklets themselves, it will be a net loss in overall damage. Rocklets only have splash damage versus aircraft, so the only way you can detonate C4 is with a direct hit, and Rocklets that directly hit the C4 will not deal damage to the vehicle.
Lightnings without Flanker Armor will be destroyed with one C4 and one full Rocklet Magazine in the rear armor.
Lightnings with full Flanker Armor will have 50% HP remaining after one C4, and will require two 8 rocklets (regardless if Typhoon or not) in the rear armor to finish them off. Often it’s safer to just use 2x C4.
MBTs without Flanker Armor will require one C4 and two full magazines in rear armor. Often it’s safer to just use 2x C4.
MBTs with full Flanker Armor will be damaged by 2x C4 into a burning state, and then one Rocklet Magazine into rear armor will finish them off.
Default and Stealth Sunderers are destroyed with 2x C4 and 2x Rocklet Magazines. Usually you would detonate C4 first, and then finish off with Rocklets.
Blockade Sunderers require 2x C4 and 5x Rocklet Magazines.
Deployment Shield Sunderers require you to first strip the shield with 4 Regular Magazines or 3 Typhoon Magazines, then damage the Sunderer into a burning state with 2x C4 and another Rocklet Magazine, and then finish it off with another Rocklet magazine. Example.
Ability: Jet Pack
This lengthy video explains everything you need to know about the Jet Pack.
“Hanger”
The idea behind Hanger is to float above the enemy when there is nowhere else to hide. Prerequisites:
- High ceiling
- Combat nearby, so enemy will not hear your jet pack sound
- Enemy has no opportunity to see you above himself unless he specifically looks upwards
Skirmisher Jump Jets

Also traditionally known as just “Jump Jets”.
The universal middle ground of the Jet Pack world, Skirmisher Jump Jets offer average performance in just about any task. They are the most versatile, and the recommended choice for most situations.
Upgrading increases fuel capacity and recharge speed by 8/11/14/17/20%.
Drifter Jump Jets

Drifter Jets maximize horizontal mobility at the cost of vertical mobility. They allow to glide – drift – though the air for a prolonged period of time, and recharge fuel quickly.
Their downside is that you gain height slowly, and only when not pressing any directional movement keys. This puts a strong limitation on versatility and combat movement.
You can also drift along the ground, moving a bit faster than sprint, but you still can’t make rapid course corrections.
Hitting a bump or an incline while drifting along the ground can slow you down, and you should hold [Crouch] to prevent that.
Drifters are also very good at climbing uphill: hold [Forward], [Jump] and [Crouch] at the same time and face the hill. When climbing like that, you can gain height much faster than Drifters normally allow.
Drifters have 15 seconds of air time at rank 1, upgrading increases it by 4/7/11/15 seconds. Same recharge time of 6 seconds at all ranks.
On a full burn, Drifters can actually gain more height than Icarus or Skirmisher Jets, but will take much longer to do so.
Overall, Drifters are very good at getting you to an objective, as long as it’s at least slightly below you. In other words, Drifters are great at moving between bases and between buildings, but not so great at maneuvering inside and around buildings.
To move upwards faster than crawl, you will need external help: uphill terrain to climb along, a Jump Pad or a Gravity Lift. Ditching an aircraft to start drifting at high altitude is also a common trick.
Due to lack of versatility and upwards speed, Drifters are rarely used effectively. Their main application is hunting enemy vehicles.
Here are some spectacular, but sorely outdated videos about Drifters:
Icarus Jump Jets
Compared to Skirmisher Jets, Icarus Jets provide significantly stronger vertical thrust and fuel recharge rate at the cost of in-air maneuverability and overall fuel capacity.
Icarus Jets simply hurtle you into the sky. They’re rather unforgiving if you miss your landing spot, but the energy regeneration is enough that you will be able to save yourself before you hit the ground. The thrust is powerful enough that even if you only have a fraction of your fuel left you can still make a quick hop up (usually about 1 story).
You can still employ the tapping movement method to get from ledge to ledge, but you need to be more careful since the fuel gets consumed so quickly you’re relying on regen to keep you up and your forward movement, and momentum between bursts to keep you moving forward. In a smaller scale, if you’re in danger, the Icarus Jets can get you out of a doorway in a split second.
They are great for getting around most bases and getting the upper hand on your opponents on the fly (pun intended). Or for getting out of hairy situations quickly.
Icarus can do some slow convulsive horizontal movement, but for the most part they lose the ability to speed drift. You can still do limited slingshot maneuvers with the help of a Jump Pad, or using a physics trick described in DarkFlight’s video below.
You can’t float in the air to drop C4 (C4 fairing). Precise movement – when you need to get exactly on that ledge or tree branch – is possible, but doing it feels like doing a surgery with a chainsaw.
Ironically, Icarus’ strong vertical thrust is what makes them hard to use – Icarus will often overshoot you, and you’ll be left hanging in the air for a second, completely exposed. You can prevent this by letting go of the [Jump] key before actually reaching the ledge, but it’s something that requires a lot of experience with Icarus specifically.
Tip: According to my tests, the highest fall you can survive with Icarus without Safe Fall implants is around 75m.
Icarus Jets have distinct disadvantages, and do only one thing well. As belthazor3457 has eloquently put it in his brief video review, it’s a one-trick-pony.
That said, when used with impeccable precision, Icarus Jets can allow for extreme mobility when moving about bases, as demonstrated in this video by DarkFlight:
He also has more examples in this video.
How to perform DarkFlight’s trick:
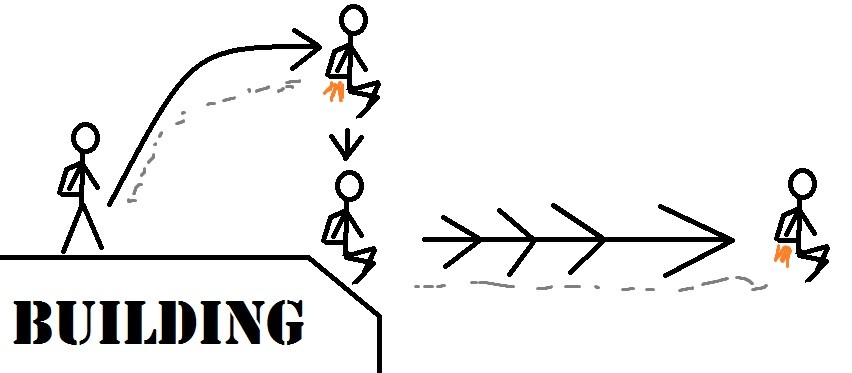
Fall on a sloped surface and start jetting a moment before you touch it. The physics engine of the game will make you bounce from it and propel you horizontally at great speeds. Keep engaging the Jet Pack to maneuver and keep altitude.
Technically, depending on the type of the sloped surface, this can be done with any type of Jet Pack, or even without the jet pack at all, but Icarus does it the fastest, and benefits the most from it.
Here’s some uncut gameplay with Icarus Jets:
Wrel’s video review:
Ambusher Jump Jets
![]()
When activated, Ambusher Jets propel you forward and slightly upward at incredible speed.
Note: As of 25th July 2019, Ambushers have been updated to work in the same was as other jump jets in term of energy utilisation. Any implants or suit slots that fully refunded Ambusher Jump Jet fuel has been updated to work in the same way as they would other Jump Jets.
Unlock cost: 150 / 200 / 250 / 500 / 1000 Certs.
Jump cooldown: 8 / 7.5 / 7 / 6.5 / 6 seconds.
- The fuel burn lasts up to 1 second.
- Higher unlock cost of Ambushers is supposed to emphasize that this ability is intended for experienced Light Assaults, sort of like Adrenaline Shield for Heavy Assaults.
Ambushers completely change Light Assault’s playstyle, to the point where it feels almost like a totally different class. It has such a profound effect on gameplay that almost everything else in this guide simply does not apply to it.
Some tips:
Ambusher Jets often will hurt you with fall damage. Safe Fall implant is nearly mandatory in order to enjoy full range of movement. Rank 2 is more than enough.
You can tap “Jump” to get a short jump, or hold it and get a few second long jump. It is surprising how much distance you can cover in one jump.
Ambusher Jump Jets are the only jet pack type that remains useful in combat, even (especially!) when you are under fire. You can rapidly jump to shift positions and dodge enemy fire.
Since there’s a considerable cooldown between jumps, if you jump into open area and get under fire you’re most likely dead. Try to jump from cover to cover so you have an option of hiding for a few seconds.
Ambusher Jets are unique in the sense that they let you switch between being behind your allies and behind your enemies at a moment’s notice. Despite the name, Ambusher Jets are excellent during direct assault, especially indoors. Normally, to strike enemies in the back, you need to go via lengthy and risky flanking route. With Ambusher Jets you can assault directly, and jump behind enemies, forcing them to fight on two fronts. Even if you die a second after, just distracting a few enemies can be enough to shift the balance in your favor.
Aerial Combatant 5 is absolutely not required to enjoy using Ambusher Jets, but it’s not be disregarded either. Ambushers are very all-in, when you jump forward to enemies, you either kill them all, manage to escape on foot, or die. Rarely you can stay in fight long enough to wait out the cooldown and jump away. Aerial Combatant 5 removes that all-in nature. It lets you jump in, kill one or two enemies and switch positions before they figure out what’s happening. Meanwhile, you’re already killing someone else somewhere else. This lets you chain ambushes like no other. If you combine that feature with a Power Knife and Nightmare implant indoors in a crowded fight…
The problem with Aerial Combatant is that it forces you give up something very important:
- If you go AC5 + Regeneration, you won’t have Safe Fall, which will force you to play very constrained, especially outdoors.
- If you go AC5 + Safe Fall, you won’t have a way to restore health, unless you also take Med Kits, which means giving up C4.
It makes more sense to give up C4, and keep the Rocklet Rifle do all anti-vehicle work.
Suit Slots
Detailed explanation of each suit slot and its mechanics can be found in Suit Slot Guide.
Notes, specific to Light Assault:
Nanoweave Armor
Reduces non-headshot damage from bullets.
Recommended suit slot to maximize combat performance, and have a greater chance when going against Heavy Assaults.
Nanoweave also makes a great choice for indoors combat. When engaging enemies while flying, your whole body will be open to enemy fire, so you will need this edge to survive. Bumping into ceiling and moving fast will also make your head a harder target, and make it harder to exploit Nanoweave’s weakpoint.
Grenade Bandoleer
Increases the amount of grenades you carry.
A solid choice when things get crowded. One frag grenade often wounds, but rarely kills anyone. Several frags thrown in a crowd of enemies are guaranteed to score a multi kill. Only recommended in large fights, when enemies tend to clump up in choke points. You can use your jet pack to bypass enemy lines, and throw grenades where it would hurt the most.
Advanced Shield Capacitor
Increases regeneration speed of personal shields.
Fully certed and equipped by default, but not recommended for LA. It’s a decent choice for outdoors combat, where you can regulate the amount of damage you’re taking, and hide as soon as your shield is down. ASC will give you more time to engage enemies, and less time spent in cover. But it won’t save your life if you get caught.
Ammunition Belt
Increases the amount of spare ammunition for primary and secondary weapon.
Not recommended for LA. Even if you lone wolf deep inside enemy territory, you should be able to safely retreat to an infantry terminal, deployed sunderer or allied engineer. Heck, you can even get ammo from enemy ammo packs.
Commonly available Ammo Printer implant further reduces usefulness of this suit slot.
Flak Armor
Reduces damage from explosions.
Not recommended for LA. Light Assaults generally should not be where they can get damaged by explosions, but even if you do find yourself being bombarded by grenades, you can just fly above them to avoid any damage:
Alternative opinion:
I am not saying Flak is necessarily better than ASC or Nanoweave on a LA. But I prefer Flak for a few reasons:
- No more deaths from AI mines
- I wont die to grenade even standing right next to it
- Dumbfires can’t one shot me (tho that didn’t happen very often before)
- If I am hovering over a tank or approaching one and the gunner spots me I can take one Halberd shot in the face without dying or one more shot from enforcer which of course increases my chances of blowing it up.
- Just overall resistance against all other splash damage + direct hit resistance against some other weapons like rocket pods and Fury/Marauder.
– Paqu
Flak Armor can be very attractive for ground troopers, who tend to bunch up and get bombarded with frags by Light Assaults with Grenade Bandoleers 😉 But LA isn’t a ground trooper, and you shouldn’t play him like one.
For Light Assaults, the main application of Flak Armor is to survive if you step on a mine while flanking, but deaths to mines happen so much more rarely than deaths to bullets that it just isn’t worth it.
Adrenaline Pump
Increases sprint speed by 10%.
Unlock cost: 30 Certs.

Not recommended. Other suit slots offer much better bonuses, and you can use Drifters / Skirmishers / Ambushers to move horizontally faster than sprint speed anyway.
Munitions Pouch
Increases spare Rocklet Rifle ammo by 1 / 2 / 3 magazines.
Unlock cost: 30 / 50 / 150 Certs.

Unnecessary for general gameplay. Rocklet Rifle already carries a superfluous amount of spare ammo.
Flight Suit
Ambusher Jets: reduces regeneration of jump jet fuel by 10 / 15 / 17.5 / 20%.
Other Jets: increases fuel capacity by 30% / 35 % / 38% / 40%.
Unlock cost: 30 / 100 / 200 / 500 Certs.

Flight Suit makes a big difference when you need to maximize your air time and overall mobility, but other suit slots are more useful for general gameplay.
Grenade
Frag Grenade

Frag Grenade is available to every other class.
Flash Grenade
Blinds affected targets for several seconds. Strength of the effect is based on the distance to the explosion.
Raw facts:
- Costs 25 nanites to spawn with.
- Fuse timer of 3 seconds.
- Blinds players even if exploded behind their back.
- If effective hit has been achieved, blinds for ~6 seconds, wipes the HUD and increases minimum Cone of Fire by 20%. Example.
- Emits loud and unique *bang* sound when explodes, so you know when to rush in to the room after throwing a Flash. A hit indicator will appear on your crosshair, if you managed to hit someone. However, that sound will warn enemies that an LA is about to breach as well.
- Has no grenade indicator.
- Enemies killed by your allies while affected by your Flash Grenade will grant kill assist XP, and will count towards Flash Grenade ribbons and medals.
Flash Grenades are most useful in breaching scenarios, when you storm a small room full of enemies, especially in an organized squad setting. With Grenade Bandoleer, you can throw several grenades at once, covering more area and increasing the chances of blinding more targets.
A lengthy fuse timer can make it challenging to intentionally hit a certain target, especially in a wide and open space or a big room.
Flash Grenades will be invaluable for aggressive Light Assault, that actively seeks and assaults enemy encampments, especially indoors. It will probably be less useful to a careful, ranged Light Assault that patrols outskirts of the battle to pick out stragglers.
Quick-Det Flash Grenade
A variant of the Flash Grenade. It has a shorter fuse timer of 1.5 seconds, but it doesn’t affect enemy Cone of Fire, and lasts only a couple of seconds.
Quick-Det Flash Grenades give a nearly instant result, which makes them more interesting than standard frags for infantry combat. It’s also much harder to accidentally hit breaching friendlies.
Smoke Grenade
![]()
Creates a thick cloud of smoke that lasts for about ~17 seconds.
Despite what the in-game stat sheet says, Smoke Grenade has a short fuse timer of 1.5 seconds, same as Quick Det Flash Grenade.
Smoke is the core part of the Smoke Ninja loadout.
NSX Fujin

A headshot with this throwing knife can kill a standard infantry enemy within 20m. This can be used to surgically and silently assassinate enemies behind the front lines, and the best part – it’s pinpoint accurate even when flying on the jet pack.
Light Assaults often easily get within flanking positions, and unlike Infiltrators, our grenade options are fairly lackluster, so it can be nice to have this option.
Utility
C4
Refer to this article for detailed information about C4.
This should be your default option, even though it’s quite expensive. Light Assault is considered the best class to use C4 with, because using C4 requires being very close to the target, and Light Assault is the best in getting close to the target while remaining unnoticed.
Even though LA can’t cloak themselves, the Jet Pack opens new ways to get to your target, unavailable to any other class. For example, a tank that bombards your base and hides behind nearby rocks to avoid rockets. LA can use his Jet Pack to move over the rocks and throw C4 on the tank from above.
Restoration Kits / Med Kits
These have good synergy with Light Assault, as we often get wounded behind enemy lines, with no allied medic to immediately heal you up.
Also, normally kits can’t be used while sprinting, but LA can bypass that by using his Jet Pack to fly while injecting himself, and preserve his speed.
Auxiliary Shield
Increases shields from 500 to 550.
Unlocked and equipped by default. While it’s a nice slot filler for new characters, other utility items are immensely more useful.
Melee
Light Assaults use the same melee weapons as everyone else. Using your knife is an essential part of the LA play, as there are plenty of opportunities for it in close range skirmishes. Melee is also often used to instantly finish off a target after you have sneaked up on it and have done several shots in its back.
Check the Melee Weapons Guide to learn more.
Implants
This is a quick overview of useful implants specifically for Light Assault. For full descriptions of all implants refer to the Implant Guide. Implants are listed in order of usefulness.
Regeneration
Automatically restores health out of combat.
A very strong convenience option, and probably the best implant for Light Assaults, because the ability to carry C4 and still have a way to regenerate health is too good to pass up.
Even Tier 1 Regeneration implant heals fast, removing the need to look for medics each time you get wounded.
Light Assaults get the most out of Regeneration, since they have the easiest time finding safe havens to recharge shields and wait for health to regenerate.
Sensor Shield
Reduces the range of enemy Radar Detection Tools against you.
Probably the most consistently useful implant, after Regeneration. Motion Spotters are the hardest counter to Light Assaults. The only problem with Sensor Shield is that you never get any feedback from its effects, so it may feel like a waste of a slot, even when it does a ton of heavy lifting in the background.
Counter Intelligence
1) Informs the player when he’s spotted.
This implant is probably more useful to Light Assault than to any other class. We rely on stealth and unpredictability to survive, and it’s useful to know when you are spotted, so you can:
- hide in safety until “spotted” fades
- make mind games with it, running in one direction while spotted, then turning around when spotted fades
- adjust your play to be more aggressive or careful depending on situation
Also useful:
- if you’re using smoke grenades as a screen to shoot through with HS/NV scope, enemy will be able to see and shoot you while you are spotted
- when running a stealthy loadout with suppressed weapon, so you know when you’ve lost your surprise advantage
- when running a loadout that requires getting close to the enemy, like SMG or shotgun
2) Automatically spots enemies that damage you, unless they use a Suppressed weapon.
Useful for making plays near cover. It is a human instinct to “address the threat”. When you get under fire, you naturally want to see who’s that shooting at you. But often if you do, you will not have enough time to retreat to safety or fight back. If you are able to break this bad habit, this implant will be useful to you.
Example situation: you run a shotgun loadout, and run on a rooftop. Somebody shoots you, you see hit markers and enemy pops up on the minimap. You jump down from the edge of the roof, so the building is behind you and the enemy. If he tries to pursue and run around the building, you will be ready for him, you will know when exactly to pop out from around the corner and blast him in face.
Sweeper HUD
Spots enemy explosives like C4 and mines within certain range, even through walls.
LAs often try flank, bypassing the usual entrances. Experienced players are well aware of that fact, and protect their flanks and rear exits with mines, which are often placed in such a way, that you can possibly notice them only tenths of second before you step on one.
Sweeper HUD will help you to survive in this case. Additionally, LAs are often first to arrive at the objective, and this implant will allow you to serve as a trailblazer for your faction.
Battle Hardened
Reduces screen shake from explosions and flinch when getting shot.
This implant is mostly taken to reduce flinch (the twitching of your screen when you get shot), to increase the chances of winning a 1v1 fight, when you and the enemy are both shooting at each other. Especially important for high skill players that often go for headshots.
This implant is controversial.
On one hand, LA is an inherently weaker class and needs every advantage in a straight up 1 v 1 fight.
However, if you play properly and flank a lot, you shouldn’t fall under too much return fire without the option to run away. For LA under fire, running away to re-engage is usually better than trying to just tank through damage and outshoot the enemy, as in a straight up fight LA is weaker than most classes, especially HA.
You can try tanking through damage if you’re partially hidden by cover, and shooting at an exposed enemy. But then you already have your advantage, and you don’t really need Battle Hardened.
Unexpected encounters, where you can’t run away and your options are fight or die, most often happen at close range, where flinch is not an issue, especially considering most of our weapons have good hip fire. As for screen shake reduction – as LA, you shouldn’t have too much vehicle fire near you.
Ammo Printer
Restores ammunition for weapons and tools.
A great option to sustain yourself in the field. Regeneration + Ammo Printer Light Assault is likely to be the most independent infantry unit in the field.
Still, I can’t recommend it over other options, because running out of ammunition happens rarely, and mostly during lucky streaks, and not regularly.
Catlike 5
Increases crouch speed and jump height.
This implant further increases Light Assault’s mobility, literally jump-starting your Jet Flight. Crouch speed increase can be useful when maneuvering in and out of cover, especially on rooftops. This is great, because crouching also provides accuracy benefits for most weapons.
It’s a great implant to have, but a bit redundant on Light Assaults.
Nightmare 5
Special cloaks the user for 2 seconds after killing an enemy within 5m. You can use your tools and weapons while special cloaked.
This luxury implant can be incredibly handy in close range flanking situations, making it easier to go on a killing spree, or to effect escape after killing an enemy.
Safe Fall
Reduces fall damage.
Safe Fall is nearly mandatory for using Ambusher Jets, but other than that, it’s one of the less useful implants for the Light Assault, because you can always slow down the fall with your Jet Pack, unless you waste too much fuel.
Safe Fall can be useful to players that are new to Light Assault or to the game as a whole, and have not yet mastered the way of the Jet Pack.
Training wheels, basically, but it’s the bad kind, since with these training wheels you will not develop the necessary habit of breaking your fall with the jet pack.
Safe Fall becomes a bit more important with Icarus Jets, since they’re a bit harder to pick up, and aren’t very good at breaking the fall.
Other uses of Safe Fall:
- You can allow yourself to fall faster, which saves time, conserves fuel and makes you a harder target.
- C4ing tanks becomes easier, because, you can float in the air without worrying about leaving enough fuel to safely land.
- For stealth: at night, LA using Jet Pack is easy to see from pretty far away, with Safe Fall you can avoid using Jet Pack while falling. This also goes for sound. A keen ear can hear when you fly on a Jet Pack nearby. With Safe Fall, you can just jump down, which will too produce a sound, but much less audible.
Aerial Combatant
Restores a portion of Jet Pack energy when killing an enemy.
A good option with Ambusher Jets, but not recommended otherwise. Jet Pack fuel is usually not in short stock, and your implant slots are better used by providing sustain, stealth or combat advantages.
Basic Tactics
Seek not beauty in battle.
Seek not virtue in death.
Think not that your life is your own.
To protect those who need protecting, strike the enemy from the rear.
Light Assaults are not the strongest in direct confrontation, so we have to play dirty to succeed. To get good engagements, we rely on:
- Cover
- Flanking
- Height Advantage
- Stealth (Surprise Advantage)
Ideally, you want to stack as many of these advantages for each engagement as possible.
My Light Assault video guide:
(This video is old, but still relevant. Don’t mind low sound quality, and enable subtitles)
This educational video by Moukass covers almost everything Light Assault does.
(This video is outdated, we didn’t have Rocklet Rifle and carbines were very inaccurate mid flight. Moukass may have played certain situations differently. It is still a great watch and has a lot of high-level tips. Also keep in mind that spotting gives away your position as well, making it easier for other enemies to flank you.)
Cover
Light Assaults have the unique ability to get to good high ground cover, overlooking the battlefield, and maneuver around that cover as they please. It’s perfect for leading a series of mid range engagements, and always gives you an option to go for an aggressive assault or to retreat if you need a respite.
When you get to a good piece of cover, peek out and take a look. Then different things can happen:
A. You see a vulnerable enemy
Vulnerable enemy is:
- within your weapon’s effective range
- relatively stationary
- doesn’t look in your direction
- busy doing something, like engaging somebody else or repairing/healing/looking through scope / manning a turret / etc.
If you don’t get shot or spotted right away, you are safe to engage. Aim Down Sights and shoot, doing your best to compensate for Recoil and manage Cone of Fire. You can learn more about both here (path to success).
B. You get shot
Things can always go wrong. As LA, you don’t get the luxury of always knowing what you’re getting into. Stay close to cover, so you always have the option of just taking two steps to hide and disengage.
Comparatively long TTK of PlanetSide 2 means that you’re probably not gonna be killed if you just take a quick peek to see if it’s okay to come out and engage. Most players don’t have means to chase an LA, so as long you have that choice of engaging or retreating, you can poke for good engagements for days.
If you have a problem of getting killed before you can reach cover, use Nanoweave Armor.
Alternatively, you can use Advanced Shield Capacitor to reduce the time you spend in cover, waiting for shields to recharge.
C. You don’t see any exploitable targets
Then you simply move to a different piece of cover. Use your minimap and combat awareness to find where enemies are and what would be a good cover to use against them.
Flanking
Pushing through front lines isn’t Light Assault’s specialty. No reason to do what you ain’t good at. So flank any time you can – move in cover around the front line, until you’re in position to attack enemy lines from the side.
Enemies won’t be watching your way, and won’t expect an attack from your angle, make the best of it.
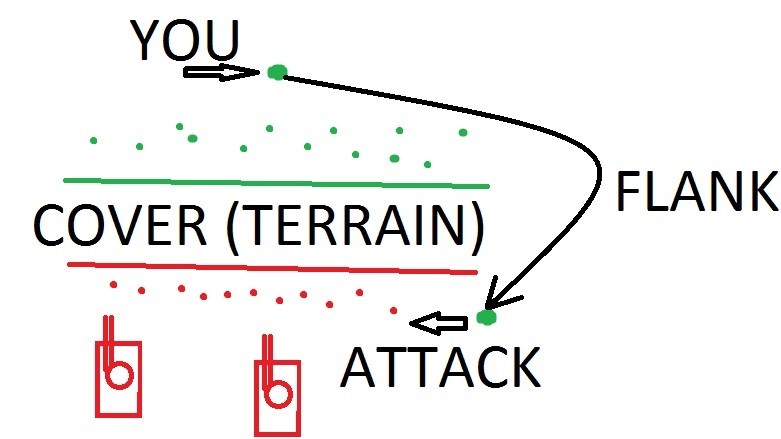
Wrel’s crash course in flanking:
Stealth
There are no new ways to be sneaky, there’s only the old one: don’t be where the enemy would expect you to be. This is relatively easy to do by staying away from the front lines, and attacking them from the sides instead.
Often “being stealthy” boils down to just staying far away from your allies, so nobody attracts enemies’ attention in your direction.
When behind enemy lines
- Don’t get closer than you have to reliably take out a target – you will be vulnerable outside of cover or high ground.
- Don’t Q spot if you don’t have to – your voice will give you away.
- Don’t shoot if you have a low chance of actually killing the target – the fewer living enemies know about your existence, the better.
- Change positions frequently, especially if you’re using unsuppressed weapons.
- Don’t wander too far from allied forces, you can’t accomplish anything alone in this game, and they will always provide a nice distraction for enemies.
Height Advantage
Engaging enemies from a higher elevation provides a lot of advantages:
- Targets will be more exposed, giving you a clear shot on their heads and showing more of their silhouettes, giving you the opportunity to fire in longer bursts and still have good accuracy.
- Targets will have an increased response time to your attack, because it comes from an unexpected direction. They will take longer to get into cover or return fire.
- In some cases, engaging from a higher elevation may cut off enemy’s escape route, and he will have nowhere to hide from your shots, at least not without exposing himself to fire from your allies.
There are certain disadvantages as well:
- Being up high can often expose you to enemy snipers and vehicle fire, especially from the aircraft.
- If an enemy contests your position, you may be left without a convenient escape route, and forced to engage in unfavorable position.
- When engaging enemies below you, due to PS2 first person camera location, you may have to expose too much of your character model to enemy fire, especially the head.
Perching
Perching is a playstyle where a Light Assaults finds a concealed position – “perch” – with a clear view of enemy lines, and kills enemies stealthily from that position. Perches include: tree branches, center columns of Towers and Biolabs, “legs” of Tech Plants and Amp Stations, and in general – any elevated position with a view on exposed enemy lines.
Perching LAs traditionally use a precision carbine or NS-44L Blackhand sidearm, which is effective in killing immobile enemies in double-tap headshots.
Perching is controversial. Our “long-range” equipment has limited effectiveness, and we can be easily shut down by enemy snipers (example 1, example 2).
- Carbines are generally ineffective at long range, they require a lot of hits to kill, giving enemy time to react and get in cover. Enemy that survives will know the direction he got shot from, and then it’s only a matter of time before your position is discovered.
- Multiple shots produce lots of tracers, making the Light Assault easier to discover. Suppressor doesn’t helps with this, and reduces damage even further.
- Precision carbines are often used with a Compensator, which extends the range of minimap detection when fired, making the Light Assault easier to discover.
Additionally, perching usually sets getting kills as a goal, rather than actually playing for the objective (capturing territory). In other words, perching Light Assault doesn’t usually contribute to his faction any more than a lackluster sniper.
In order to be effective, perching needs to be done in moderation, and only for a short time.
- When it is appropriate – if there is an enemy line, exposed from at least one direction. If there is, then you have to know a position where you can exploit their weakness, and how can you get there without being noticed.
- How to get kills – you gotta know which targets can be engaged and killed reliably before they can get away. You gotta know how to control your weapon’s Recoil, and understand Cone of Fire mechanics.
- Know your cue to leave. Change positions when an enemy player survives your shots. Run away as soon as you even suspect you were spotted – you heard enemy voice or an enemy looked directly at you. Run away as soon as shots were fired in your direction.
Choosing a position
Best positions for LA are a highly situational thing. A perfect position can become terrible in a heartbeat. The golden rule is to never stay in one place for long. Usually, first shots fired in your direction are your cue to leave.
Let’s take a look at a hypothetical situation:
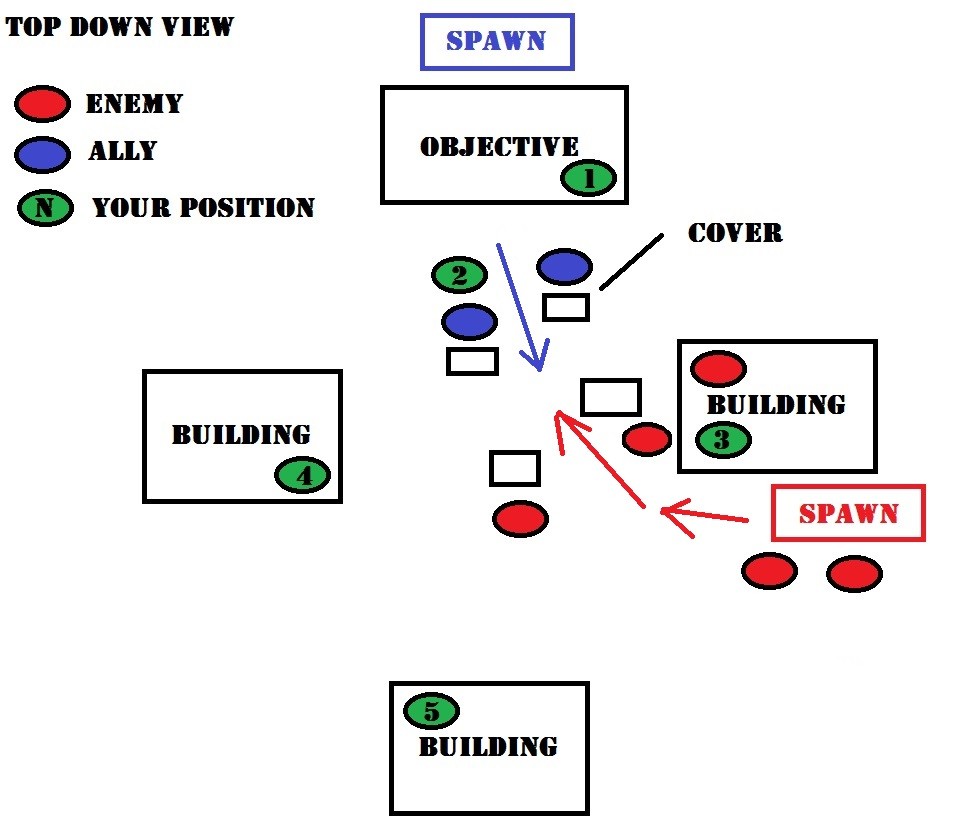
Situation: two sides fight for a base. Doesn’t matter who’s attacking or who’s defending, because most often both sides just attack each other at the same time, and a front line forms naturally. Usually, on an open ground between pieces of cover.
If anyone tries to leave the cover and advance further, he gets killed, and neither of the sides can advance without outside help. It is your job as a Light Assault to be that outside help.
Green circles mark different possible positions you can take.
- On the roof of the objective building. Usually not a good place to be, especially if there’s no railing to protect you. Enemies are pushing to that same building, and they will see you on that roof.
- Behind/on top of cover near your allies. There’s no point in being there, unless you’re looking to make some plays with a short ranged weapon while jumping around and above that cover. It’s better than being in open field, that’s about it.
- On the roof of the building in front of enemy spawn. Makes sense only if that spawn is a Sunderer, not a spawn room. Extremely dangerous place to be, unless your allies have already taken this building, or you’re trying to take out enemy Sunderer solo.
- Flanking position on the assaulting enemy. Better than before, but still kinda dangerous, because enemies will still look in that general direction as they are moving to the objective building.
- Flanking position on enemies’ backs. Offers best view of the target, as they will be wide open before you. Fish in a barrel. But there’s a downside – by this time you’re so far away from allies, that you risk being flanked yourself. Extremely rewarding to visit here once in a while.
How to be useful
The first priority of every Light Assault is to keep roofs and high ground clear of enemy forces. This is necessary to ensure you can operate in the area yourself.
Light Assaults specialize on delivering precise bursts of high damage where it is needed the most. They are also great at making enemy lives miserable with constant harass and flanking attacks, forcing them to fight on multiple fronts.
Light Assaults often get a choice at where-when-how-who they engage.
All this means you are great at clearing choke points and destroying priority targets. So in any given battle, find what obstructs the movement of allied forces, be it a tank, a MANA turret or simply dug in infantry, and do your best to destroy or distract them.
- Destroy enemy AV and AA turrets with 2x C4 bricks, if they are being useful to the enemy. Be on the lookout for repairing engineers, they’re vulnerable. But beware of the mines they might have placed to protect their flanks.
- Destroy enemy vehicles with C4, when they’re in compromised position near walls or rocks, or at least harass them with Rocklet Rifle
- Medics are always a priority, because they can revive anyone you kill, nullifying your hard work.
- Hunt down enemy Infiltrators and Light Assaults, you do it better than any other class.
- Help to destroy enemy Sunderers. Some of them you can even take out solo.
- Overload or protect base’s generators.
- Destroy enemy Spawn Beacons.
- Place your own Spawn Beacons in a hard-reachable place if you happen to be a squad leader
- Hunt enemy MAXes and their support
- Generally be a pain in the backside by flanking and killing everyone you can.
- Cap points while enemies are distracted elsewhere. Distracting a few enemies from the front lines to recap the point may be all your allies need in order to prevail.
Capture Point Bait
If you find yourself alone at a capture point, do not stand guard. Cap the point, then run away and hide nearby.
Wait for enemy to approach and start capping (you will see cap icon blinking), then jump out of hiding and blow their head off.
This gives you a surprise advantage, reduces the risk of getting flanked, because capture points tend to have multiple approach paths available, and Internet Delay favors attacks and counterattacks more than camping.
Capturing bases
Most capture points are located inside buildings. Because of it, the most reliable way of capturing bases involves “Cap Point capture and hold” tactic: an infantry unit uses a Galaxy to drop straight on point, rushes in, kills any defenders and protects the Cap Point while timer ticks.
They rely on Medics to keep everyone alive, and thus bypass spawn mechanics and vehicle play completely. The Cap Point building often gets surrounded by vehicles and enemy infantry within minutes, and going outside is suicide.
In this setting, Light Assault is ineffective, because he’s forced to stay indoors and can’t use his Jet Pack to maneuver. If he goes outside and dies, medics won’t be able to reach him, and his team will be one man short. Any other class would be more useful here.
However, Light Assaults can still be used in some situations:
My outfit always has a Light Assault in squad during ops, especially if there’s an indoor cap point. Here’s a hint: keep the light assault outside the point building.
Enemies will always clump up near the doorways of the building when your squad inside uses those doors as chokepoints. Use the Motion Spotter your Infiltrator sets down (you do use infiltrators for point holds, right?) so that your Light Assault can remain out of sight and out of danger. He’ll be able to see on his minimap when enemies are bunched up and what direction they’re facing.
With enough practice, then without any communication needed, when the Light Assault makes his move and drops down outside the building, he’ll kill at least a few people and cause chaos and disorder. Then your squad will know to push outside the building and wipe out the rest of the enemies outside. If your Light Assault did his job, most of the enemies outside will have their repair tools and medic guns out and you can wipe them all out and revive your Light Assault.
The key to doing point holds against a larger force of defenders is to never let them group up into large enough numbers outside to rush you on point. You deal with smaller groups and completely wipe them out to send them back to the spawn room.
The Light Assault is also the perfect flanker for dropping behind lone enemies right as they enter the building. This way you don’t have those 1 v 1 fights on the stairways where if your guy falls, one enemy will get in and shoot a bunch of your people in the back.
But that’s talking about competitive side of PS2, when top outfits exchange blows on the battlefield. In a more casual setting, where attackers try to reach the cap point using nearby Sunderers for spawn, having a few Light Assaults operating in the area in addition to main forces can be a huge advantage.
Defending bases
Light Assault is as useful during defense as he is during attack; and because there’s always a spawn room available nearby, Light Assault can operate without the fear of death putting him out of the action.
When the enemy uses “Cap Point capture and hold” tactic mentioned above, Light Assault is one of the best ways to counter it, as he can use his Jet Pack to assault the Cap Point building from multiple directions, distracting enemies as his allies attack the point from ground entrances.
In casual environment, front lines often form between defenders’ spawn room and attackers’ Sunderer. Light Assault can effectively flank these front lines, as well as help his team to take out Sunderers with C4.
However, when enemies bring multiple vehicles and spam the base with explosives, Light Assault becomes useless, because going outside the buildings and on top of the roofs often leaves him exposed to vehicle fire. But, to be honest, all infantry becomes weak at that point, and best course of action for the defenders usually is to redeploy to a nearby base and pull their own vehicles.
Tower Stomping
Due to their unparalleled vertical mobility, Light Assaults are particularly effective at attacking bases with “Tower” layout. In the video below, Wrel explains everything you need to know about Tower Stomping.
Light Assaults are so effective at tower stomping, that I consider it to be kinda cheap, so I implore fellow Light Assaults to perform tower stomping only when it’s justified: if the tower is actually being contested, and you do have a realistic chance to capture it.
A skilled LA can wreak havoc among tower’s defenders. But if the tower isn’t being contested, and the LA is the only soldier of his faction in that tower, then all his flying around and killing people serves no purpose other than to farm kills. It’s not any different from lolpod farming or spawncamping. I find such behavior despicable.
Biolab Fighting
Tip: when on the roof, walking on the blue shields produces no footstep/landing noise, for when you want to sneak up on an enemy.
– Corezor
Loadouts and Playstyles
These are some of the most popular loadouts and playstyles, listed roughly in order of versatility and usefulness to the faction.
Classic
The classic Light Assault playstyle uses the Standard Loadout, or its variation, and follows the Basic Tactics. You can replace the primary weapon with an SMG or a shotgun, but overall playstyle will remain the same, you would just have to get closer to enemies.
Shadowflight
Shadowflight is an expanded version of the standard LA loadout, and it’s also a playstyle. It puts a higher accent on stealth and flanking, and moves away from engaging enemies head on. Your goal is to be an unseen deadly shadow, killing enemies before they see it coming, always guessing at your position.
The theory of the playstyle is very simple. Proper execution is the hard part.
You want to always engage enemies when they aren’t looking at you. Ideally, they don’t even know that your direction presents a threat to them.
That ensures you get a perfect first ambush. But that gets you only one kill. To have a higher chance of killing multiple enemies without getting spotted, you want to retreat to cover, and move to a different position for the next engagement.
It is misdirection at the most basic level. First you engage from the one position, and by the time anyone is looking in your direction, you are already gone, ready to engage from a different direction. This is how you regain stealth between engagements.
Regaining stealth here means disappearing without a trace for the enemy to follow. The enemy knows you’re out there, or might be out there, but they got no idea where to look. It’s like being cloaked, but without the cloak, so you can’t just hide out in the open. Fortunately, you have a jet pack to take you to wonderful places. Be creative.
Distance and walls. These are the most ancient, yet the most effective ways of protection.
With Shadowflight, you want to always engage enemies at range of 20-40m, and from cover, with access to a safe escape route.
A lot of the time, if the enemy knows where you are, it’s not even worth starting a firefight. Some players are skilled enough and well equipped enough to just shoot and kill you even in partial cover, and that’s why you need to restealth between engagements – you want to catch them off guard every time you shoot at them.
Weapon Choice
Shadowflight uses a precision carbine with a Suppressor. Suppressor hurts your killing power, but it has a great synergy with the Shadowflight playstyle:
- Suppressor makes it easier to restealth between engagements
- Suppressor delays enemy response when you engage
Even with a Suppressor, hit markers will tell the enemy he’s getting shot from a certain direction, and tracers can give away the direction to you as well. However, this is different from knowing your exact position from the minimap signature and muzzle flashes.
Additionally, at close range of ~20m, tracers don’t render too well, especially for the person they are directed at. A lot of the time the enemy might stare you directly at you and not realize that you’re shooting him.
Precision carbines have great synergy with Suppressor:
- High projectile velocity ensures that Suppressor isn’t going to hurt velocity too much
- High Velocity Ammunition can compensate for some of the Suppressor’s penalties
Combine HVA and Suppressor with Advanced Forward Grip and you get a very versatile weapon with easy recoil, serviceable hip fire, and good damage per mag. Exactly what you want in a mid range ambush weapon.
Implant
Counter Intelligence gives you more control over your stealth. Most of the time you can tell if you’re lit up by Motion Spotter anyway, and with Counter Intelligence you almost always can tell if the enemy has your exact position on the minimap.
Sensor Shield 4 protects you from Motion Detection tools.
Regeneration is always a great filler, giving you a bit of sustain out there in the field.
If you have neither Counter Intelligence or Sensor Shield, feel free to fill the implant slot with anything else that makes most sense to you.
In the end, when you peek from cover you either get shot or you don’t, and if you don’t, you may as well engage, without caring if you’re spotted or not.
Other equipment
The rest of the loadout is the same as Standard LA Loadout.
The reason I recommend sticking with Frag Grenades is this – for all the buff Flash Grenades received, there’s one thing Frags can do: clear out Motion Spotters and other deployables.
Ideally, you also want a camo fitting your potential cover. If you’re gonna be using suppressor and engaging from a stationary position, good camo can add a lot to response time. But it’s hard to get a fitting camo, since sometimes you’re gonna be engaging from base walls, and sometimes from terrain, and sometimes be up against sky.
Using no camo at all is just fine too. It’s more stealthy than most people realize.
While you are engaging from a stationary position, you are more vulnerable. If you get shot while engaging another target, Internet Delay will put you at a disadvantage, adding precious milliseconds to your reaction time. Even if you move right after getting damage for the first time, your character’s model is still gonna be exposed for a moment, giving enemies more time to shoot you.
Ideally, you don’t want to get noticed at all, but bad things happen, and when they do – Nanoweave Armor can make a difference between living and dying.
Incidentally, it takes 10 seconds before your shields start recharging – exactly the same amount of time the enemy Spot lasts on you.
Closing Thoughts
The good thing about using a precision carbine here is that always gives you an option to engage. It’s accurate enough to be competitive at most ranges except very long, it has acceptable hip fire, so even if you lose the positioning game, you always get a chance to outshoot the enemy.
Ideally, you wanna stack as many advantages as you can for each engagement, but you’re not helpless even when nothing goes in your favor. This is what makes Shadowflight different from shotgun and SMG loadouts, which also have to rely on stealth and flanking.
Shadowflight is perfect for players who have great judgement when it comes to picking engagements, but don’t aim that well, and don’t have a powerful PC to sustain a more aggressive approach.
Vehicle Hunter
Loadout: Suppressed Carbine with good hip fire, Drifter Jets, Nanoweave, Rocklet Rifle with Typhoon Rocklets, C4, Target Focus implant.
This is a situational loadout that you equip only to deal with a specific enemy vehicle, then you switch to your previous loadout.
Avoid engaging infantry, unless they block your path, or can give away your position, or they engage on your first. In that case, a Suppressed Carbine ensures you can take them out without alerting the vehicle pilot. If the carbine has good hip fire, you can engage while flying, saving some time and giving you a good angle of attack.
Normally, you want to be using Drifter Jets with this loadout, but be careful about flying in enemy line of sight. Overall, which Jets you want to equip heavily depends on surrounding terrain, and if the base has gravity lifts or jump pads to help you gain some speed and height.
Vehicles usually have trouble engaging airborne targets, so you number one threat will be enemy infantry, and you want to equip Nanoweave for that.
Get Typhoon Rocklets for your Rocklet Rifle. They make it more realistic to take out any ground target at close range. You can even take out two tanks in one life, if you use C4 + Typhoon Burst in rear armor combo.
Obviously, C4 is mandatory. Target Focus implant is great with this loadout, as it helps to identify damaged vehicles, so you can save some of your limited firepower if the target is already damage.
Deep Flanking with a Shotgun
The optimal way to play with a buckshot shotgun is as mobile skirmisher, jumping and flying all over the place, helping your team to capture and hold the objective. Something you can see in my (outdated) Shotgun Streaks videos. Shotguns are especially great at quickly killing vulnerable enemies at close range.
However, there’s another way to look at shotguns. In ideal situation, shotguns have very high damage per magazine. A pump action shotgun can kill up to 6-7 people before needing to reload, which is a rare trait for a non-LMG primary weapon. Usually, high damage per magazine doesn’t mean much on CQC weapons, because at close range you can kill 1 or 2 enemies before they start reacting to you, and will either kill you, or force you to run away, and you’ll have time to reload anyway.
Also, it’s hard to kill an aware enemy with just one pump action shotgun shot, this usually happens on immobile enemies, or enemies moving in a straight line, when you can safely get within contact shot distance, so realistically it’s 2-3 kills before needing to reload.
However, deep behind front lines, enemies will be relaxed, thinking they are safe, and they will be slow to react when you start killing their comrades nearby. They will spend more time standing around and tunnel-visioning at distant targets, so they will be easy to sneak up on and one-hit-kill with a shotgun.
The basic idea behind Deep Flanking is to use your Jet Pack to insert yourself deep behind enemy lines, find a group of unaware enemies, and quickly kill all of them. Adrenaline Pump or speed drifting along the ground can help you transition between targets faster.
There’s a bit of synergy with Drifter Jets, as they will allow you to perform Deep Flanking over wider area, but you’ll lose a lot of vertical speed and so the ability to make vertical plays near cover. Drifters are not really a necessity, and you can perform the same flanking with Skirmisher Jets, just over shorter range or longer time due to need to refuel halfway.
You can use a Power Knife to supplement such playstyle. If you’re getting that close to enemies that you can reliably OHK them with a pump action shotgun, you might as well use the knife. The knife still has shorter range, but in exchange it’s much quieter, doesn’t put you on the minimap, and has infinite ammo. So knife the enemies you can knife, and shoot everyone else.
This might be the easiest way to get kills with a shotgun, but there are a few reasons to not play like that:
- You will spend a lot of time moving. It’s possible you’d kill twice as many enemies in half the time by playing near front lines.
- Doing this doesn’t help your faction, because you’re killing people not directly fighting for the objective, and they’re likely to just respawn nearby, so your attack will have no impact at all.
Loadout: Smoke Ninja
This loadout relies on Smoke to provide concealment for the Light Assault, and disrupt and annoy enemies. Light Assaults get access to all infantry-based ways of deploying smoke:
- An S-series carbine with a Smoke Launcher
- Light Assault’s Smoke Grenade
- Hunter Crossbow‘s Smoke Bolts.
All three are viable, but they have different strong and weak points that you have to keep in mind.
For the primary weapon, you should go with a Carbine with Suppressor or Flash Suppressor, to hide your muzzle flash and make you harder to see from inside smoke.
Suppressor will generally increase your stealth, so you don’t give away your position if you have to defend yourself while moving into flanking position / moving into melee range.
If you’re not running Infravision implant, you should go with HS/NV scope on it.
A big part of this loadout is a Power Knife, which you can you use to instantly kill enemies as you move through the smoke. When dealing with Heavy Assaults, make sure to go for a headshot, as it will kill them even through an overshield.
Nightmare implant makes an amazing combination with this playstyle. Avoid using Vampire, as its healing will make you glow with green FX, making you more noticeable in smoke.
The overall idea of this loadout is to cover a group of enemies with smoke, and then either engage them with a carbine from range, or move into smoke, and start slaughtering them one by one.
Smoke and Cloak will make you hard to pin down as you move between enemies. You don’t necessarily have to play Light Assault for this loadout to work, as nothing stops Infiltrators from using the same Crossbow with same Smoke Bolts.
The difference here is how you want to approach said group of enemies, which will make it easier – Jet Pack or Cloak.
All that said – smoke is situational and unreliable, even in favorable situations, so don’t expect too much from it.
Using Smoke
Generally, you will want to deploy smoke on top of isolated group of enemies, get inside the smoke cloud yourself, and combo as many people as you can. Keep in mind that flame from your jets will be visible through the smoke, so use them sparingly on approach. Do NOT rely on smoke too much. It makes you just a bit harder to notice, and becomes instantly useless if you get spotted.
Your hip fire crosshair will change color to red when you aim at an enemy within 10m, use it to help you find targets inside smoke.
Friendly Fire is a hurdle with this playstyle. You will spend a lot of time in hugging distance of enemies, and you will often take damage from allies shooting at those enemies. Don’t blame your allies for this friendly fire, just take this for granted.

There are several key aspects to finding a group of enemies that will be slow to react to your attack:
- They have to be busy with something, like shooting your allies.
- There has to be a clear front line established. A direction, leading to enemies. To have a surprise advantage, you want to attack from other directions, because an attack from the front line direction is already expected.
- There has to be a clear border of safety established. Enemies consider themselves to be safe behind that border.
On the picture above, the border of safety is the corner of the building, but it can be any sort of cover. To have a greater surprise advantage, you want to attack from inside that border of safety.
And what enemies expect the least is a threat at melee range. People can react to being shot. At range, TTK of LA’s carbine will be over a second. Even more against heavies. Plenty of time to find new cover or shoot back. Good players got that at muscle memory level.
But cover won’t help against a melee threat, and one barely has a chance to survive if he lets that threat within stabbing distance.
Melee attacks against a group of enemies are usually suicidal in nature. They conflict with common sense and are very rare.
Melee attacks inside smoke are even more rare. Smoke is used so rarely people barely have an idea how to react to it, and usually it’s spammed by engineers and medics from a safe distance. Nobody uses smoke for melee.
Oddly, the more there are people in a group, the less aware they generally are. Every single one of them thinks “guys around will see threats and protect me”, when in reality all of them tunnel vision in one same direction of the frontline.
When you combine so many factors that enemies do not expect, you can hope to ambush whole groups of people.
Farming Melee Kills
Why would you even want to grind kills with melee weapons? For “Exceptional” directive, using NS Campion and NS Harrower, purchased for 500 DBC each. For “Force Recon” directive, using your standard knife. For events and medals.
Playing Stalker Infiltrator is usually a better choice for this purpose, as they can more consistently ambush people at close range.
However, you can still play melee Light Assault, using adjusted version of the smoke loadout above. Since you will be using standard knives, you can choose to rely on Crossbow Melee Combos to get nearly instant kills, and then you will have to use other sources of smoke.
Smoke Grenade have a nice utility of delivering smoke in a bit different way than the Smoke Launcher. You can throw a grenade under your feet or bounce it from a doorway or a window to create a source of smoke inside a building.
But Smoke Grenades alone will not cut it, because they take too long to deploy smoke, and they’re a bit harder to get where you need them, so it’s recommended to use them in combination with Smoke Launcher.
Keep in mind that going into melee for most of your kills is dangerous, and hardly optimal. Your K/D and KPM are likely to suffer, and you’ll be much less useful to your faction. It can also be quite frustrating to play.
Sidearm: Hunter Crossbow with laser sight and 1x reflex or HS/NV scope.
First and foremost, the crossbow is used to give yourself that one body shot + one quick knife swing almost instant kill combo, even against full nanoweave targets. This way you can kill most enemies before they even identify you as a threat.
Crossbow also has utility of being a very stealthy weapon that does a lot of damage in one shot, and it is able to destroy all deployables from any range with one shot, and OHK infiltrators on a headshot within 43m. Avoid headshotting if you want to try to knife them.
HS/NV scope makes harder to see cloaked objects and deployables, so I recommend using 1x reflex over it.
You can also do this useful trick: if you’re chasing an unaware enemy, you can shoot him in the back with the crossbow, the enemy will turn around to see what is damaging him, and eat a knife swing in the face. But never use this trick against Heavy Assaults and high level players.
HAs will activate overshields and your knife won’t kill them, and other players may not let you in melee range; their reflex would be to jump forward, turn around and headshot you before you can do a second shot with the crossbow or run up and knife.
Crossbow can be inconvenient to use: it takes 1 second to cycle after each shot, and this process is interrupted by using the knife, so misses are punished severely. Crossbow has longer equip time than most sidearms. Time between shoot + stab combos is ~1.5 seconds.
Try to nit hit enemies in their legs, if they have full nanoweave armor, a knife swing will not kill them.
Alternatively, NC players can use Mag-Scatter. Its main advantage is being able to do multiple shots in a short amount of time. In that regard, it is much more forgiving than the crossbow. However, Mag-Scatter has many drawbacks: much shorter range where it effectively does full damage of one shot, its OHK combo does not work against full nanoweave targets, unless at least one pellet hits the head, it’s not suppressed and has a loud faction specific sound.
Mag-Scatter has shorter equip time of 0.5 sec and shorter time between shoot + stab combos of ~1.1 sec. Mag-Scatter also doesn’t have to deal with the chunkiness of needing to cycle the crossbow after each shot.
Suit Slot: Nanoweave Armor / Grenade Bandoleer / Adrenaline Pump
I recommend Nanoweave. It will help you survive lots of friendly fire you will be inevitably taking, and survive when trying to combo aware enemies. Also stacks nicely with med kits.
Adrenaline Pump is useful for doing lunges towards melee distance.
Generally, I didn’t survive long enough to need more smoke than I had without bandoleer. Being able to resupply the smoke launcher from engineers’ ammo kits helps a lot.
Utility Slot: med kits.
Will help you stay in action more, and do turn-arounds, when you combo an enemy, get shot by a second enemy, hide into cover, eat a medkit, cycle the crossbow, and combo the second enemy as he approaches to finish you off.
Keep in mind that if you don’t have shields a melee attack will kill you even with full health.
Implant: Counter-Intelligence.
Knowing when you get spotted is incredibly useful: it tells you if you should abort your flanking maneuver, and that your smoke screen became useless. Sensor Shield is also a strong choice.
Ability Slot: whatever jets you are most comfortable with. I recommend Skirmisher Jets for maximum versatility, but Drifters can be a strong choice too, since this playstyle relies a lot on deep flanking and insertion.
Playstyle tips
Mostly you will be playing with carbine in hands. Take out the crossbow only to combo someone, or when you dive in a cloud of smoke or a group of enemies.
Avoid open fields. Your kill potential is at the strongest when you are within melee distance, and you have a window of ~0.2-0.4 seconds to oneshot an enemy. Best plays are made near doorways and corners. Use internet delay to your advantage as much as you can.
People normally don’t expect a one hit kill at melee distance, and often forget that knifes even exist. Use this to lure enemies close to you.
You can do wide circles around base fights, hunting lonesome snipers and engineers behind turrets.
When you have several unaware enemies at stabbing distance in front of you, you can’t guarantee which enemy will be hit by quick knife attack, so it will be better to not even deal with the crossbow. Wield the knife and cut them down, it will be more reliable, and take less time and concentration, since you can just mash the melee attack button.
Aiming for the head with the wielded knife is a good way to reduce TTK against wounded enemies.
Dealing with Heavy Assaults
Heavy Assaults are a big problem for this loadout. You cannot OHK combo them when they are protected by overshields. A headshot with a crossbow does 625 * 1.5 = 937 damage. With a knife swing it will be 937 + 500 = 1437 damage, not enough to reliably tear through 1440-1666 effective HP of the HA, so sometimes even after a headshot it’s gonna take 2 knife swings to finish him off, more than a full second – enough time for HA to kill you.
- Try to combo HAs before they notice you and activate overshields.
- If you’re engaged by HA, run or trick him into thinking that you are running, so he drops his overshields, and then you circle back and combo him.
- If HA’s overshield is active, but he’s not aware of you, better don’t touch him. If you need to remove him from your path, a better choice would be to just headshot him with the carbine.
- If HA has no shields, the combo will kill him even through full overshield energy and nanoweave. If HA is spotted and you’re within 10m, you will see his health bar if he has no shields. If HA is eating a med kit, it’s also a tell that he has no shields.
- If you come face to face with a HA and running is not an option, try to headshot + knife him, and pray that he’s wounded or not at full overshield energy. If he survives the first combo, jump around and try to knife him a second time, but you’re most likely dead.
Additional Material
Jump Pads and Gravity Lifts
Light Assaults can use gravity lifts and jump pads to their advantage, a lot more so than regular infantry.
Both are often used as means to get speed or height with drifter jets, but can also be used for the same purposes with any other jet.
Also, being in the gravity lift even for a moment or using a jump pad makes you immune to fall/collision damage for several seconds.
Assorted tips and tricks:
- Gravity lifts tend to “overshoot” you. Hold [Crouch] as you’re leaving the gravity lift to land on your feet as soon as you get where you want instead of hanging in the air for a few seconds.
- You can ascend or descend quicker while in a gravity lift; look in the direction you wish to move, press forward (W). Since you can’t look directly up or down, you will have to spin to remain inside the gravity lift.
- Jump Pads don’t always send you to the one same landing point, the location of your landing can be influenced by moving or jumping or jetting.
Wrel shows both of these tricks in this video.
Directives Walkthrough
Light Assaults have 6 Directives:
- Kills – Any type of kill counts.
- SMG Kills – Any type of kill using a SMG.
- Carbine Kills – Any type of kill using a Carbine.
- Shotgun Kills – Any type of kill using a Shotgun.
- Vehicle Destruction – Destroying any vehicle as Light Assault, typically you’ll use C4 for this.
- Light Assault Kills – Kill enemy Light Assaults.
Kill credit awarded only if you play Light Assault class and not in a vehicle. As you may have noticed, the directives overlap quite a bit. If you kill an enemy Light Assault with a carbine, the kill will count towards all three: kills, carbine kills and Light Assault kills.
Incidentally, vehicle kills also count as kills. E.g., if you destroy an enemy Flash with a carbine, it will count towards all three: kills, carbine kills and vehicle destruction.
The LA Directives are split in 4 independent tiers:
- First tier requires you to complete 2 out of 6 directives.
- Second tier requires 3 out of 6.
- Third tier requires 4 out of 6.
- Fourth tier requires 5 out of 6 directives.
The higher the tier, the more kills is required to complete a directive. Tiers are completely independent, you can complete “Kills” and “Carbine Kills” to get through the first tier, and then complete again “Kills”, “Shotgun Kills” and “Light Assault Kills” to get through the third tier.
Note that excess progress does not cross over to the next tier. For example, Tier 3 requires to get 300 kills with a shotgun, and Tier 4 requires 800 kills. But if you do 500 shotgun kills while on 3rd tier, you will still need 800 kills to complete the 4th tier.
Completing each tier will award you with some Directive Points. Completing the final tier will award you with a lot of Directive Points, and unique reward – Auraxium Infused Plating, a cosmetic armor option that demonstrates skill and status, but can give away your position and faction, especially at night.
What to do?
LA Directives are relatively easy to complete, because they overlap so much. In effect, they require you to auraxium – get 1160 kills with – each: a carbine, a shotgun and an SMG. The real amount of kills may vary depending on how long will you spend on first three tiers.
The “Kills” directive will automatically complete along the way, and “Light Assault KIlls” is likely to autocomplete as well. If you play LA properly, and often go to places only other Light Assaults can go, you will naturally kill enemy Light Assaults. You should be hunting enemy Light Assaults anyway, as LA is the best LA counter. As I have found out, enemy Light Assaults constitute 30-40% of overall kills for me.
Vehicles are much more rare than infantry, so it’s better to disregard the “Vehicle Destruction” Directive altogether.
You can use different weapons within one weapon class. E.g., you can split those 1160 carbine kills between four different carbines. But I recommend sticking with one weapon. It’s cheaper, you will learn to use one specific weapon well, and you will receive an auraxium medal in the end, which serves as prestige and awards 200 certs.
If you want to take directive run as an opportunity to improve, it’s highly recommended you check out the Infantry Guides.
Which equipment to use?
For carbine kills, I recommend sticking with the default carbine: TRAC-5, Mercenary and Solstice. All of them are strong weapons in their own regard. Go here to learn more about weapons themselves.
For shotgun kills, same as with carbines, you should stick to the one that’s available by default: FA1 Barrage, Mauler and Thanatos. These shotguns are the easiest ones to get consistent results, and remain effective at longer ranges than most other shotguns, especially if you Aim Down Sights. However, they often take a lot of shots to kill just one enemy, so you shouldn’t jump into a crowd of enemies like you can with a full auto shotgun. Go here to learn how to use shotguns.
SMG kills are going to be the hardest – SMGs require good gunplay skills from the user to be effective at close range, and they’re not effective at other ranges at all. You will have to unlock an SMG for 1000 certs, and attachments will cost another 330 certs. I recommend using NS-7 PDW for that purpose, as it’s the most versatile SMG, and plays a lot like a carbine.
Experienced and skilled players can alternatively use SMG-46 Armistice, AF-4 Cyclone or NSX Tengu. I don’t recommend using other SMGs, as they are a bit weaker. Go here to learn how to use an SMG.
As for the rest of the loadout, I recommend using the standard LA loadout. It will provide the most utility and versatility.
However, if you have a hardcore dedication to complete the LA Directives as soon as possible, you can use Med Kits instead of C4, and Flash or Smoke grenade instead of Frag, as you need only weapon kills. If you go with Smoke grenades, you can use a HS/NV scope to allow yourself see through the smoke, but this combo is not something I’d recommend, as smoke is generally underpowered.
With Med Kits, you won’t really need Regeneration implant, so you might want to go with any other implant you fancy.
Advanced Specialization Program
There are two ASP abilities, specific to Light Assault:
SMG Secondary
Allows use of SMGs in the secondary weapon slot, excluding Auraxium weapons. This is a rather powerful ability, absolutely worth unlocking for any LA main.
SMGs take only 0.25 seconds longer to equip than most sidearms, and they have excellent performance from the hip, which makes them acceptable on the quickdraw.
Sidearms are still going to be better for situations when you need to just quickly finish off an enemy after running out of ammo for the primary weapon, or when you are caught reloading or using a Rocklet Rifle.
Besides shortest Equip Time, sidearms also have fastest reloads, so they will also take less time to reload and go back to your primary weapon. That speed is what you would be losing when going for an SMG secondary.
However, what you will be gaining is a second primary weapon, which means:
- You can complement a shotgun with an accurate SMG like NS-7 PDW to have better chances in ranged combat.
- Or you can combine a ranged carbine with a CQC-dominating 1st generation SMG.
- You can also combine an unsuppressed primary with a suppressed SMG for flanking situations.
- SMGs have much more reserve ammo, increasing your longevity.
Overall, SMG secondary increases versatility and gives you new combat options, at the cost of mentioned downsides.
All that said, if you are looking to maximize your combat effectiveness, you want your primary weapon to be either a CQC-oriented carbine, or a versatile carbine, and in that case you don’t have much reason to bother with SMG secondaries.
Concussion Grenade Access
Unlocks access to Concussion Grenades on the Light Assault. This is basically a sidegrade to Flash Grenades, with a higher emphasis on keeping enemies in place rather than making them unable to shoot back.
Concussion Grenades are arguably better for flanking situations, where you can stun a group of enemies and kill several of them at once, increasing the amount of time you can engage enemies before being forced to retreat. However, most of our weapons lack in Damage per Magazine to truly capitalize on this, not to mention there’s no guarantee you won’t be engaged by someone who wasn’t concussed. Often you can achieve a similar effect with the Flash Grenade anyway.
Overall, it’s hard to justify spending an ASP point for this perk.
Outdated Videos
These videos are outdated and are no longer directly relevant to learning how to play Light Assault, but may still hold cultural and historical value.