You can find pre-made queries here. This article explains how they work, so you can make your own queries, if need be.
How to make an API Query
Information in the API is distributed between many collections. Each collection contains entries with typical structure for that collection. Each entry contains fields with information.
Usually, information about in-game objects is distributed between many different collections. For example, to pull full stats of one weapon, you have to access as many as 17 (!) different collections.
Fortunately, you can access several collections at once by joining several queries together.
Before you proceed, It is highly recommended you get a JSON formatter plugin for your browser. Google it.
List of collections: https://census.daybreakgames.com/get/ps2/
Census website: https://census.daybreakgames.com/
Some queries pull a lot of info at once, and if you intend to make several queries in a short time frame, you may be required to register a Service ID.
Basic Queries
To query a collection, you simply write its name in the link. For example, let’s query the “item” collection, which is basically a huge list of all items in game:
https://census.daybreakgames.com/get/ps2/item
This will return a JSON string with the first entry of the “item” collection. In this case, it contains information about Mag-Cutter.
To query a collection for multiple entries, you have to specify the amount using a c:limit modifier. One does not simply access ALL entries in a collection.
https://census.daybreakgames.com/get/ps2/item?c:limit=5
This will give you first five “items”. However, there is an overall limit to query size, and querying for several thousand of items will get hard and messy, so it’s a method best kept to “small” collections of several hundred members.
To query specific entries, you can search entries with a field containing a certain value. For example, you can query a weapon by a name, or by an item_id.
https://census.daybreakgames.com/get/ps2/item?name.en=TRAC-5
https://census.daybreakgames.com/get/ps2/item?item_id=43
Weapon name has to be written exactly as it appears in game, it is sensitive to letter case and spaces. Notice how we also specified the language of the name field. Collections with localized fields, such as names and descriptions, will contain all languages at the same time, which can get cluttering. You can specify a language like this:
https://census.daybreakgames.com/get/ps2/item?name.en=TRAC-5&c:lang=en
You can search for multiple entries with a certain value in a field. For example:
https://census.daybreakgames.com/get/ps2/item?item_category_id=8
This query will display the first entry in the “item” collection with the item_category_id of 8, which is the Carbines’ category ID. To show all entries with that item_category_id, you have to again use the c:limit:
https://census.daybreakgames.com/get/ps2/item?item_category_id=8&c:limit=400
Joining Collections
Joining several collections in one query makes it easier to access full information about something. For example:
This query will join item and item_category collections, so you can access a weapon by a name, and see its category right away.
“On” is the name of the field in parent collection, “to” is the name of the field in child collection. In some cases you can forego specifying the “on” and “to” parts of the joining. In this case, you can simply write:
https://census.daybreakgames.com/get/ps2/item?name.en=TRAC-5&c:lang=en&c:join=item_category
Sometimes on and to can be omitted and the join will still work. That’s because if you don’t specify them it will use item_id by default.
Most times using only on to specify which field from the parent collection to use is enough. For example instead of item_id you might want to use item_category_id or there is no item_id in the collection so there is no default.
But there are times when you have to use to as well. That’s when the joining field from the parent collection has a different name from the identifying field of the child collection.
For example joining attachment item info to the attachment list of a weapon. The attachments list collection uses attachment_item_id to identify the attachment, but the attachment info collection uses item_id.
You can also specify the name of the join:
This can make large queries more readable. If the child collection contains several entries with that identifier, you need to specify that you want to join all of them.
This query will show all weapons in the “Carbine” category.
Multi Join
You can string several joins together by separating them with commas:
This identical to using several join commands in one query:
Multi-Level Join
You can create multi level joins by using round brackets: ( and ).
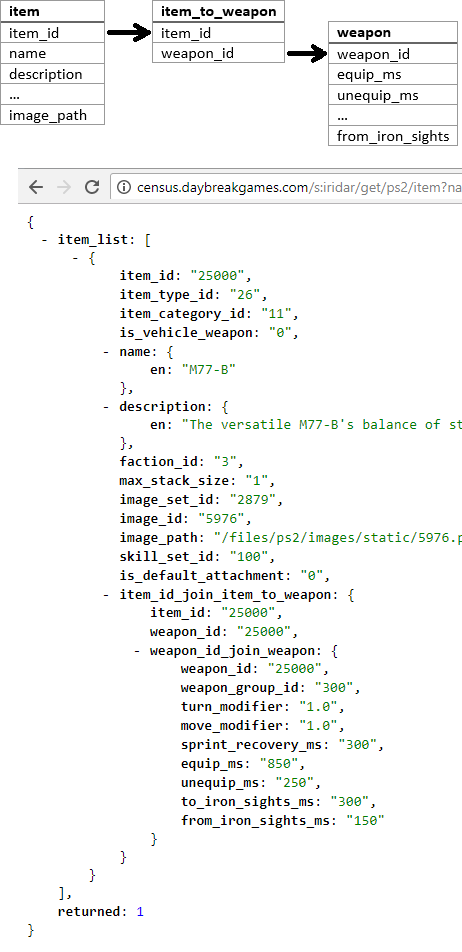
This query will display some of the weapon’s stats, stored in the “weapon” collection. It has the following structure and query response:
Collections
You may find this map of the API useful. All credit goes to /u/Arklur.
item
This collection contains meta information about an item, such as its localized name and description. This is the starting point for queries of weapon stats.
Fields
Category: item_category_id
You can figure out item’s category by searching for the specified item_category_id in the item_category collection, or joining it.
Description: description
Contains all languages by default, but you can access specific language by writing the language’s two-letter code after a dot, for example: description.en, or using a &c:lang=en modifier.
Faction: faction_id
These field will specify which factions can use the weapon. Faction IDs can be accessed in faction collection.
Item’s Image: image_path
This can be used to access item’s in game icon. Simply paste the path after the basic census link:
https://census.daybreakgames.com/files/ps2/images/static/963.png
Some images are missing from the API, and will give a page_not_found error when you try to access them. There is nothing to be done about it, but you can datamine weapons’ icons from client files by using PS2LS tool. Images are stored in .dds format, and you can use any free converter to convert them into .png.
Image Set: image_set_id
The API usually stores several icons of different sizes. The image_path contains the address of the largest image, you can access smaller images by searching or joining the image_set collection.
weapon_datasheet
Parent collection: item
Join key: item_id
Magazine Size: clip_size
Ammo Pool: capacity
It’s worth noting that Ammo Pool includes the ammunition already loaded into the weapon, so 40/240 in the API will appear as 40/200 in game.
The rest of the fields in weapon_datasheet collection are misleading and should not be used, as they refer to the old format of displaying weapon stats in game, basically somehow correlating with the number of bars in certain categories.
fire_mode
Parent collection: item
Join key: item_id
This collection contains some of the weapon stats, related to Damage and Reload times. However, the fire_mode_2 collection contains the same information and much more, so it is preferable to use that when possible.
It is important to understand that in-game firemodes, such as “semi-auto” and “fully-automatic”, and the API “firemodes” are different.
As far as API is concerned, “semi auto” and “full auto” are fire groups, and “fire modes” make the distinction between hip firing and ADSing.
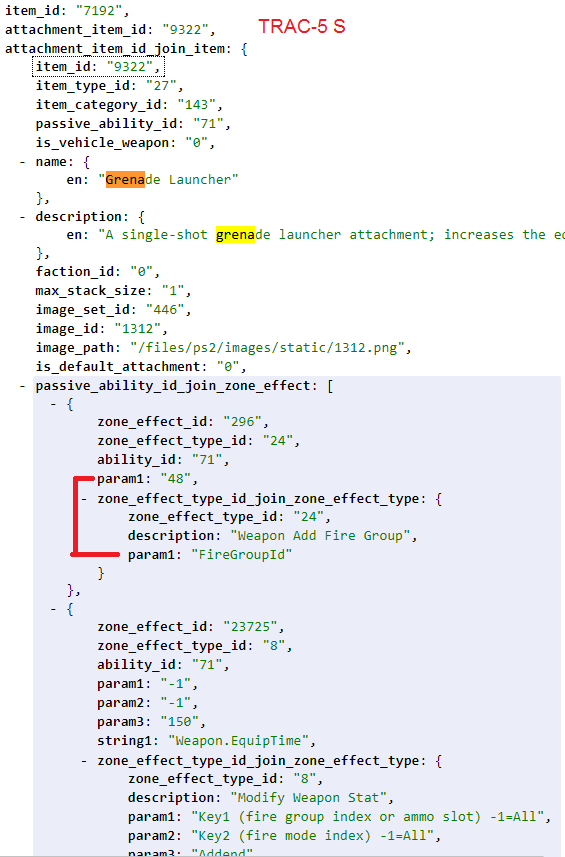
Attachments like Underbarrel Grenade Launcher function by attaching an additional fire_group to a weapon.
Each API firemode contains a complete set of parameters and keys to entries in other collections that define how a weapon functions. So it is technically possible to give a weapon completely different functions in different firemodes; that’s how NSX Amaterasu works.
The fire_mode collection will usually have multiple entries for each weapon, all using the same item_id key. So when joining the item_id collection, remember to use ^list:1 modifier, or when searching the fire_mode collection manually, remember to use &c:limit=400 modifier.
Cone of Fire Bloom: cof_recoil
Short Reload: reload_time_ms
Reload Chamber Time: reload_chamber_time_ms
Pellets Per Shot: pellets_per_shot
Pellet Spread: pellet_spread
Magnification: default_zoom
Projectile Speed: muzzle_velocity
Minimum Damage: damage_min
Maximum Damage: damage_max
Minimum Damage Range: damage_min_range
Maximum Damage Range: damage_max_range
Resistances: damage_target_type, damage_resist_type
weapon
Parent Collections: item -> item_to_weapon
Key: weapon_id – required to join fire_group collection.
Sprint Recovery Time: sprint_recovery_ms
A delay before a weapon can be fired after you stop sprinting.
Equip Time: equip_ms
Unequip Time: unequip_ms
Scope In Time: to_iron_sights_ms
Scope Out Time: from_iron_sights_ms
Unused or unknown fields
weapon_group_id, turn_modifier, move_modifier
fire_group
Parent Collections: item -> item_to_weapon -> weapon_to_fire_group (list)
For each weapon_id there are one or several corresponding entries in fire_group collection.
Each fire_group entry refers to weapon’s in game firemode, such as 3x Burst, Semi Auto, etc.
Each fire_group entry has an index, which refers to the order of in-game firemodes. Index of 0 corresponds with weapon’s first firemode.
Most fire_group entries have two firemode_ids. The first defines how the weapon behaves while hip firing, the second – ADSing.
Example
Link to example query. First, we have to access TRAC-5’s weapon_id by joining the item_to_weapon collection. TRAC-5 has two in-game firemodes, semi auto and auto. This is represented in the API by fact that there are two entries in weapon_to_fire_group collection with TRAC-5’s weapon_id. But first you have to join the item_to_weapon collection to access TRA
Each weapon_to_fire_group entry contain a fire_group_id and index.
The entry with index of 0 refers to TRAC-5’s default in-game firemode – the full auto one. Pressing the in-game Change Firemode key basically increases weapon’s current Fire Group index by 1.
For each fire_group_id, there are two entries in fire_group_to_fire_mode collection.
Again, each fire_group_to_fire_mode entry contains a fire_mode_id and index.
The entry with index of 0 refers to hip fire stats of the weapon, index of 0 refers to ADS stats.
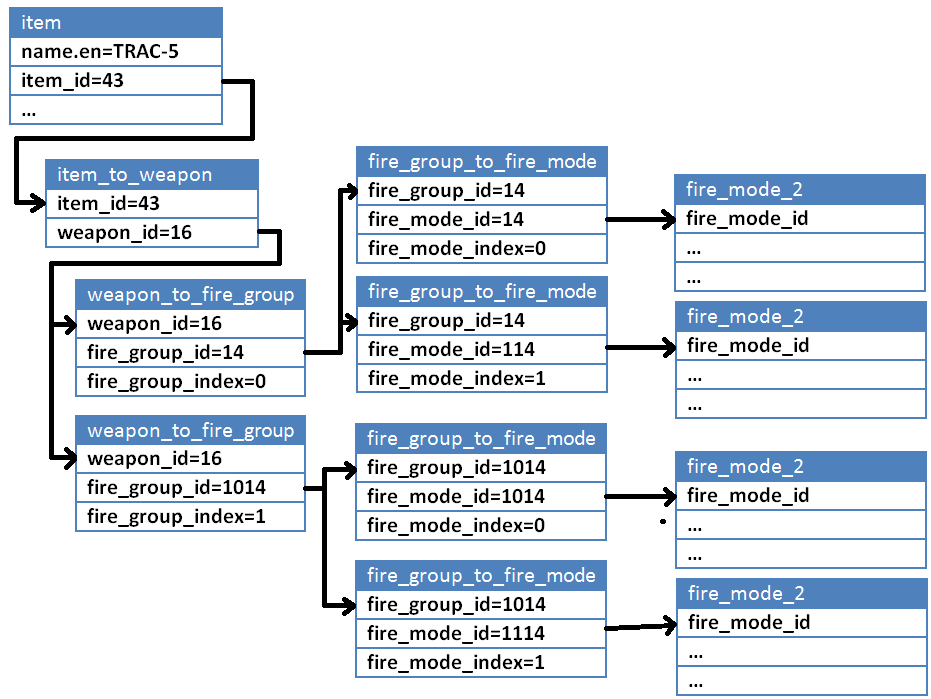
Each fire_mode_2 entry completely describes how a weapon performs, so in theory, a weapon can have completely different performance between hip firing and ADSing. Same goes for different in-game firemodes. This is why it’s possible for Spiker to have a secondary charge up mode.
Additional Fields
For some specific weapons, fire_group entries also contain some crucial stats:
transition_duration_ms – how long does it take a weapon to switch to this fire group.
chamber_duration_ms – how long does it take to cycle a Bolt Action or Pump Action weapon between shots. To calculate actual time between shots, you need to add together the chamber_duration_ms and refire_ms.
can_chamber_ironsights – whether a Bolt Action or Pump Action weapon can be cycled between shots while the user Aims Down Sights.
spool_up_ms – how long does it take for a spool-up weapon to reach its maximum Rate of Fire. Ex. T7 Mini-Chaingun
spool_up_initial_refire_ms – initial Refire Time of a spool-up weapon.
fire_group_to_fire_mode
A pass-through collection between fire_group and fire_mode_2. In addition to fire_mode_ids, also contains indexes of relevant fire_modes.
fire_mode_2
This collection is much trickier to access than fire_mode, and requires a multi-level join. However, in return it provides a much clearer structure and more stats.
Collection: fire_mode_2
Parent collections: item -> item_to_weapon -> weapon_to_fire_group (list) ->
fire_group_to_fire_mode (list) -> fire_mode_2
Check this example to see which keys you need to specify for each join.
Join key: fire_mode_id
Contains keys: player_state_group_id, damage_direct_effect_id, damage_indirect_effect_id
Step by step
item -> item_to_weapon
To learn weapon’s weapon_id.
item_to_weapon -> weapon_to_fire_group (list)
Here you get a list of weapon’s in-game firemodes, such as “3x burst” and “semi-auto”. Each fire group has an index. Index of 0 refers to weapon’s default firemode.
weapon_to_fire_group (list) -> fire_group_to_fire_mode (list)
Here you get a list of fire modes for each fire group. Usually this will be hip firing and ADSing. Each mentioned firemode will also have an index. Usually, index of 0 usually refers to hip firing, and index of 1 to ADSing.
fire_group_to_fire_mode (list) -> fire_mode_2
Finally, you get to weapon stats for each firemode.
Fields
fire_mode_2 collection has the same fields as fire_mode collection, and more:
automatic – defines whether the weapon will continuously fire if you hold the “fire” key.
move_modifier – a multiplicative modifier to player’s movement speed in this firemode. This is how you access weapon’s ADS Movement Speed Modifier.
cof_scalar, cof_scalar_moving – multiplicative multipliers to Cone of Fire values written in Player State Group entries. For example, Laser Sight functions by reducing cof_scalar of hip fire fire_modes. Moving CoFs are already affected by cof_scalar, so cof_scalar_moving is an additional variable.
Projectile Velocity aka Muzzle Velocity: projectile_speed_override
Each projectile in PS2 has a pre-defined velocity. This field will override projectile’s pre-defined velocity. This is a convenient way for developers to set different velocities for different weapons that use the same projectile (e.g. bullet).
Magnification: zoom_default
This is the field that gets overridden by optics attachments.
Pellet Spread: cof_pellet_spread
For non-shotgun weapons, this will be equal to 0.
Cone of Fire Bloom: cof_recoil
Headshot Damage Multiplier: damage_head_multiplier
Increase this is by 1 to get a total multiplier. E.g., damage_head_multiplier of 1 means the weapon deals 2x damage on headshots.
Legshot Damage Multiplier: damage_legs_multiplier
Subtract this value from 1 to get the total multiplier. E.g. damage_legs_multiplier of -0.1 means the weapon deals 0.9x damage on legshots.
fire_ammo_per_shot – determines how many rounds a weapon spends with each shot. E.g., shotguns fires multiple pellets per shot, but spend only one round per shot. While NSX Masamune fires all 4 rockets at the same time from the hip.
fire_auto_fire_ms – sets the weapon’s Refire Rate in fixed burst firemodes.
fire_burst_count – sets the weapon’s burst length in fixed burst firemodes.
fire_charge_up_ms – determines for how long can you hold the fire key before releasing to fire. E.g. Lancer. It is unclear where the information about different charge levels is stored.
fire_delay_ms – determines the amount of time that passes between you clicking to fire, and the weapon firing. E.g. NSX Yumi, RailJack.
Minimap Fire Detect Range: fire_detect_range
Refire Time: fire_refire_ms
The amount of time that must pass between shots. Refire Time also plays an important role in CoF Recovery and Recoil Recovery processes. Can be used to calculate weapon’s Rate of Fire:
Rate of Fire = 60 / Refire Time.
Pellets Per Shot: fire_pellets_per_shot
How many projectiles a weapon fires with each shot. Important for shotguns and other similar weapons.
Maximum Indirect Damage: max_damage_ind
Maximum Indirect Damage Radius: max_damage_ind_radius
Minimum Indirect Damage: min_damage_ind
Minimum Indirect Damage Radius: min_damage_ind_radius
Go here to learn about Indirect Damage Mechanics.
Recoil Statistics
Maximum Recoil Angle: recoil_angle_max
Minimum Recoil Angle: recoil_angle_min
First Shot Recoil Multiplier: recoil_first_shot_modifier
This is the total multiplier, no need to add or subtract anything.
Maximum Horizontal Recoil: recoil_horizontal_max
Minimum Horizontal Recoil: recoil_horizontal_min
Horizontal Recoil Tolerance: recoil_horizontal_tolerance
Maximum Vertical Recoil: recoil_magnitude_max
Minimum Vertical Recoil: recoil_magnitude_min
Recoil Scaling Stats: recoil_increase, recoil_increase_crouched,
recoil_horizontal_max_increase, recoil_horizontal_min_increase
Recoil Recovery Delay: recoil_recovery_delay_ms
Recoil Recovery Rate aka Recoil Decrease: recoil_recovery_rate
recoil_recovery_acceleration – no solid information on how it functions, presumably the value of 1000 means there is no acceleration.
Unused or unknown fields
grief_immune, sprint_fire, turn_modifier, use_in_water, cof_override, cof_range, armor_penetration, shield_bypass_pct
effect
Parent Collection: fire_mode_2
Join keys: damage_direct_effect_id, damage_indirect_effect_id
This collection’s entries contain effects caused by weapons. Usually, they just repeat the weapon’s damage values, but there are exceptions.
For example, accessing Rocket Launchers’ Indirect Damage Effect allowed to discover the Hidden Scaling of Indirect Damage based on Rocket Flight Distance.
Similarly to zone_effect collection, you can join the effect_type collection to get textual description of what effect’s parameters do.
player_state_group
Contains some information about weapon’s Cone of Fire properties, but less than player_state_group_2.
Parent Collection: fire_mode_2
Each fire_mode_2 entry contains a player_state_group_id. The player_state_group collection contains multiple entries with the same player_state_group_id.
Each entry contains the textual description of the player state, like “Standing” or “CrouchWalking”, and weapon’s Minimum Cone of Fire in that state.
Fields: player_state, min_cone_of_fire
player_state_group_2
Basically the same as player_state_group collection, but with more stats.
Parent Collection: fire_mode_2
player_state_id – determines which player stance is being described in this entry.
| Player State ID | Stance |
| 0 | Standing Still |
| 1 | Crouching Still |
| 2 | Standing Moving |
| 3 | Sprinting |
| 4 | Falling Long |
| 5 | Crouching Moving |
can_iron_sight – whether the user can Aim Down Sights in this state. This is likely the field that was changed when players lost the ability to Aim Down Sights while jumping and falling.
cof_grow_rate – degrees per second, the speed of Cone of Fire expansion when it blooms or when the player moves to a stance with larger Minimum CoF.
cof_recovery_rate – degrees per second, the speed at of Cone of Fire reduction when the user stops firing or moves to a stance with lower Minimum Cone of Fire.
Maximum Cone of Fire: cof_max
Minimum Cone of Fire: cof_min
Cone of Fire Recovery Delay: cof_recovery_delay_ms
I assume this functions by the same principles as Recoil Recovery Delay.
Unused or unknown fields
cof_shots_before_penalty, cof_recovery_delay_threshold, cof_turn_penalty
fire_mode_to_projectile
A pass-through collection between fire_mode or fire_mode_2 and projectile collections.
projectile
Contains information about the projectile used by a weapon in specific fire_mode.
Parent Collection: fire_mode_2 -> fire_mode_to_projectile -> projectile
Projectile Speed aka Muzzle Velocity: speed
Keep in mind that this field will be usually overridden by projectile_speed_override in fire_mode_2 entry.
Projectile Lifespan: lifespan
Dumbfire Rocket Acceleration: acceleration
Dumbfire Rocket Maximum Speed: speed_max
Projectile Gravity: gravity
drag – unknown field. Possibly a delay between weapon “firing” and projectile appearing. It seems to be greater than zero only for grenade-like weapons. Drag > 0 query.
Projectile Flight Type: projectile_flight_type_id
This field can be used to search or join the projectile_flight_type collection. This is a small collection with only a few entries:
- Ballistic
- True Ballstic – Uses Real Gravity
- Dynamic
- Proximity Detonate
These descriptions can be used to speculate how the projectile will behave in game.
- Ballistic type is likely to “detonate” and disappear upon hitting anything.
- Dynamic type is assigned to grenade-like projectiles, so it means it will bounce around until the lifespan is over, and then it will “detonate”.
- Proximity Detonate type likely means the projectile will “detonate” when near an eligible enemy object. E.g. flak weapons.
By “detonate” I mean the projectile will apply its effects. E.g. a bullet will deal direct damage, a rocket will explode and deal direct and indirect damage, a Smoke Grenade will puff out smoke.
Lock-on Turn Rate: turn_rate
Lock-on Lose Angle: lockon_lose_angle
Lock-on Lifespan: lockon_lifespan
Lock-on Acceleration: lockon_acceleration
Still no idea how it works.
item_attachment
PlanetSide 2 weapon attachments are also a part of the item collection. The item_attachment collection contains entries with item_ids of attachments, available to a weapon with a certain item_id.
Example query. Example response.
Parent Collection: item
Then you can join the item collection to get the item entries for all attachments, available to a weapon.
zone_effect
Among other things, this collection contains effects of all weapon attachments.
Parent Collection: item
Most attachment item entries have a passive_ability_id field. You can use this to join it with ability_id of zone_effect entries.
zone_effect_type
This collection contains textual descriptions of values stored in zone_effect entries.
Each zone_effect entry has a zone_effect_type_id field. It can be used to create a join with zone_effect_type collection.
Attachment Effects Examples
Figuring out attachment effects can get kinda messy, so let’s go over a few examples so you get the general idea of how it works.
Scope
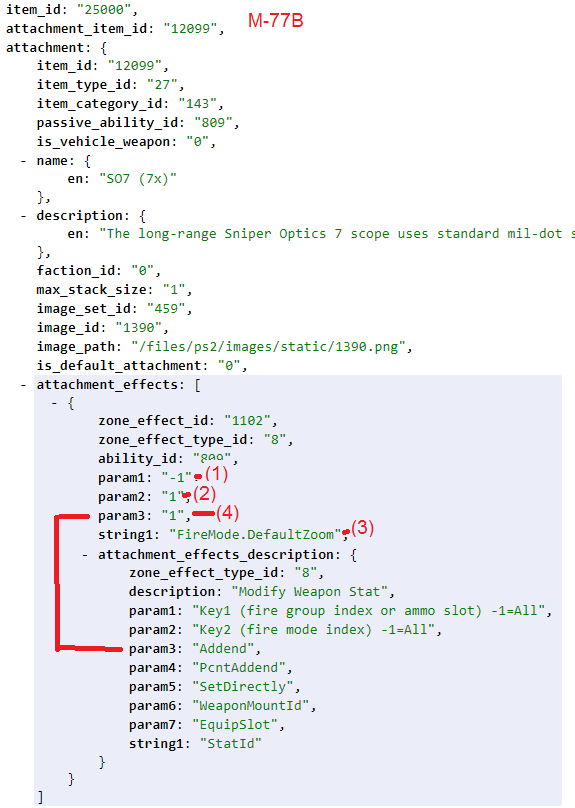
Query. Here we are interested in four things.
- The attachment affects all fire_groups.
- The attachment affects only fire_modes with index of 1 (usually, ADSing).
- The attachment changes weapon’s default zoom in affected firemodes.
- The value is changed by adding “1” to it.
M-77B has Default Zoom of “6”, so the 7x Scope Attachment simply adds “1” to that value.
Forward Grip
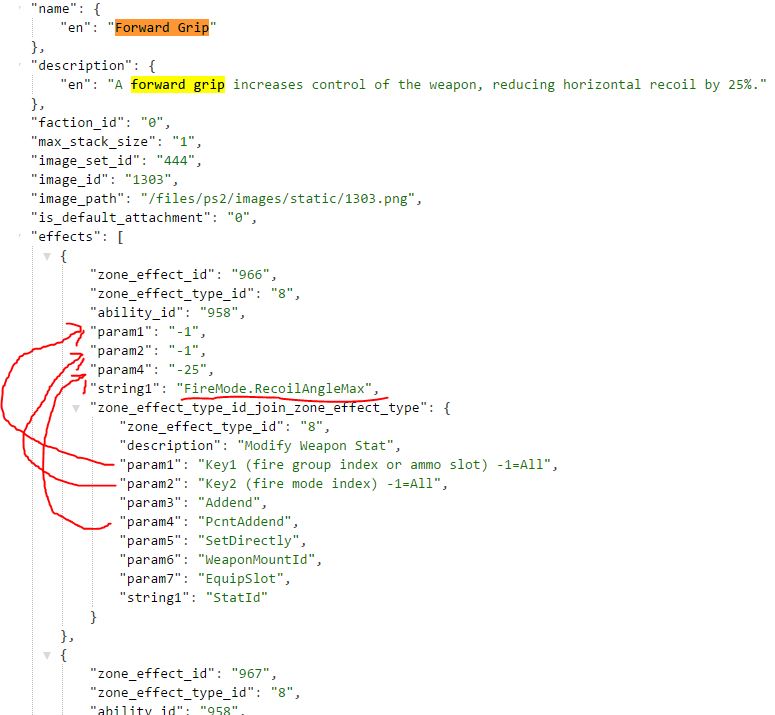
The “string1” description tells us the affected weapon statistic is Maximum Recoil Angle.
“param1” and “param2” are set to “-1”, which means that all weapon’s Fire Modes are affected by the attachment, i.e. regardless if you hip fire or ADS and from which stance.
“param3” is not set for this effect.
“param4” is set to “-25”. Description of param4 is “PcntAddend”, where “pcnt” stands for “percent”. So this effect of the Forward Grip reduces Maximum Recoil Angle by 25%.
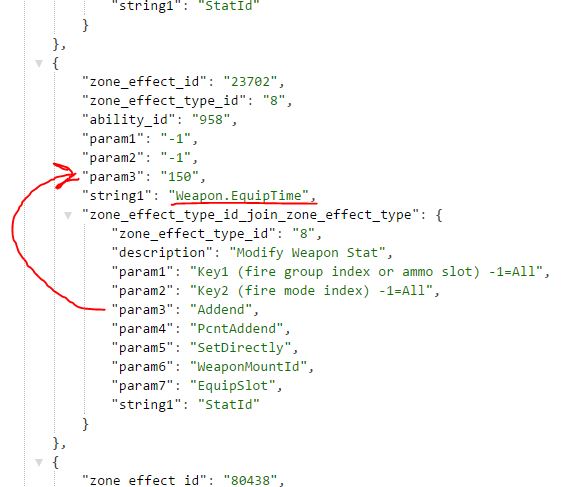
But there are other effects of the Forward Grip.
For example, here we can see that for TRAC 5 Forward Grip also increases Equip Time by 150ms.
Suppressor
Here we can see that Suppressor for TRAC 5 reduces Max Damage Range by 5m and Min Damage Range by 20m.
HS/NV Scope
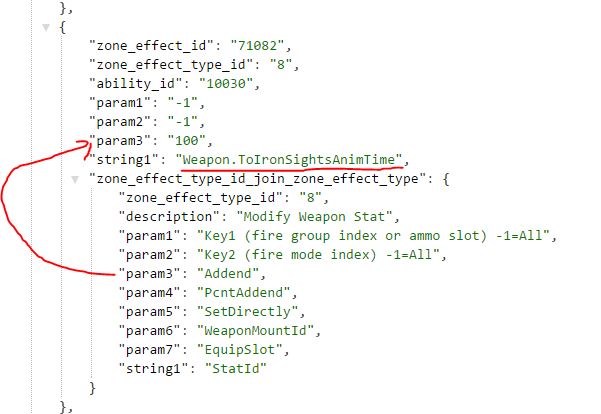
Increases the time it takes to ADS by 150ms.
For comparison, by default it takes TRAC 5 another 150ms to ADS:
Underbarrel Grenade Launcher
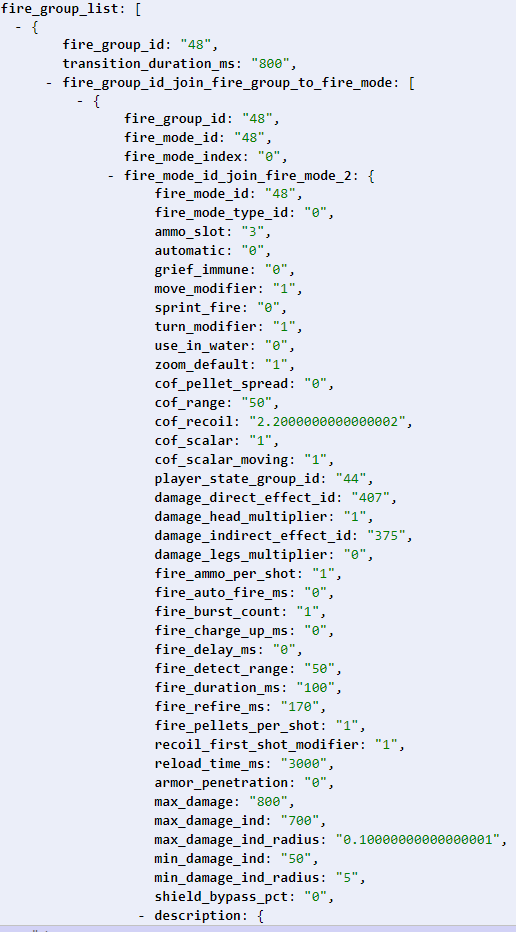
Example query. We can see that Underbarrel Grenade Launcher attachment adds a Fire Group to a weapon. Let’s query that Fire Group. Here’s what we get:
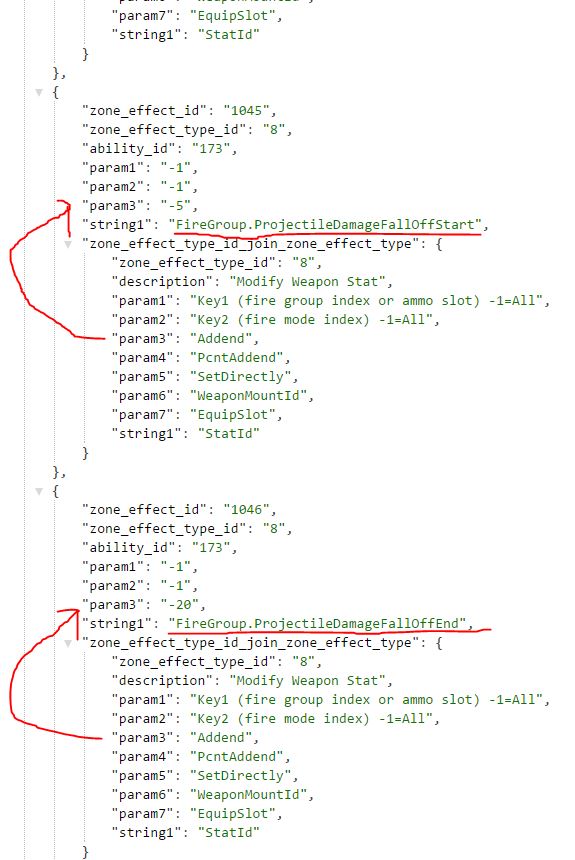
This way we can access exact stats of the Grenade Launcher, and learn that it takes 0.8 seconds to switch to it.
Ability Effects Examples
zone_effect collection also contains effects of passive and active abilities, such as Zealot Overdrive Engine of VS MAXes. Example query.
We can query the armor_info collection and learn that ZOE 1 increases incoming damage by 20% from all sides except Bottom.
Armor and Resistances
You can learn about Armor and Resistance interactions here.
profile_2 – contains unit names and their profile_ids.
profile_armor_map, profile_resist_map – contains armor_info_ids and resist_info_ids for built-in armor and resistance values for all profiles, using profile_id as key.
armor_facing – contains descriptions for different armor_facing_ids. You need those to learn which armor_info is applied to which unit’s projection.
armor_info – contains the actual information about units’ armor, both built-in and acquired from items and abilities, using armor_info_id as key.
resist_info – same as armor_info, but for resistances. resist_info_id is key.
resist_type – contains textual descriptions for different resist_type_ids. Incomplete and sometimes not exactly accurate.
For example, it doesn’t contain Damage Type 9 – Tank Mine and Damage Type 11 – C4. It also won’t tell you that AV Grenades use Damage Type 34 – Infantry Rockets.
All of these collections are utilized in the “Resistances” and “Built In Resistances” pages of the Toolbox, which calculates weapon damage to vehicles.
This multi-join query will show you built-in Armor and Resistance values for the Lightning.
Credits
Huge thanks to /u/L33-the-3rd, /u/shaql, /u/fisu_, /u/Wrel and /u/nehylen for teaching me how to use the API. You guys are awesome, wouldn’t be here without y’all.

