Introduction
PlanetSide 2 is a First Person Shooter, so naturally using your weapons is a big part of gameplay. However, in-game descriptions of weapons and attachments are far from being comprehensive, and online spreadsheets can be confusing to grasp.
Purpose of this guide is to help you learn everything there is to know about PlanetSide 2 weapons.
Where to get weapon stats
Explained in this article.
Weapon Mechanics
Let’s start by examining the in-game weapon stat picture, and use TRAC-5 Terran Republic Carbine as an example:
The main description is mostly for flavor, but it will tell you which factions can use the weapon.
Weapon Type
TRAC-5 Weapon Type: carbine.
Weapon’s type provides you with a general idea about the weapon, as well as determines which classes can use it, for example:
- Compared to Assault Rifles, Carbines generally have a bit higher vertical recoil, lower projectile speed, and shorter minimum damage range, which makes them less effective at range. But better “hip accuracy” makes them better when hip firing.
- Carbines can be used by Engineer and Light Assault classes.
Damage
TRAC-5 Damage: 143 / 10m / 112 / 60m.
The four values are: maximum damage, maximum damage range, minimum damage, minimum damage range.
Usually players use a more convenient damage formula: 143 @ 10m – 112 @ 60m.
This reads as: TRAC-5 does maximum damage of 143 up to 10 meters, and then the damage linearly falls down to its minimum value of 112 at 60m. After 60m bullets will always do minimum damage.
The difference between Max and Min damage values is called damage degradation. The bigger it is, the more noticeable will be the decrease in weapon’s performance as the distance to the target grows.
When damage is reduced by Resistances or Armor, such as Nanoweave, it is rounded up. However, when affected by degradation over range, it is rounded down.
Locational damage

Head shot damage is multiplied by Headshot Damage Multiplier. Most weapons have Headshot Damage Multiplier of 2x, but here are the most notable exceptions:
- Bolt Action Sniper Rifles: 2.1x
- Shotguns, T7 Mini-Chaingun, Hunter Crossbow: 1.5x
- NS-61 Emissary autopistol: 1.8x
- NSX Tomoe: 2.5x
- NSX Daimyo: 5x
Interesting facts:
- Both 143 and 125 damage bullets require 4 headshots to kill a generic infantry target.
- Both 200 and 167 damage bullets require 3 headshots.
- Headshots ignore Nanoweave Armor.
Arms and Body take normal damage from bullets, but it can be reduced by Nanoweave Armor.
Weapon Model is ignored by bullets; they go right through it. Video test.
Leg shot damage is multiplied by Legshot Damage Multiplier. All known small arms and machineguns have 0.9x Legshot Damage Multiplier.
Damage to legs can be further reduced by Nanoweave Armor, down to 1x * 0.9 * 0.8 = 0.72x damage.
This can be critical in some edge cases. For example, a Hunter Crossbow bolt to the chest and one knife swing will kill an infantryman through full nanoweave, but will fail to do so if the bolt hits a leg.
Hit Markers
Thanks to /u/Yaluzar and /u/VORTXS for these pictures.
PlanetSide 2 will provide different hit markers depending on which body part you hit and how much damage you deal.
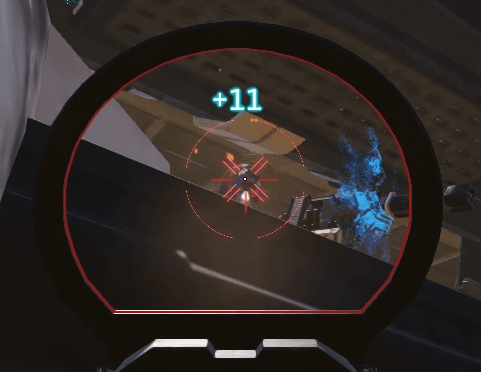

- A simple hit is a cross.
- A headshot is a double cross.
- Any hit that deals over 250 damage will have a circle around it.
BTK: Bullets to Kill
BTK = Round_UP(Target Health / Bullet Damage)
Unless specified otherwise, we will talk about BTK against generic infantry target, which has 1000 health + shields, no Nanoweave and takes only body shots.
All classes except infiltrator have this amount of health and shields. Infiltrators have 500 health and 400 shields.
Bullet Damage Tiers
Bullet Damage values are usually tiered. Most common bullet damage tiers:
| Bullet Damage | BTK |
| 500 | 2 |
| 334 | 3 |
| 250 | 4 |
| 200 | 5 |
| 167 | 6 |
| 143 | 7 |
| 125 | 8 |
| 112 | 9 |
| 100 | 10 |
| 91 | 11 |
| 84 | 12 |
| 77 | 13 |
| 71 | 14 |
| 67 | 15 |
The important thing to understand about damage tiers, is that If the bullet damage gets even one point lower, you’re going to need an additional bullet to kill a generic infantry target. For example:
- At 10m TRAC-5 does 143 damage, and it takes 7 bullets with that damage to kill a generic target: 143 * 7 = 1001 damage.
- At 11m, TRAC-5 will deal 142 damage, and 7 bullets with 142 damage will deal only 994 damage, so you will need an additional bullet to kill the target.
For most weapons, going even one meter beyond maximum damage range will increase BTK by one. This doesn’t mean that you should always try to stay within maximum damage range, of course.
BTK Thresholds
Most weapons deal less and less damage as distance to the target increases. This means that at longer ranges you will need more bullets to kill.
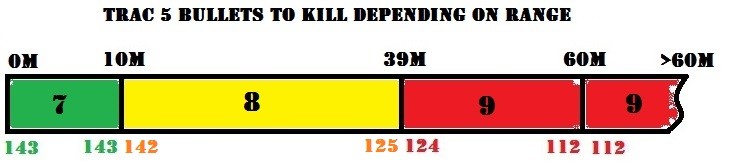
TRAC-5 has damage degradation of two tiers, from 143 to 125 to 112. So there are three bullets-to-kill values for this weapon:
- BTK of 7 within 10m, where TRAC-5 does 143 damage
- BTK of 8 between 11m and 39m, where TRAC-5 does between 142 and 125 damage
- BTK of 9 after 40m, where TRAC-5 does between 124 and 112 damage
These ranges: 0m – 10m, 11m – 39m, 40m+ are called BTK Thresholds.
- Most automatic primary weapons drop two tiers.
- Some automatic weapon, intended for ranged combat, drop only one tier.
- Most SMGs drop four tiers.
Advantages of high bullet damage
Weapons with higher bullet damage tend to be more effective at range, because their damage is harder to regulate on the receiving end, as they do damage in strong, sudden chunks as opposed to mild continuous drain.
Higher bullet damage makes individual bullets more important, so even if you see a tiny part of the target, and can only hit it with single shots, you’ll still be doing considerable damage.
If target was already wounded, higher bullet damage increases the chance that you’ll kill the target with your first shot.
High bullet damage increases your Alpha Damage.
Alpha Damage
Alpha damage is a term used to describe the damage done to the enemy before he has a chance to react, or damage done by a first shot.
In a theoretical situation where two players start shooting at each at the same time, Alpha Damage would describe the damage of their first shots. In this situation, the gun with higher alpha damage will have an advantage, because sometimes the damage of the first shot is enough to kill the opponent. Starting the fight with a headshot would further increase this advantage.
Alpha Damage vs DPS
Rate of Fire doesn’t come into play until the second shot and on.
A slow firing 200 damage ACX-11 versus a rapid fire 125 damage SMG means that the ACX-11 will do 200 damage with the first shot and the SMG will do 125.
It will only take a few tenths of a second for the SMG to compensate for this, but a few tenths of a second is all that separates the best from the worst Time to Kill as well.
It’s a disadvantage that the lower bullet damage gun must climb out before it can gain a DPS advantage with higher RoF. It’s why the AC-X11 owns but the GD-7F is a constantly reloading blah sandwich.
It also means, to the astute observer, that if the first shot is a headshot, the higher damage gun is almost assured to win, regardless of the opponent.
Spray and pray guns don’t land headshots as easily or as often, so best case scenario is 400dmg vs 250dmg, but more realistically it’s 400 vs 125.
This isn’t even including the psychological aspect of having your shields damn near gone the same instant the engagement starts.
It’s also why the Gauss Rifle, Gauss Rifle S, and GD-22S among others are so insanely beastly despite not out-DPSing the more common 143 damage guns on paper.
Sure, if the fight starts with the lower RoF gun spraying bullets all around the target and never hitting them, they’re TECHNICALLY at more of a disadvantage than had the higher ROF gun done the same, but beginning a fight like this means a certain death for either of them, so it’s entirely academic.
– Epic High Five
Indirect Damage
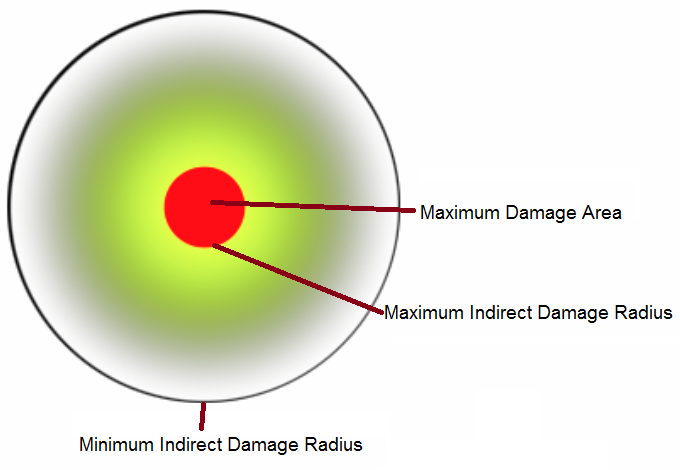
Some weapons deal splash damage with their attacks, like X2 Lasher and most Rocket Launchers. Indirect Damage is defined by 4 stats:
- Maximum Indirect Damage
- Maximum Indirect Damage Radius
- Minimum Indirect Damage
- Minimum Indirect Damage Radius
Indirect damage scales over distance: Maximum Indirect Damage is dealt within Maximum Indirect Damage Radius, then the damage linearly downscales to Minimum Indirect Damage at Minimum Indirect Damage Radius. Basically, the further you are away from the explosion, the less indirect damage you take.
Indirect damage is applied on direct hits on as well.
Fire Rate
TRAC-5 Fire Rate: 750 RPM (rounds per minute).
Also known as Rate of Fire, or RoF for short. Determines how many rounds would a weapon fire in a minute if it didn’t have to reload.
Most weapons have constant Rate of Fire, but there are exceptions: G30 Vulcan, T7 MCG and Hellion chainguns start firing at lower RoF, and build it up to the maximum over time. T7 MCG also has access to BRRT attachment, which reduces spool-up time and increases maximum RoF.
Known bug: depending on PC performance and settings, there could be a negative impact to Rate of Fire.
DPS: Damage Per Second
Knowing weapon’s RoF, you can calculate its Damage Per Second (DPS):
DPS = Bullet Damage * Rate of Fire / 60 seconds in a minute
TRAC-5 DPS: 143 * 750 / 60 = 1787
TTK: Time To Kill
TTK = (BTK - 1) / ( RoF / 60)
TRAC-5 TTK: (7 – 1) / (750 / 60) = 6 / 12.5 = 0.48 seconds
Average TTK is considered to be 0.5 seconds.
Advantages of high RoF
High RoF makes damage more consistent in CQC, when target will be moving and actively dodging your fire. The higher your RoF, the easier it will be to hit your target with at least some bullets.
High RoF gives a TTK advantage when transitioning to the next BTK Threshold.
For example, let’s compare two SMGs:
AF-4 Cyclone: 167 @ 6m – 100 @ 46m / 652 RoF
SMG-46 Armistice: 125 @ 6m – 84 @ 42m / 896 RoF
They both have similar DPS. At 6m, they have the same TTK of 0.47. However, when crossing the bullet damage threshold from 6m to 7m, Armistice’s TTK will increase to 0.54, and Cyclone’s TTK will increase to 0.56.
They both will need one additional bullet to kill, but Armistice fires those bullets at a much faster rate, so it’s a less of a problem for that weapon.
This determines how much of a penalty is inflicted by using Suppressor, and generally for engaging the target outside the maximum damage range.
Rate of Fire defines weapon’s Refire Time, which plays an important role in Recoil Recovery Time.
Wrel has a great video about using slow firing weapons, which also highlights some other advanced weapon mechanics:
Fixed Burst Weapons
Burst weapons have two parameters when it comes to Rate of Fire:
fire_refire_ms – for normal weapons, this is the Refire Time, that determines the time between shots during automatic fire. For burst weapons, Refire Time determines the minimum amount of time between the last shot in one burst, and the first shot in the next burst.
fire_auto_fire_ms – this parameter is unique to burst weapons, and it determines the time between shots within a burst, i.e. what normally would be the Refire Time for a non-burst weapon.
Burst RoF = (1000 / fire_auto_fire_ms) * 60
RPM = (1000 / ((Burst Length - 1)* fire_auto_fire_ms + fire_refire_ms)) * 60 * Burst Length
Grenade and Melee Interactions with Burst Weapons
Credit for this discovery goes to /u/regulusmagnus.
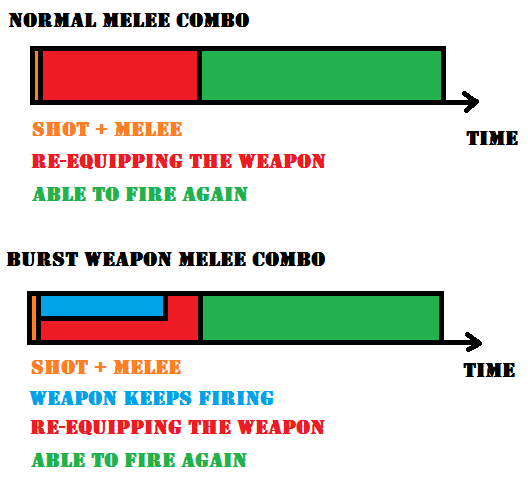
Fixed burst weapons have an unusual interaction: you can perform quick melee attacks and throw grenades during the fixed burst. Simply press “melee attack” or “throw grenade” right after you click “fire” to start the burst.
In general, performing a quick melee strike or throwing a grenade is nearly instant, and it ignores weapon’s Refire Time, if you do it right after firing a weapon. However, it forces you to re-equip your weapon, and there will be some time before you can fire again.
Using a burst weapon allows you to “break” the game’s weapon mechanics, and effectively keep firing the weapon even while not holding it. Video demonstration.
- Throwing NSX Fujin counts as a grenade throw, and this trick works with it as well.
- This trick does not work while Aiming Down Sights.
It’s pretty clear that this is a bug, and not an intended feature, but might as well abuse it until it gets fixed, if ever.
How to benefit from this in-game
To be blunt – you’re not very likely to. To benefit from this trick, and to reliably kill the enemy with a melee or NSX Fujin combo, you need a burst fire weapon that deals high damage per burst:
As you can see, the list is fairly short, and none of them are a perfect fit. The trick is nice to know, but you won’t be using it to farm droves of enemies with any of these weapons.
NSX Yumi benefits from this technique a lot, mostly due to charge up delay. However, this weapon is absolutely horrible for fighting within ~15m, and normally you want to stay out of close range, so there won’t be many opportunities.
Pilot is almost a good fit. To be absolutely perfect, it’s only missing the extra 25 damage per burst that it would take to reliably melee combo full health enemies with max rank Nanoweave.
Faction specific burst pistols get an honorable mention, because you can do one burst, and then melee combo together with a second burst, reliably killing through Nanoweave. The tricky part is to do the melee strike right after the second burst started. Do it too early – you won’t be getting out the second burst. Do it too late – you’re not getting the benefit from this trick.
Rocklet Rifle is normally worthless against infantry due to poor accuracy and not having enough damage to kill a full health enemy even assuming you hit all rocklets. Doing a melee combo during its burst solves both problems, and confuses the hell out of the enemy. However, it’s still nothing more than a last resort, after you’ve exhausted ammo from both your primary weapon and sidearm. Even then, wielding your knife should arguably be your go-to option.
Jackhammer deals such high damage per burst that doing a melee strike on top of it is redundant. If you’re in melee range, you’re already getting 100% burst accuracy, which is enough to kill almost all infantry targets.
Bolt Action and Pump Action Weapons
Time Between Shots = Refire Time + Chamber Duration
Chamber Duration and Refire Time can be accessed in DBG API. Search for chamber_duration_ms and fire_refire_ms respectively.
Time Between Shots is one of the biggest differences between different Bolt Action and Pump Action weapons.
Almost all BASR have Refire Time of 170ms, and Bolt Chamber Time is shown on in-game weapon stat sheet.
For example, M-77B has 1225ms Chamber Duration and 170ms Refire Time, so it can fire a shot once every 1225 + 170 = 1395ms = 1.395 seconds.
Pump Action Shotguns have Refire Time of 150ms, and Chamber Duration of 600ms or 700ms, so their Time Between Shots is 0.75 and 0.85 seconds respectively.
Melee Interactions with Pump Action and Bolt Action Weapons
Credit for this discovery goes to /u/Diesl
Pump Action and Bolt Action weapons have an unusual interaction: you can perform quick melee attacks during chamber animation. This works with the Hunter Crossbow as well.
To trigger this bug-feature, you have to hit “quick melee” during Chamber Time, but not during Refire Time. If you quick melee during Refire Time, the weapon will still perform the usual chamber animation after the weapon is re-equipped, so there will be a significant delay before you can fire again.
The Time Between Shots will still increase by ~half a second, but it’s still much faster than if you performed a melee attack and rechambering separately.
To benefit from this bug-feature in game, you have to perform a melee combo on the enemy. Remember to quick melee ~0.2 seconds after the shot. You will be able to fire or perform another melee combo faster than usual.
Note that this doesn’t work with grenades, only quick melee attacks.
Muzzle Velocity
TRAC-5 Muzzle Velocity: 490 m/s.
Also known as bullet speed or projectile velocity. Determines the speed at which bullet travels, in in-game meters per second.
High projectile velocity is important for ranged combat, as it makes it easier to hit targets, especially if they are moving, both due to less pronounced bullet drop, and due to reduced bullet travel time. When firing at moving target at range, remember to lead – aim a bit ahead of the target.
In PlanetSide 2, bullets are affected by gravity, and the slower the bullet flies, the more time gravity has to affect it. When firing at distant targets you have to aim a bit higher to hit the target.
All infantry weapons have the same Gravity of 11.25, except for bolt action sniper rifles, which have 7.5, and shotguns’ slug ammo, which has 8.
So when comparing two weapons with different Projectile Speeds, it’s easy to predict which weapon will have more drop.
Most Vanu Sovereignty primary and secondary infantry weapons do not have bullet drop, but they have lower projectile velocity on average. VS Bolt Action Sniper Rifles, Rocket Launchers and Shotguns Slugs do have drop.
It is assumed that bullets always fly at constant speed, with no acceleration or deceleration mechanics. However, most of the rocket-type projectiles do have acceleration mechanics, with starting velocity, acceleration, and maximum velocity.
When coupled with Projectile Lifespan, Projectile Velocity determines the projectile’s maximum travel distance.
Reload Speed
TRAC-5 Reload Speed: 3.8 sec / 2.595 sec.
Listed as long reload / short reload.
Short reload time is used when a gun has its magazine swapped, but the chamber isn’t cycled. The long reload time is when the magazine is swapped and the chamber gets cycled, which happens only if you empty the entire magazine.
Ammunition
TRAC-5 Ammunition: 40 / 240.
Listed as Magazine / Total Ammo. How many rounds the gun holds / how many rounds do you carry with yourself, including rounds loaded into weapon.
Some Vanu Sovereignty weapons use infinite ammo with heat mechanic: weapon generates heat when you fire, and loses heat when you stop firing.
Sprint Recovery
Weapons cannot be used while sprinting. The only exception from this is wielded melee.
When you stop sprinting, there is a Sprint Recovery Delay before you can start firing.
Sprint Recovery is equal to 0.3 seconds for infantry weapons and 0.5 seconds for MAX weapons.
Bullet origin
Not a statistic, but important part of weapon mechanics. In PlanetSide 2, bullets don’t actually fly from the weapon’s barrel, they fly from your first person camera, which is located somewhere in the upper chest of your 3rd person model.
Hip Accuracy and Aim Accuracy
(Cone of Fire)
Overall weapon accuracy is determined by two separate mechanics: recoil and cone of fire. Recoil is discussed in detail in the section below, for now let’s talk about Cone of Fire, which is an important mechanic, with lots of quirks and subtleties around it.
 ^ this is what you can see on the weapon stats sheet in game. But we will use the picture below, which is easier to comprehend.
Basics
PS2 CoF mechanics demonstrated by developers
Fired bullets are randomly distributed within the cone called Cone of Fire (CoF), measured in degrees.
At all times there are 3 CoF values: Minimum, Current and Maximum.
As long as you don’t fire, your Current CoF will almost instantly reduce to Minimum CoF.
Minimum CoF and Maximum CoF depend on your stance – what your legs are doing at the moment, and whether you’re aiming down sights or not.
Sprint CoF value is meaningless, because no weapon can fire while sprinting, and Sprint Recovery for all weapons is long enough for Sprint CoF to fully shrink to normal moving CoF before you have a chance to fire.
Cone of Fire Bloom
When you fire, your Current CoF will increasingly grow (bloom) with each shot, at a rate listed in Bloom per Shot field. It will continue to grow until you stop firing or your Current CoF reaches Maximum CoF.
Weapons that do more damage per bullet usually have higher Bloom per Shot values.
Notice that there are separate Bloom per Shot values for aiming down sights and hip firing.
Usually, hip Bloom per Shot is double of the ADS Bloom per Shot, but there are a lot of exceptions: T7 MCG, SMGs and most of the sniper rifles have same Bloom per Shot for both hip and ADS.
Size of the crosshair roughly indicates the size of your Current CoF when hip firing, but there is no way to ascertain your Current CoF when aiming down sights.
When you stop firing, Current CoF will shrink back to the Minimum CoF for your current stance, after a small delay, equal to weapon’s Refire Time for all known weapons.
CoF size increase speed is 50 degrees per second.
In essence, first few fired shots are the most accurate. The longer you fire the weapon without pause, the less accurate will it become.
Cone of Fire Recovery Rate
For vast majority of weapons, Cone of Fire recovers at a rate of 20 degrees per second, but there are exceptions:
CoF Recovery Rate can be potentially set separately for each stance.
CoF Example
If you aim down sights with TRAC-5 while moving while standing, your CoF will be 0.3.
If you fire ten rounds, your CoF will bloom by
0.05 x 10 = 0.5,
and will be equal to
0.3 + 0.5 = 0.8 degrees.
When you stop firing, your Current CoF will reduce back to 0.3, after a delay, equal to the refire time:
60 / 750 = 0.08 seconds.
And the reduction itself will take will take
(0.8 – 0.3) / 20 = 0.025 seconds.
So it will take:
0.08 + 0.025 = 0.105 seconds
to fully restore Cone of Fire after your last shot.
Advanced Information
Rule #1
If you change stances while firing, and your Current CoF is bigger than Minimum CoF for your new stance, your Current CoF will stay big until you stop firing.
Example: You see an enemy while sprinting. You stop sprinting, and start firing from the hip while moving. Then you decide you could use additional accuracy and aim down sights. But your cone of fire cannot reduce while you fire, so it will stay as big as it was when you were hip firing. The only benefit is that you will now use ADS CoF Bloom parameter.
Lack of understanding of this aspect of CoF mechanics is the reason behind 99% complains about “bad hit detection”, and “I dumped full mag in enemy’s back, then he turned around in killed me”. It’s likely out of that full mag only several bullets hit because the shooter’s CoF was huge.
Tip: In situations like this, either don’t waste time and speed on aiming down sights, or stop firing for a moment to let your cone of fire reset.
Exception: if you change stances and your Current CoF is larger than Maximum CoF for your current stance, your Current CoF will instantly reduce to match.
Most weapons cannot take advantage of this, since their ADS Maximum CoF is too large to reliably hit anything, but there are exceptions:
T7 MCG has fixed ADS CoF. ADSing even for a tiniest amount of time will “reset” the current CoF for this weapon, which got big while hip firing during a fall or a jump.
NSX Naginata has very small Maximum ADS CoF while being still, so even if your Current CoF is huge, staying still for a moment will instantly reduce your Current CoF back to the small Maximum CoF.
Rule #2
If you change stances while firing, and your Current CoF is smaller than the Minimum CoF for your new stance, your Current CoF will increase to match. However, if your Current CoF is larger than Minimum CoF for your new stance, your Current CoF will remain the same.
Implication: standing still can provide additional accuracy to first few fired shots, but then you can start moving without any cost in accuracy.
This is best explained by examples:
As you go about your business, you see an enemy and decide to kill him.
Example 1: You decide that you need maximum accuracy. You stand still and aim down sights and fire a ten round burst from your TRAC-5. Your initial CoF is 0.1, after firing ten rounds it increases to 0.1 + 0.05 * 10 = 0.6.
Dramatization: you successfully kill your target, but enemy sniper sees that you just stand still and kills you.
Example 2: You realize that standing still is a bad idea. You fire a ten round burst from TRAC-5 while aiming down sights and standing moving. Your initial CoF is 0.3. You fire off 10 rounds, and your CoF becomes 0.3 + 0.05 * 10 = 0.8.
Dramatization: you avoid being sniped, but due to increased CoF and because it’s harder to shoot while moving, too many of your shots have missed and target got away.
Example 3: You become the guru of gunplay. You fire four rounds with TRAC-5 while standing still and aiming down sights, then you start moving and fire six more rounds.
Your initial CoF is 0.1. You fire 4 rounds and it blooms to 0.1 + 0.05 * 4 = 0.3. Then you start moving, and due to changing stance your CoF “increases” from 0.3 to 0.3. Then you fire off 6 more rounds and your CoF blooms to 0.3 + 0.05 * 6 = 0.6.
Notice, that even though you were moving 60% of the time, your final CoF was the same 0.6 as in Example 1, when you were standing still the whole time.
Standing still during first few shots will provide an accuracy boost. But after those few shots, standing still will not provide any additional accuracy other than that standing still in itself makes hitting easier.
Jumping and Falling
Jumping will instantly kick you out of Aiming Down Sights.
Most weapons have a huge Minimum CoF for jumping and falling, so they will be extremely inaccurate mid air. The only exceptions from this are Carbines and Rocklet Rifle.
Jumping also slows you down, and this effect stacks. After a few consecutive jumps, your movement will slow down to a crawl for a few seconds.
While falling a short distance of ~5m, you can still Aim Down Sights, and you will be considered Standing Moving, even if you hold the Crouch key.
Example: While holding an Assault Rifle or an LMG, you jumped from the roof and your CoF got huge. While falling, you saw an enemy and opened fire. When you land, your cone of fire will stay huge until you stop shooting and let your cone of fire reset.
Angular Size
This research has been proven to be wrong. Do not use it.


Iron Sight Zoom
TRAC-5 Iron Sight Zoom: 1.35x.
“Default ADS Magnification” would be a more proper way to call it.
The strength of magnification when you aim down sights. For all weapons that actually use Iron Sights, 1.35x is the standard value. 1x Reflex Sights and HS/NV scope also provide 1.35x magnification. For sniper rifles that can’t use Iron Sights, “iron sight zoom” shows the magnification of the default sniper scope.
Fire Modes
Some weapons can switch between fire modes by pressing [B] key. There are Semi Auto, X-Round Burst and Full Auto fire modes.
Using single shot and burst modes should be avoided when possible, because the first shot of each burst (or each shot in semi auto) is subjected to First Shot Recoil Multiplier. This increases your recoil per time, and makes it harder to land several consecutive shots/bursts on target.
Burst weapons that always fire in 2-3 round bursts are an exception to that rule, since they usually have very low first shot recoil modifier.
For purposes of weapon mechanics, the same weapon in different fire modes is considered two different weapons. This makes it possible to create performance-altering fire modes, such as for Spiker pistol, which has a burst fire mode and a charge up splash attack mode.
Hidden Statistics
These statistics are not shown on the in-game stats sheet, but they still affect the performance of your weapon in a meaningful way. You have rely on external sources to access these stats.
Equip time
Equip Time refers to the time it takes for you to switch to an item and prepare it for use.
However, first you have wait through the Unequip Time of the item you had in hands previously. Unequip Time is equal to 0.25 sec for all weapons, except Anti-Materiel Rifles.
Example
Your primary weapon is TRAC-5 with 0.55 sec Equip Time. Your sidearm is Emperor with 0.25 sec Equip Time.
Switching from your primary weapon to the sidearm will take 0.25 second Unequip Time + 0.25 second Equip Time = 0.5 seconds before you can fire.
Switching from your sidearm to the primary weapon will take 0.25 second Unequip Time + 0.55 second Equip Time = 0.8 seconds before you can fire.
General notes
- Bigger and heavier weapon types have longer Equip Time.
- Equip Time is equal to 0.25 seconds for all pistols and wielding the knife
- Ranges from 0.55 to 1.2 seconds for most primary weapons.
- Equip time is increased by Forward Grip and Underbarrel Grenade Launcher.
- Using a quick melee attack or throwing a grenade forces you to re-equip your weapon.
Switching Items
A lot of weapon mechanics are tied to Refire Time, such as CoF Recovery and Recoil Recovery. However, Refire Time is completely ignored when you switch to a different piece of equipment.
For example, NS Decimator rocket launcher has Refire Time of 0.3 seconds. But you can fire a rocket, and instantly start switching to a sidearm. Or you can fire a Sniper Rifle and instantly perform a quick-melee attack. This is known as melee combo.
Reloading can also be instantly interrupted by switching items.
Using a quick-melee attack forces you to re-equip your weapon, but you can interrupt that process by equipping something else instead.
For example, let’s say you’re playing a Heavy Assault with a big LMG with a Forward Grip that takes ~1.25 seconds to equip. You perform a melee combo on one enemy, but suddenly another enemy appears. It will take you a long time to re-equip the LMG after a quick-melee attack. But you can interrupt the equipping of the LMG by equipping a Sidearm instead, which will take just half a second.
Throwing grenades also forces you to re-equip your weapon, but for some reason that process cannot be interrupted as quickly.
Projectile Lifespan
Determines the amount of time that bullet exists for. If the bullet doesn’t hit anything during it’s lifespan, it will disappear harmlessly.
Usually it’s not important, but can be crucial in certain edge cases, like super long range sniping:
Spectre’s bullets have lifespan of 1.25 seconds. Normal velocity is 570, suppressed velocity is 570 * 0.6 = 342. That would put theoretical maximum range at 712m normal and 427m suppressed.
ADS Movespeed Multiplier

Normally, you can move only at 50% speed while aiming down sights. However, some of the weapons allow you to move at 75% speed while aiming down sights. Naturally, being faster is good, as it means you’ll have easier time dodging incoming fire while aiming.
It’s important to realize that going from 50% ADS speed to 75% ADS speed actually makes you 50% faster in comparison: 0.5 * 1.5 = 0.75
Here’s a list of weapons that have 0.75x ADS Movespeed multiplier:
- Assault Rifles: TAR, GR-22, Carnage BR, H-V45, NS-11A
- Carbines: LC3 Jaguar, AF-4A Bandit, Zenith VX-5, NS-11C, NSX Tanto
- Shotguns: ALL, including NC05 Jackhammer
- SMGs: ALL
- Sidearms: ALL
- LMGs: NS-15M
- Scout Rifles: NS-30 Vandal
- Sniper Rifles: NS-AM7 Archer
NSX Masamune has 0.33x ADS Movespeed Multiplier.
Scope-In and Scope-Out Times
Scope In is the time it takes you aim down sights:
- 250-300ms for sniper rifles
- 350ms for Rocket Launchers
- 150ms for other weapons.
- HS/NV Scope increases Scope In Time by 100ms.
Scope Out is the time it takes you to return to hip firing:
- 150 ms for most weapons
Please note, these are weapon and interface animation times. The Cone of Fire that affects actual weapon accuracy changes independently, the process is described in detail in Cone of Fire section above.
Fire Detect Range
When firing an unsuppressed weapon, your position will be momentarily highlighted as a dot on minimap of enemy players within Fire Detect Range, which is equal:
- 40-50m for most unsuppressed infantry weapons.
- 60m for Second Gen Battle Rifles.
- 10m for Hunter Crossbow.
- 5m for wielded attacks with Power Knives (even when not activated).
- 100m for Sniper Rifles, except 40m for TRAP-M1, and 150m for Directive Sniper Rifles and NS-AM7 Archer.
- 100m for Rocket Launchers.
- Barrel Attachments affect Firing Detection Range: Compensator increases by 35m, Flash Suppressor by 15m, and Suppressor removes it completely.
Recoil Mechanics
Here are full recoil stats for the TRAC-5:
Stat Name |
Value |
| Vertical Recoil Min | 0.3 |
| Vertical Recoil Max | 0.3 |
| Vertical Recoil Increase | 0 |
| Vertical Recoil Increase Crouched | 0 |
| First Shot Recoil Multiplier | 2.35x |
| Recoil Angle Min | 23 |
| Recoil Angle Max | 25 |
| Horizontal Recoil Min | 0.225 |
| Horizontal Recoil Max | 0.225 |
| Horizontal Recoil Increase | 0 |
| Horizontal Recoil Tolerance | 0.55 |
| Horizontal Recoil Tolerance Increase | 0 |
| Recoil Recovery Delay | 80ms |
| Recoil Recovery Rate | 18 |
| Refire Time | 80ms |
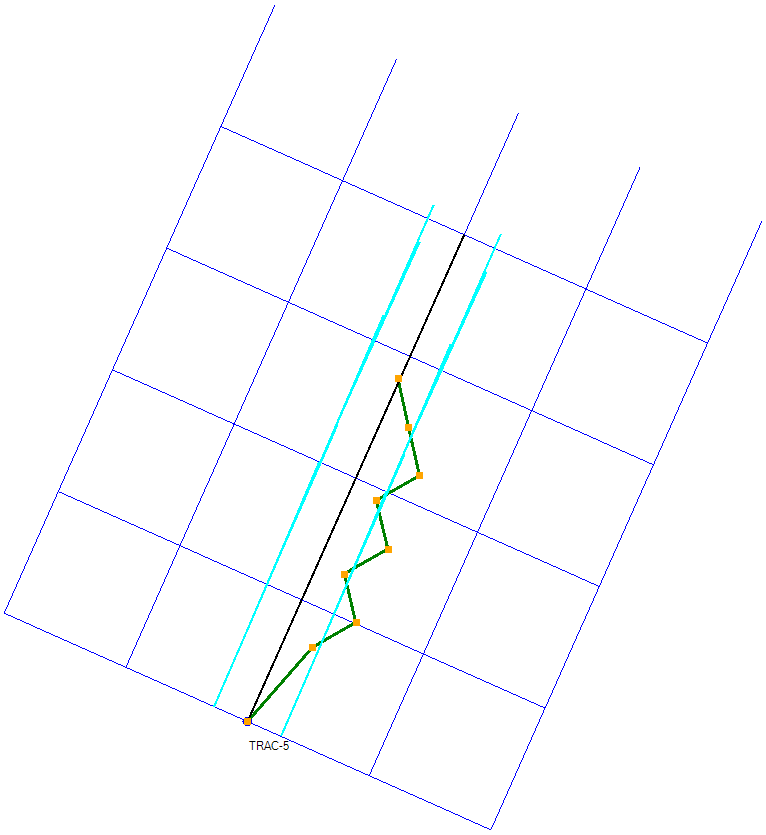
Each weapon has a recoil pattern resembling a letter T. Let’s construct such a pattern for TRAC-5:
- Blue dot is the center of your Cone of Fire, located in the center of the screen.
- Red line is “vertical” recoil. “Vertical” is in quotes, because as you can see on the picture, red line isn’t exactly vertical. Same goes for “horizontal” recoil, which isn’t truly horizontal either. This is because of the Recoil Angle, applied to the whole recoil pattern.
- Green line is “horizontal” recoil.
- A and B orange zones are the multitude of points to which the recoil can kick your aim after the shot. Which zone gets chosen is completely random for each shot, as long as your current shot sequence is within Horizontal Tolerance (not displayed on this picture).
Now that we’ve created a recoil pattern, we can predict how a recoil path would look:
Without recoil patterns:
Let’s talk through what all those different recoil stats actually mean.
Vertical Recoil
| Vertical Recoil Min | 0.3 |
| Vertical Recoil Max | 0.3 |
For each shot, Vertical Recoil is a random value between Vertical Recoil Min and Vertical Recoil Max. TRAC-5 and many other weapons have the same Vertical Recoil Min and Vertical Recoil Max, so they have a constant Vertical Recoil per Shot.
First Shot Recoil Multiplier
| First Shot Recoil Multiplier | 2.35x |
FSRM multiplies the Vertical Recoil of:
- First shot of each fixed burst
- Each shot done in semi-auto
- First shot in a full auto series of shots
High FSRM values make it harder to maintain accuracy during short bursts, which can get rather annoying, since first few shots often decide the outcome of the engagement. First few shots are also the most accurate due to Cone of Fire mechanics.
The usual tactic for dealing with FSRM is to aim lower in advance, and let the FSRM kick the crosshair to where you want it to be.
Horizontal Recoil
| Horizontal Recoil Min | 0.225 |
| Horizontal Recoil Max | 0.225 |
For each shot, Horizontal Recoil is a random value between Horizontal Recoil Min and Horizontal Recoil Max. The direction of the Horizontal Recoil – “left” or “right” – is also completely random, as long as the Accumulated Horizontal Recoil stays within Horizontal Recoil Tolerance.
TRAC-5 and many other weapons have the same Horizontal Recoil Min and Horizontal Recoil Max, so they have a constant Horizontal Recoil per Shot.
Horizontal Recoil Tolerance
| Horizontal Recoil Tolerance | 0.55 |
Horizontal Recoil Tolerance determines how far can Horizontal Recoil kick your crosshair from the initial aiming position.
You can find a full explanation of Horizontal Recoil Tolerance in this article, here in this guide I will offer only basic information.

Horizontal Recoil Tolerance is an angle. Center of that angle is located in the position of your crosshair during the first shot.
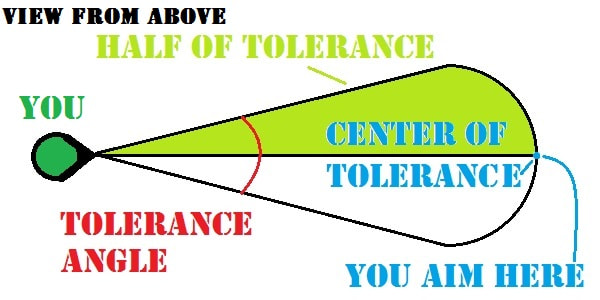
A simple rule: Accumulated Horizontal Recoil can exceed Half of Tolerance once before being forced into opposite direction.
For TRAC-5, Half of Tolerance is equal to 0.275, and here is a simulated recoil pattern:
- First shot randomly recoils to the right. Accumulated Horizontal Recoil (AHR) is equal to 0.225.
- Second shot also randomly recoils to the right. AHR = 0.45.
- Third shot is forced to recoil to the left, since 0.45 > 0.275. AHR = 0.225.
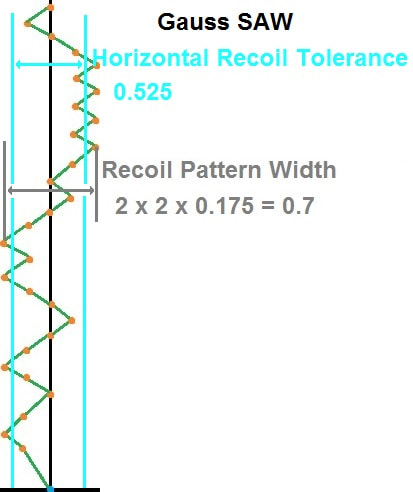
Let’s use Gauss SAW for another example:
| Horizontal Recoil Min | 0.175 |
| Horizontal Recoil Max | 0.175 |
| Horizontal Recoil Tolerance | 0.525 |
This is a recorded path of the crosshair during a long burst with Gauss SAW, similar to this video.
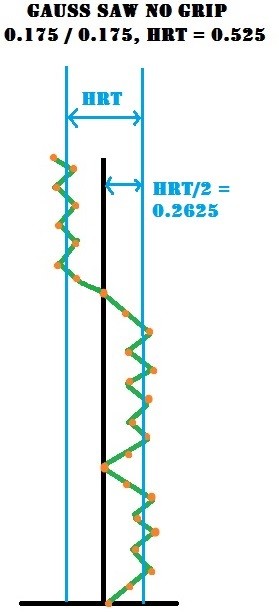
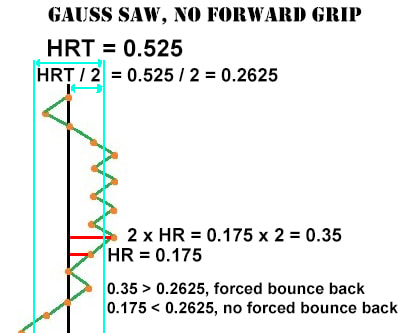
Accumulated Horizontal Recoil from 2 shots of Gauss SAW is equal to 0.35, which is greater than Half of Tolerance: 0.2625. That is why Gauss SAW can only recoil twice in the same direction.
The interesting part is that HRT could take different values without affecting anything. Gauss SAW could have Tolerance anywhere between 0.36 and 0.69, and the result would be exactly the same – still kick only up to 2 times in the same direction.
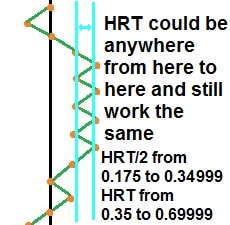
This leads to funny and unexpected things. For example:
T32 Bull: 0.18 / 0.18 Recoil, 0.5 Tolerance
T16 Rhino: 0.2 / 0.2 Recoil, 0.7 Tolerance
TMG-50: 0.175 / 0.175, 0.7 Tolerance
T32 Bull has much lower Tolerance than T16 Rhino, yet they both kick up to 2 times in one direction.
TMG-50 has same tolerance as T16 Rhino, but lower Horizontal Recoil, so it kicks up to 3 times in one direction, making it potentially less stable.
Horizontal Recoil Stability
Knowing how HRT works, you can predict the stability of weapon’s horizontal recoil pattern.
The Weapon Toolbox can calculate:
Average Horizontal Deviation – the average distance between the crosshair and its original position during fire. The lower, the better.
Maximum Horizontal Deviation – maximum distance. The lower, the better.
If there is a big difference between Max. and Average deviations, it means the weapon can be unpredictable; it has stable recoil most of the time, but there is a chance it will kick an extra time. The known example of this is Cyclone.
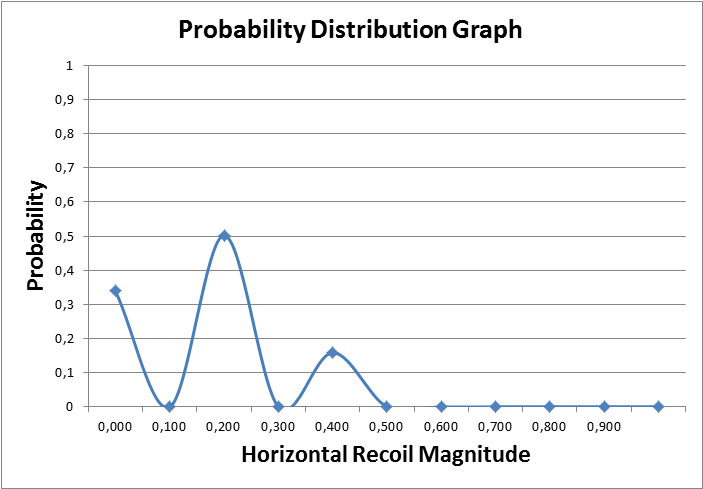
The Toolbox will also draw a probability distribution graph, a visual representation of the horizontal recoil pattern.
Solstice VE3
AF-4 Cyclone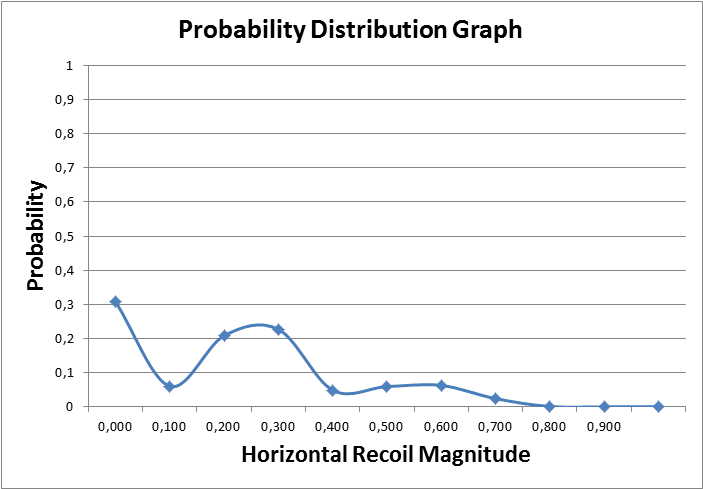
Recoil Pattern Width
This point is mostly academic. In practical terms, Recoil Pattern Width is equal to 2x Maximum Recoil Deviation.
Horizontal Recoil Bias
Horizontal Recoil Bias is a completely misleading term, used by people that don’t know how recoil works. Whether the gun has overall a left or right pull has no connection with horizontal recoil, and is actually determined by Recoil Angle.
Recoil Angle
For each shot, Recoil Angle is a random value between Recoil Angle Min and Recoil Angle Max. Recoil Angle affects both Horizontal and Vertical Recoil. Recoil Angle is the cause of some weapons having a left or right pull.
- If Recoil Angle is greater than zero, the gun will have a right pull.
- If Recoil Angle is less than zero, the gun will have a left pull.
- If Recoil Angle is equal to zero, the gun will have no bias.
- “Horizontal recoil bias” does not exist as a thing.
Let’s take a look on how recoil angle works, using Eridani SX5 as an example:
| Vertical Recoil Min | 0.2 |
| Vertical Recoil Max | 0.2 |
| Horizontal Recoil Min | 0.3 |
| Horizontal Recoil Max | 0.392 |
| Recoil Angle Min | 20 |
| Recoil Angle Max | 20 |
As you see on the video, the recoil either:
- kicks slightly left and hard up
- kicks hard right almost without upwards movement
This is because Eridani’s recoil pattern looks like this:
The video above proves:
For all weapons, Horizontal Recoil functions the same – it produces random shaking, uncontrollable and unpredictable jitter along the axis which is perpendicular to axis of the Vertical Recoil.
Each shot with a weapon without Recoil Angle (aka “no horizontal bias”) will kick the crosshair randomly to the left or right.
If a weapon has positive Recoil Angle (has a “horizontal recoil biased to the right”), the horizontal recoil will still randomly kick the crosshair to the left or right, but it will a bit less apparent, especially on weapons with strong Recoil Angle and weak Horizontal Recoil. A left kick of the Horizontal Recoil will seem like an upwards movement with barely any angle at all, while horizontal kick to the right will seem like a hard dive to the right.
This disproves a popular myth that weapons with biased recoil are more effective at range because “their recoil pattern is more predictable”.
The difference between Recoil Angle minimum and maximum values is called Recoil Angle Variance. High Recoil Angle Variance reduces stability of the recoil pattern, as shown here.
Recoil Scaling
| Vertical Recoil Increase | 0 |
| Vertical Recoil Increase Crouched | 0 |
| Horizontal Recoil Increase | 0 |
| Horizontal Recoil Tolerance Increase | 0 |
Some weapons in PlanetSide 2 have recoil scaling over time. Each consecutive shot may have more or less recoil than previous shot. Both Horizontal and Vertical Recoil can be scaled. How it works (source):
- If Recoil Increase is positive, with each shot it will be added to Minimum Recoil, until Minimum Recoil becomes the same as Maximum Recoil.
- If Recoil Increase is negative, with each shot it will be subtracted from Maximum Recoil, until Maximum Recoil becomes the same as Minimum Recoil.
- Vertical Recoil has separate scaling for Standing and Crouching.
- Horizontal Recoil Tolerance can be scaled as well.
The most notable example of Recoil Scaling mechanics is MGR-L1 Promise:
| Vertical Recoil Min | 0.15 |
| Vertical Recoil Max | 0.3 |
| Vertical Recoil Increase | -0.05 |
| Vertical Recoil Increase Crouched | -0.1 |
| Horizontal Recoil Min | 0.1 |
| Horizontal Recoil Max | 0.3 |
| Horizontal Recoil Increase | -0.05 |
| Horizontal Recoil Tolerance | 5 |
| Horizontal Recoil Tolerance Increase | 0 |
Recoil Scaling while Standing
| Shot # | Vertical Recoil | Horizontal Recoil |
| 1 | 0.15 / 0.30 | 0.10 / 0.30 |
| 2 | 0.15 / 0.25 | 0.10 / 0.25 |
| 3 | 0.15 / 0.20 | 0.10 / 0.20 |
| 4 | 0.15 / 0.15 | 0.10 / 0.15 |
| 5 | 0.15 / 0.15 | 0.10 / 0.10 |
Recoil Scaling and Attachments
It’s interesting to note that attachments that affect recoil, such as Forward Grip, do not have any effect on scaling values. Since the reduction is percentage-based, it will have a different effect on minimum and maximum values – the larger value will have a stronger reduction in absolute terms.
So using a recoil-affecting attachment will often reduce the amount of shots required for the recoil to fully scale.
For example, here are numbers for MGR-L1 Promise when it’s used with Forward Grip and Compensator. Note that Promise doesn’t actually have access to Compensator, this is just for the purposes of demonstration.
| Shot # | Vertical Recoil (-15%) | Horizontal Recoil (-25%) |
| 1 | 0.1275 / 0.255 | 0.075/ 0.225 |
| 2 | 0.1275/ 0.205 | 0.075 / 0.175 |
| 3 | 0.1275 / 0.1505 | 0.075 / 0.125 |
| 4 | 0.1275 / 0.1275 | 0.075 / 0.075 |
| 5 | 0.1275 / 0.15 | 0.075 / 0.075 |
Without attachments, it took Promise 4 shots to fully scale Vertical Recoil, and 5 shots for Horizontal Recoil. With Forward Grip and imaginary Compensator, it would take 4 shots for Horizontal Recoil. It would still take 4 shots for the Vertical Recoil, but this the gap between Minimum and Maximum values would be only half as big.
Recoil Recovery Delay
| Recoil Recovery Delay | 80ms |
| Refire Time | 80ms |
After you stop firing, your crosshair will move back to its original position. This process will begin after a delay.
True Delay = Refire Time + Recoil Recovery Delay
Refire Time is the minimum amount of time between two shots. It can be calculated as:
Refire Time = 60 / Rate of Fire
Recoil Recovery Delay is a hidden statistic, and can be accessed through DBG API.
Recoil Recovery Delay is often equal to weapon’s Refire Time, making the True Delay equal to 2x Refire Time.
Notable exceptions: Shotguns, Battle Rifles, Semi Auto Sniper Rifles and Semi Auto Scout Rifles all start crosshair movement earlier, making it easier to take several shots in a quick succession.
You can learn more about Recoil Recovery Delay in this article.
Recoil Recovery Rate
(Recoil Decrease)
| Recoil Recovery Rate | 18 |
| Refire Time | 80ms |
Measured in degrees per second, Recoil Recovery Rate determines the speed at which your crosshair returns to original position after you stop firing.
High Recoil Decrease value is handy for burst firing, as it allows you to quickly re-acquire the target after a burst and re-center your crosshair on it.
Recoil Recovery Acceleration
We don’t know much about this parameter beyond this:
Recoil recovery acceleration is set to 1000 as a baseline. I don’t know what the time scale is on that, but it seems to modify the recoil settle speed. 1000 seems to keep the recoil recovery consistent. If you drop it lower, it seems to accelerate the recoil recovery up to its normal recoil recovery value. (c) Wrel
Recoil Recovery and Recoil Compensation
It’s worth noting that Recoil Recovery mechanics properly kick in only if you don’t move your crosshair to counteract Vertical Recoil.
For example, as demonstrated in this video, if you fire a long burst, and the gun kicks up, and you move the crosshair downwards to keep the aim on target, then when you release the trigger, the crosshair will barely move.
Recentering Time (for Tap Firing)
Recentering time depends on five weapon stats: Vertical Recoil, Horizontal Recoil, Refire Time, Recoil Recovery Delay and Recoil Decrease.
How it works
You fire a shot and your crosshair gets kicked by Recoil. Then, after a delay equal to Refire Time + Recoil Recovery Delay, crosshair starts returning to original position. The speed of crosshair movement is equal to Recoil Decrease, measured in degrees per second.
Full formula

So, for fast tap firing you want to have: high Rate of Fire, low Recoil and Recoil Recovery Delay values and high Recoil Decrease.
Let’s analyze Recentering Time on the example of shotguns. We will compare their recentering time for the purposes of Tap Firing with slug ammo.
All shotguns have Recoil Recovery Delay of 0.
| Rate of Fire | Vertical Recoil | Horizontal Recoil | Recoil Decrease |
Calculated Recentering Time | Measured Recentering Time | |
| Quick Reload | 225 | 2.8 | 0.5 | 15 | 0.457 | N/A |
| High Capacity | 225 | 2.5 | 0.65 | 15 | 0.439 | N/A |
| Full Auto | 260 | 2.0 | 0.95 | 12 | 0.416 | N/A |
| Baron | 200 | 2.2 | 0.45 | 15 | 0.450 | N/A |
It’s worth noting that recentering time only concerns the crosshair movement. Cone of Fire reset is a separate mechanic.
Theoretically it’s possible to fire the next shot before crosshair fully returns from the previous shot, but it’s very hard to aim while crosshair is moving on its own.
Recoil and Scope Magnification
There is a myth that low magnification scopes have less recoil than higher magnification scope. This is false:


PlanetSide 2 recoil values are measured in degrees, they are absolute. Low magnification scopes appear to have less recoil, because each shot moves the crosshair only a few pixels, but with low magnification the target will also be only a few pixels in size.
Recoil Classification
- Horizontal Recoil can be with or without variance.
- For example, VX6-7 has unvaried horizontal recoil: 0.25 / 0.25
- Serpent VE92 has varied: 0.25 / 0.275
- Recoil Angle can be: equal to zero, varied or unvaried.
- Example: GD-7F has varied recoil angle of -20/-18.
- T5 AMC has unvaried recoil angle of 20/20.
- Pulsar C has no recoil angle.
Not taking Recoil Scaling into account, Horizontal Recoil and Recoil Angle give us 2 x 3 = 6 total recoil variants. Here they are, from best to worst:
Unvaried horizontal recoil, no recoil angle
Variables: 1) Direction of the horizontal shift
The best kind of recoil. The only variable in this type of recoil is whether horizontal recoil will kick left or right, and this is random for each shot.
The distances between crosshair positions are always equal, so all you can/need to do to compensate for this type of recoil, is to pull your mouse down at a constant rate.
Unvaried horizontal recoil, unvaried recoil angle
Variables: 1) Direction of the horizontal shift
Additionally: 1) Harder to track targets moving to the left or right
Practically same as the previous type, but with angle applied to it.
A bit less convenient to compensate for, because you need to pull your mouse at an angle. As long as target is stationary, compensating for this type of recoil is practically the same as for the non-angled recoil – just pull your mouse at a constant rate into the opposite direction.
However, things become complicated when you try to track a moving target and compensate for angled recoil at the same time. Here’s an example to explain that (numbers are purely fictional):
Let’s say that to compensate for angled recoil you need to pull your mouse down at speed of 50 pixels per second, and to the left at 15 px/s.
- The target is moving to the left at a rate of 30 pixels per second. To track it and compensate the recoil, you need to pull your mouse down at 50 px/s, and to the left at 45px/s (15 px/s to compensate for recoil, and additional 30px so your crosshair moves with the target).
- If the target is moving to the right, you need to move mouse down at 50 px/s, and to the right at 15px/s (30 px to the right, minus 15px/s to the right the angled recoil is already doing for you).
- This kind of left-right imbalance can be hard to adjust on the fly.
There is a popular myth that angled recoil is more stable, predictable and easier to compensate. But for all intents and purposes, angled recoil with no horizontal variance is the same or worse than non-angled recoil with no horizontal variance.
Varied horizontal recoil, no recoil angle
Variables:
1) Direction of the horizontal shift
2) Size of the horizontal shift
Similar to the first type, but in this case horizontal shift for each shot is randomly taken from the range of [Min; Max]. For the Jaguar, horizontal recoil is 0.245/0.275, so each shot’s horizontal shift can be anywhere from 0.245 to 0.275. This reduces the consistency of the recoil pattern by introducing an additional variable.
Varied horizontal recoil, unvaried recoil angle
Variables:
1) Direction of the horizontal shift
2) Size of the horizontal shift
Additionally: 1) Harder to track targets moving to the left or right
A combination of two previous types, has both of their weaknesses. A fairly rare type of recoil.
Unvaried horizontal recoil, varied recoil angle
Variables:
1) Direction of the horizontal shift
2) Size of the horizontal shift due to recoil angle
3) Direction of the vertical shift due to recoil angle
4) Size of the vertical shift due to recoil angle
Additionally: 1) Harder to track targets moving to the left or right
This recoil type introduces an additional variable: the recoil angle.
This creates a three-fold problem:
1) The direction of the vertical recoil is random for each shot, so you can’t precisely compensate for it, because you don’t know precisely where it’s going to be directed.
Let’s take a closer look at one of the “horns” of the picture above:
Varied recoil angle introduces A and B.
“A” is the variance of the vertical shift. For VX6-7 it is equal 0.0275. So while the vertical recoil of VX6-7 is constant at 0.3, due to the random recoil angle it varies from 0.3 to 0.2725.
In this case, the recoil angle variance of 10 degrees, introduced vertical recoil variance of ~10%.
So not only the direction of the vertical shift is random, but also its magnitude.
“B” is the variance of the horizontal shift. While the horizontal recoil of VX6-7 is constant at 0.25, due to random recoil angle it varies from 0.25 to 0.21.
In this case, the recoil angle variance of 10 degrees introduced horizontal recoil variance of ~19%.
Varied horizontal recoil with varied angle
note: Serpent’s stats on this picture are outdated!
Variables:
1) Direction of the horizontal shift
2) Size of the horizontal shift due to recoil angle
3) Size of the horizontal shift due to random horizontal recoil
4) Direction of the vertical shift due to recoil angle
5) Size of the vertical shift due to recoil angle
Additionally: 1) Harder to track targets moving to the left or right
The worst type of recoil, usually found on CQC weapons. In addition to the example above, it also has innate horizontal recoil variance.
In theory, Serpent has horizontal recoil of 0.25/0.275, but due to recoil angle these values are actually closer to 0.2/0.275.
On average, this means that Serpent will have less horizontal recoil than it should. While less horizontal recoil should be good in theory, in practice, the big difference between maximum and minimum horizontal recoil values means that the gun will have a higher chance of “veering off” the target.
Health, Armor and Resistances
To properly calculate damage to any PlanetSide 2 unit, be it infantry or vehicle, you have to take into account these three mechanics:
Health
Health is the amount of damage a unit can withstand before being destroyed. Health varies from unit to unit. When talking about infantry, we treat personal shields as health as well.
Here’s a table of current health values for PlanetSide 2 units. Keep in mind that health values from vehicles are based on in-game testing. They should be accurate, but there’s no way to be 100% sure.
| Profile ID | Unit Name | Health |
| 4 | Infantry | 500 |
| – | Carapace Infantry | 1000 |
| 8 | MAX | 2000 |
| 24 | Flash | 1500 |
| 27 | Harasser | 2500 |
| 33 | Sunderer | 5000 |
| 95 | ANT | 4000 |
| 26 | Lightning | 4000 |
| 30 | Prowler | 5000 |
| 29 | Magrider | 5000 |
| 31 | Vanguard | 6000 |
| 35 | Mosquito | 3000 |
| 36 | Reaver | 3000 |
| 34 | Scythe | 3000 |
| 28 | Valkyrie | 3000 |
| 37 | Liberator | 5000 |
| 38 | Galaxy | 7000 |
Armor
Armor refers to directional damage modifiers. Armor can increase or decrease the damage a unit is taking from the front, left side, right side, rear, top and bottom. For example, tanks use this system by having negative bottom and rear armor, so they take bonus damage from the bottom and rear.
It doesn’t matter which part of the unit is hit. Only the position of the attacker to relative to the vehicle is important. So if you’re standing to the side of the tank, you don’t need to try and fish for rear armor hits, you won’t do any bonus damage anyway. To deal bonus damage, you have to be specifically behind the tank, and it doesn’t matter which part of the tank you’re hitting, be it tower or even the cannon.
All that said, currently most units do not have any armor. Units with armor:
- Liberators and Valkyries have 50% bottom armor.
- Tanks have negative 100% rear and bottom armor, so they take double damage from those projections, and normal damage from everywhere else.
- Mineguard certification for ground vehicles increases bottom armor, among other things.
- Zealot Overdrive Engine MAX ability makes the MAX take more damage by providing negative 20% armor to all projections.
- Some implants and abilities also affect units’ armor.
Resistances
Every source of damage has a specific Damage Resist Type associated with it. For example, most primary and secondary infantry weapons have Damage Resist Type 2 – Small Arms.
Every unit has a collection of Resistances that increase or decrease the damage they take from a specific Damage Resist Type. For example, MAXes have 80% against Small Arms.
Many abilities and certifications modify the Resistances.
Example 1
Let’s take a Liberator with Composite Armor. It is being shot by a Ground-to-Air lock-on launcher. Normally, Liberator has 5 000 Health. Composite Armor further increases that by 10%, to 5 500 Health. The rocket launcher fires a rocket. It has:
- 700 Direct Damage with Damage Resist Type 34 – Infantry Rockets.
Liberators take 70% more damage from that Damage Type, but in this case it doesn’t matter. All anti-air-capable lock-on launchers fire rockets that automatically detonate near enemy aircraft, damaging them with their Indirect Damage instead.
- 400 Indirect Damage with Damage Resist Type 12 – Flak Explosion.
Liberators take 130% more damage from that Damage Type.
The rocket follows the Liberator, exploding under its belly, so the damage will be reduced by bottom armor.
First, we take the 400 raw damage and apply Resistance to it.
400 * (1 + 1.30) = 400 * 2.3 = 920
Then we apply 50% of Bottom Armor to it.
920 * 0.5 = 460
That’s the amount of damage one lock-on rocket would deal to a Liberator in its bottom projection. Taking Composite armor into account, that would be
460 / 5500 = 8.4% of its Health
The Liberator in our example would require 12 such hits to destroy.
Example 2
An infantryman with Flak Armor 5 is being directly hit by a Decimator Rocket. It deals:
- 975 Direct Damage, Resist Type 34 – Infantry Rockets.
- 350 Indirect Damage, Resist Type 6 – Common Explosion.
By default, infantry has no armor and no resistances to these damage types. However, Flak Armor 5, among other things, adds 20% Resistance to Damage Type 34 and 50% Resistance to Damage Type 6.
So a rocket that would deal:
975 + 350 = 1325 damage
Would kill the infantry. But with Flak Armor 5, that damage is reduced:
975 * 0.8 + 350 * 0.5 = 955
So the generic infantry man at full health + shields will survive the hit.
Toolbox
Some of the Toolbox’s functionality is specifically dedicated to calculating weapon damage to different vehicles, taking their Health, Armor and Resistances into account.
What is Recoil Recovery Acceleration?
https://iridar-mirror.knyazev.io/planetside2/weapons/weapon-mechanics/#Recoil_Recovery_Acceleration
I can’t seem to find any where a list of *infantry* resistances. I have often wondered why hmgs were considered more powerful than carbines and assault rifles, and I realized it’s probably because lmgs have their own resistance categories. If that’s true, I would like to know what those infantry resistances are.
Infantry has no resistances by default. Pretty much all infantry weapons share the same Damage Resist Type. LMGs are not considered more powerful than ARs and carbines. They are actually pretty bad weapons by comparison, and their only advantage is larger magazines.
Thanks for the reply. What about the heavy assault’s heavy weapon, like TR’s mini chaingun? It’s a different category than lmgs.
You’ve got some errors writing out the calculations, though the results are accurate.
For example one, you forget to multiply the lock-on rocket percentage damage by 100, leaving it in decimal. The actual percentage is 8.4%.
For example two, the flak armor 5 damage should be written as 975 * 0.8 + 350 * 0.5 = 955, since 20% damage resistance means they’re taking 80% damage, which is 0.8.
It might be a bit pedantic, but the typos definitely threw me off a bit at first.
Good catches, fixed now, thanks!