
Performance has always been an outstanding issue for PlanetSide 2, as it’s a beautiful and demanding MMO game that’s played on a huge variety of PCs.
This guide is a compilation of all available information regarding tuning PlanetSide 2 and will arm you with knowledge necessary for best possible looks and performance.
Healthy game on a healthy PC
Naturally, game’s performance depends on the quality of your computer’s software and hardware, so that’s where we will start.
If you don’t own a PC, or your PC is below recommended specifications, you will have to upgrade or buy a PC. I can help you with that.
Hardware and Overclocking
CPU
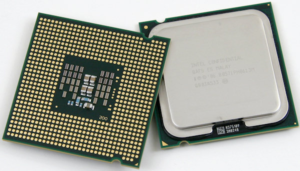
PlanetSide 2 is an MMO game released in 2012, with potentially hundreds of players in a battle. As a consequence, PlanetSide 2 puts more load on CPU than most games. It is built on DirectX 9, which is more sensitive to CPU frequency and per-core performance than number of cores and multi-threading
In other words, for PlanetSide 2, it’s better to have fewer, but more powerful cores than a ton of weak cores. This means Intel CPUs are generally preferable. Any 4-core CPU released in the last several years will be just fine. However, you can often squeeze out some extra performance by overclocking.
Overclocking a CPU involves increasing its clock frequency:
Clock Frequency = Base Clock Frequency (BCLK) * Multiplier
There are two ways of overclocking to reach a higher Clock Frequency: by increasing BCLK and Multiplier.
Pretty much any CPU can be overclocked by raising BCLK. However, this also raises the operating frequency of other PC components, which can lead to irreparable damage.
Overclocking by multiplier is safer and yields better results, since it only changes the CPU frequency. However, not every CPU and Motherboard support it. Overclocking by multiplier requires:
- A motherboard with a fitting chipset. Ryzen CPUs can be overclocked by multiplier on both cheap B-series chipsets, and premium X-series. Intel CPUs require a premium Z-series chipset, such as Z370.
- CPU itself must have unlocked multiplier, which means any Ryzen CPU, or an Intel CPU with a “K” index at the end of its name.
Most CPUs have a dynamic multiplier. Windows will automatically change current multiplier within certain bounds depending on current load and Power Settings. The gist of overclocking by multiplier is to increase the maximum multiplier.
If you have fitting hardware, overclocking a CPU by multiplier is as easy as going into UEFI or BIOS and increasing maximum multiplier.
For example, Intel Turbo Boost is just it – a temporary increase of maximum multiplier. An automatic overclock, basically.
There is a catch: increasing the Clock Frequency beyond a certain point will make the system unstable, and the PC can potentially crash and reset. To increase the system stability, it is often necessary to increase CPU’s voltage. Doing so can potentially damage the PC, and it will reduce system’s longevity, and increase power consumption and heat emissions.
The general goal of overclocking is to achieve the highest clock frequency with lowest increase in voltage while keeping the system stable under load.
RAM
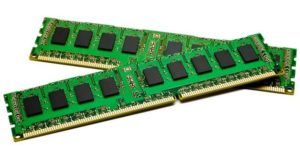
How much RAM PlanetSide 2 requires?
We know that 4 GB RAM is not enough. 8 GB is the bare minimum, but after a short while you will see it start to max out, and the game will become more choppy. A simple re-start of the game is enough to solve this.
16 GB RAM is not necessary at first, but it will make you able to Alt+TAB in and out of the game noticeably faster and will allow you to keep the game at its best performance for longer.
Usually, gaming performance does not depend on RAM performance too much, but that is because most games put most of the load on the graphics card. PlanetSide 2 performance, more often than not, is limited by CPU, and in these cases RAM performance can be important.
RAM speed, including the CPU-to-RAM interconnect speed, makes a large difference in performance of deferred rendering graphics engines, such as Forgelight.
RAM performance is determined by Frequency and Timings. Both of these parameters determine how fast can the PC get the data in and out of RAM. Higher Frequency is better, and lower Timings are better. However, the higher the Frequency, the harder it gets to get short Timings.
My personal recommendation is to first settle on capacity and frequency, and then get the RAM with shortest timings your money can buy.
Your RAM frequency depends on what kind of frequency your Motherboard supports, and obviously on the RAM itself.
Overclocking RAM. It is usually possible to manually change RAM’s frequency and timings, but it will not necessarily work.
For reliable results, it is better to buy RAM that underwent factory testing and have been confirmed to perform in a stable manner with certain Frequency and Timings. These parameters are usually written into RAM as XMP (Intel Extreme Profiles), and “overclocking” RAM is as simple as choosing a certain XMP in BIOS settings.
‘Debloating’ Windows – For those of you with 8GB RAM who are worried about their RAM usage this can come in handy. Skip down to the GPU section if you’re not interested in potentially sketchy stuff (though I have been testing this over the last couple of weeks and it seems safe provided you play it safe.)
BEFORE YOU TRY ANYTHING I MENTION BELOW – create a restore point in Windows first. This will give you a safe state you can reset your PC to at any time in the case you mess something up or disable something you don’t want completely removed.
Seriously create a restore point before you try anything here.
There’s a few scripts here that can be used to reduce the amount of bloatware Windows carries with it. I really wouldn’t suggest using all of these. Some will leave your PC vulnerable.
Update to the latest version of Windows 10 to start off. These scripts are designed for Windows 10 and I don’t know if they work on older OSes. Also, download the Scripts off of the linked Github repository.
Unzip them and open the folder in File Explorer. In File Explorer, click on File > Open Windows PowerShell > Open Windows PowerShell as Administrator.
Then use the following command lines to let you actually run the scripts:
Set-ExecutionPolicy Unrestricted
ls -Recurse *.ps1 | Unblock-File
ls -Recurse *.psm1 | Unblock-File
And these will let you run the scripts with .\[FileName+extension]. A word of warning – I would really suggest not to run the disable-windows-defender one, and certainly do not touch any of the others you’re not certain of yourself. Better safe than sorry after all.
If all of the above goes well, you should see a lowered background RAM usage. I dropped about 500mb background utilisation of RAM personally, but your mileage will vary.
~u/uzzi38
Graphics Card
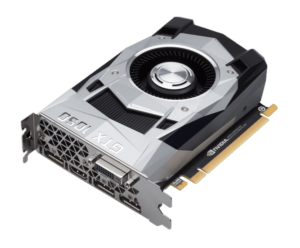
For the time of its release, PlanetSide 2 featured stunningly beautiful graphics, but due to outstanding performance issues, a lot of the eye candy has been cut over time.
If your intention is to use “competitive” settings, it is often better to disable certain graphical features, as they may interfere with visibility.
As a consequence, any entry-level gaming graphics card should suffice for PS2.
If you already own a Graphics Card with superfluous power, you can slightly improve visual quality by using Supersample Anti Aliasing.
Overclocking a GPU. Most gaming GPUs can be overclocked by increasing its Clock Frequency and its Memory Frequency.
As with CPUs, an increase in Voltage may be necessary to keep the system stable, and overclocking will increase power consumption and heat emissions. For best results, you should search for a guide on how to overclock your specific Graphics Card.
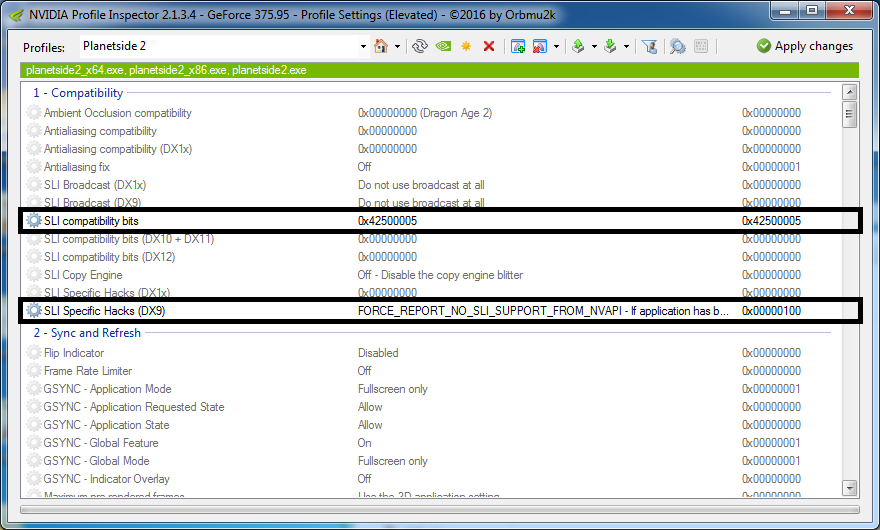
nVidia SLI Configuration
Credit: /u/octiceps, link to post
With the right driver settings, SLI works well with PlanetSide 2: Sli OFF / Sli ON.
To configure these settings, you will have to download and install this version of nVidia Inspector. Launch the nVidia Inspector and click on the wrench and screwdriver button.
A large window with a lot of stuff will open. Find a drop down list at the top and select PlanetSIde 2. Set the driver settings for SLI and click “Apply Changes” at the top right to save.
If you break something, simply click on the nVidia logo button to restore default settings.
Just keep in mind that SLI provides good scaling only if you are GPU-bound, which is an uncommon scenario for PS2. You have to have a very good CPU, or two old and bad GPUs for SLI to be worth it.
Motherboard
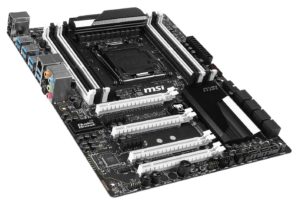
Motherboard connects all your components together and distributes power. Quality of Motherboard’s power system determines stability and longevity of CPU and RAM overclock, and Motherboard’s chipset determines what and how can you overclock at all.
To overclock an Intel CPU with unlocked multiplier, you normally need a Motherboard with Z index in its chipset name.
Most modern “gaming” motherboards make it very easy to overclock components, and often even have a 1-button solution “make overclock for me”, like MSI’s OC Genie.
Motherboard also usually contains a built-in Sound Card and Network Adapter. Quality of both of them is important for comfortable gaming in PS2. Always use a cable network connection to play online games, wireless network is not stable enough.
Motherboard also determines how many graphics cards can you install at once, though in case of PS2 it doesn’t make sense to use more than one.
Storage

Installing PlanetSide 2 on an SSD, if you can afford it, should improve loading times and potentially solve framerate drops / hitching after you first load into battle.
Having Windows and Windows Pagefile installed on an SSD should improve performance as well.
Operating System
Make sure that your Operating System is clean and has no viruses or malware:
() DrWeb CureIt! is a free tool that scans for viruses. Unlike most antiviruses, you don’t have to keep it running all the time, you just download the latest version of the CureIt! and perform a scan once.
() MalwareBytes Anti-Malware is a free tool that scans for malware – the type of harmful trash programs that don’t quite qualify to be viruses, but still can cause issues. MalwareBytes has a free version that can be used the same way as CureIt!.
() Install all relevant Windows updates by enabling WIndows Update in Control Panel.
() Install fresh drivers for your hardware.
() If your system has been running for several years, it may be a good idea to reinstall, or at least do some cleanup:
Kerish Doctor is a comprehensive solution for cleaning up Windows, and has useful functions like fixing registry errors. It has a 15 day free trial period, which should be enough to get your OS in order.
() Make sure your system is not suffering from the HPET Bug.
() Disable all unnecessary background programs while playing PS2. You can do it manually, or use Razer Gamebooster freeware or Windows 10 Game Mode to do it for you.
Choosing Operating System
- PlanetSide 2 will not run on any version of Windows XP.
- PlanetSide 2 requires a 64 bit OS.
There are no other hard requirements, and if you’re satisfied with your current version of Windows, there is no need to change it.
PlanetSide 2 and Windows 10
![]()
PlanetSide 2 runs well on Windows 10, though there are a lot of reasons to keep using Windows 7 x64.
If you can get your hands on it, use Windows 10 LTSB, which doesn’t come with a bunch of useless apps, and installs only stable and tested updates.
PlanetSide 2 Performance
Now that you have a clean sparkly-fresh computer, it’s time to tune PlanetSide 2.
What each setting does

The [CPU] or [GPU] tag near setting’s name indicates whether the setting puts higher load on CPU or GPU respectively.
Display Mode: changes between Windowed, Full Screen and Fullscreen Windowed.
Full Screen is always better, as lets the game use your PC’s resources more efficiently. Windowed or Fullscreen Windowed will increase input lag.
Input lag is a delay between you pressing a button or moving the mouse, and it happening on screen. Naturally, you want to avoid input lag as much as possible.
Different Display Modes also put different requirements on video recording software or non-Direct X crosshair overlays, if you want to use any of that.
[GPU] Resolution – click here if you don’t know what Resolution is.
Higher resolution results in higher detalization and sharper picture. It’s best to use native resolution, which is usually, the highest resolution that your monitor and graphics card can support, unless that causes too much strain on your PC.
[GPU] Render Quality sets the ratio between rendered resolution / displayed resolution.
Changing the Render Quality makes the game render at a different resolution, and then scale it to your current display resolution. In essence, Render Quality slider gives you the option of playing at a different resolution without affecting the size of HUD elements, such as crosshairs, menus, minimap, etc. Unless HUD size is an issue, it is preferable to change resolution itself.
If you already have great performance, and you’re looking to improve visual quality, you can increase render quality past 100% to gain Supersample Anti Aliasing.
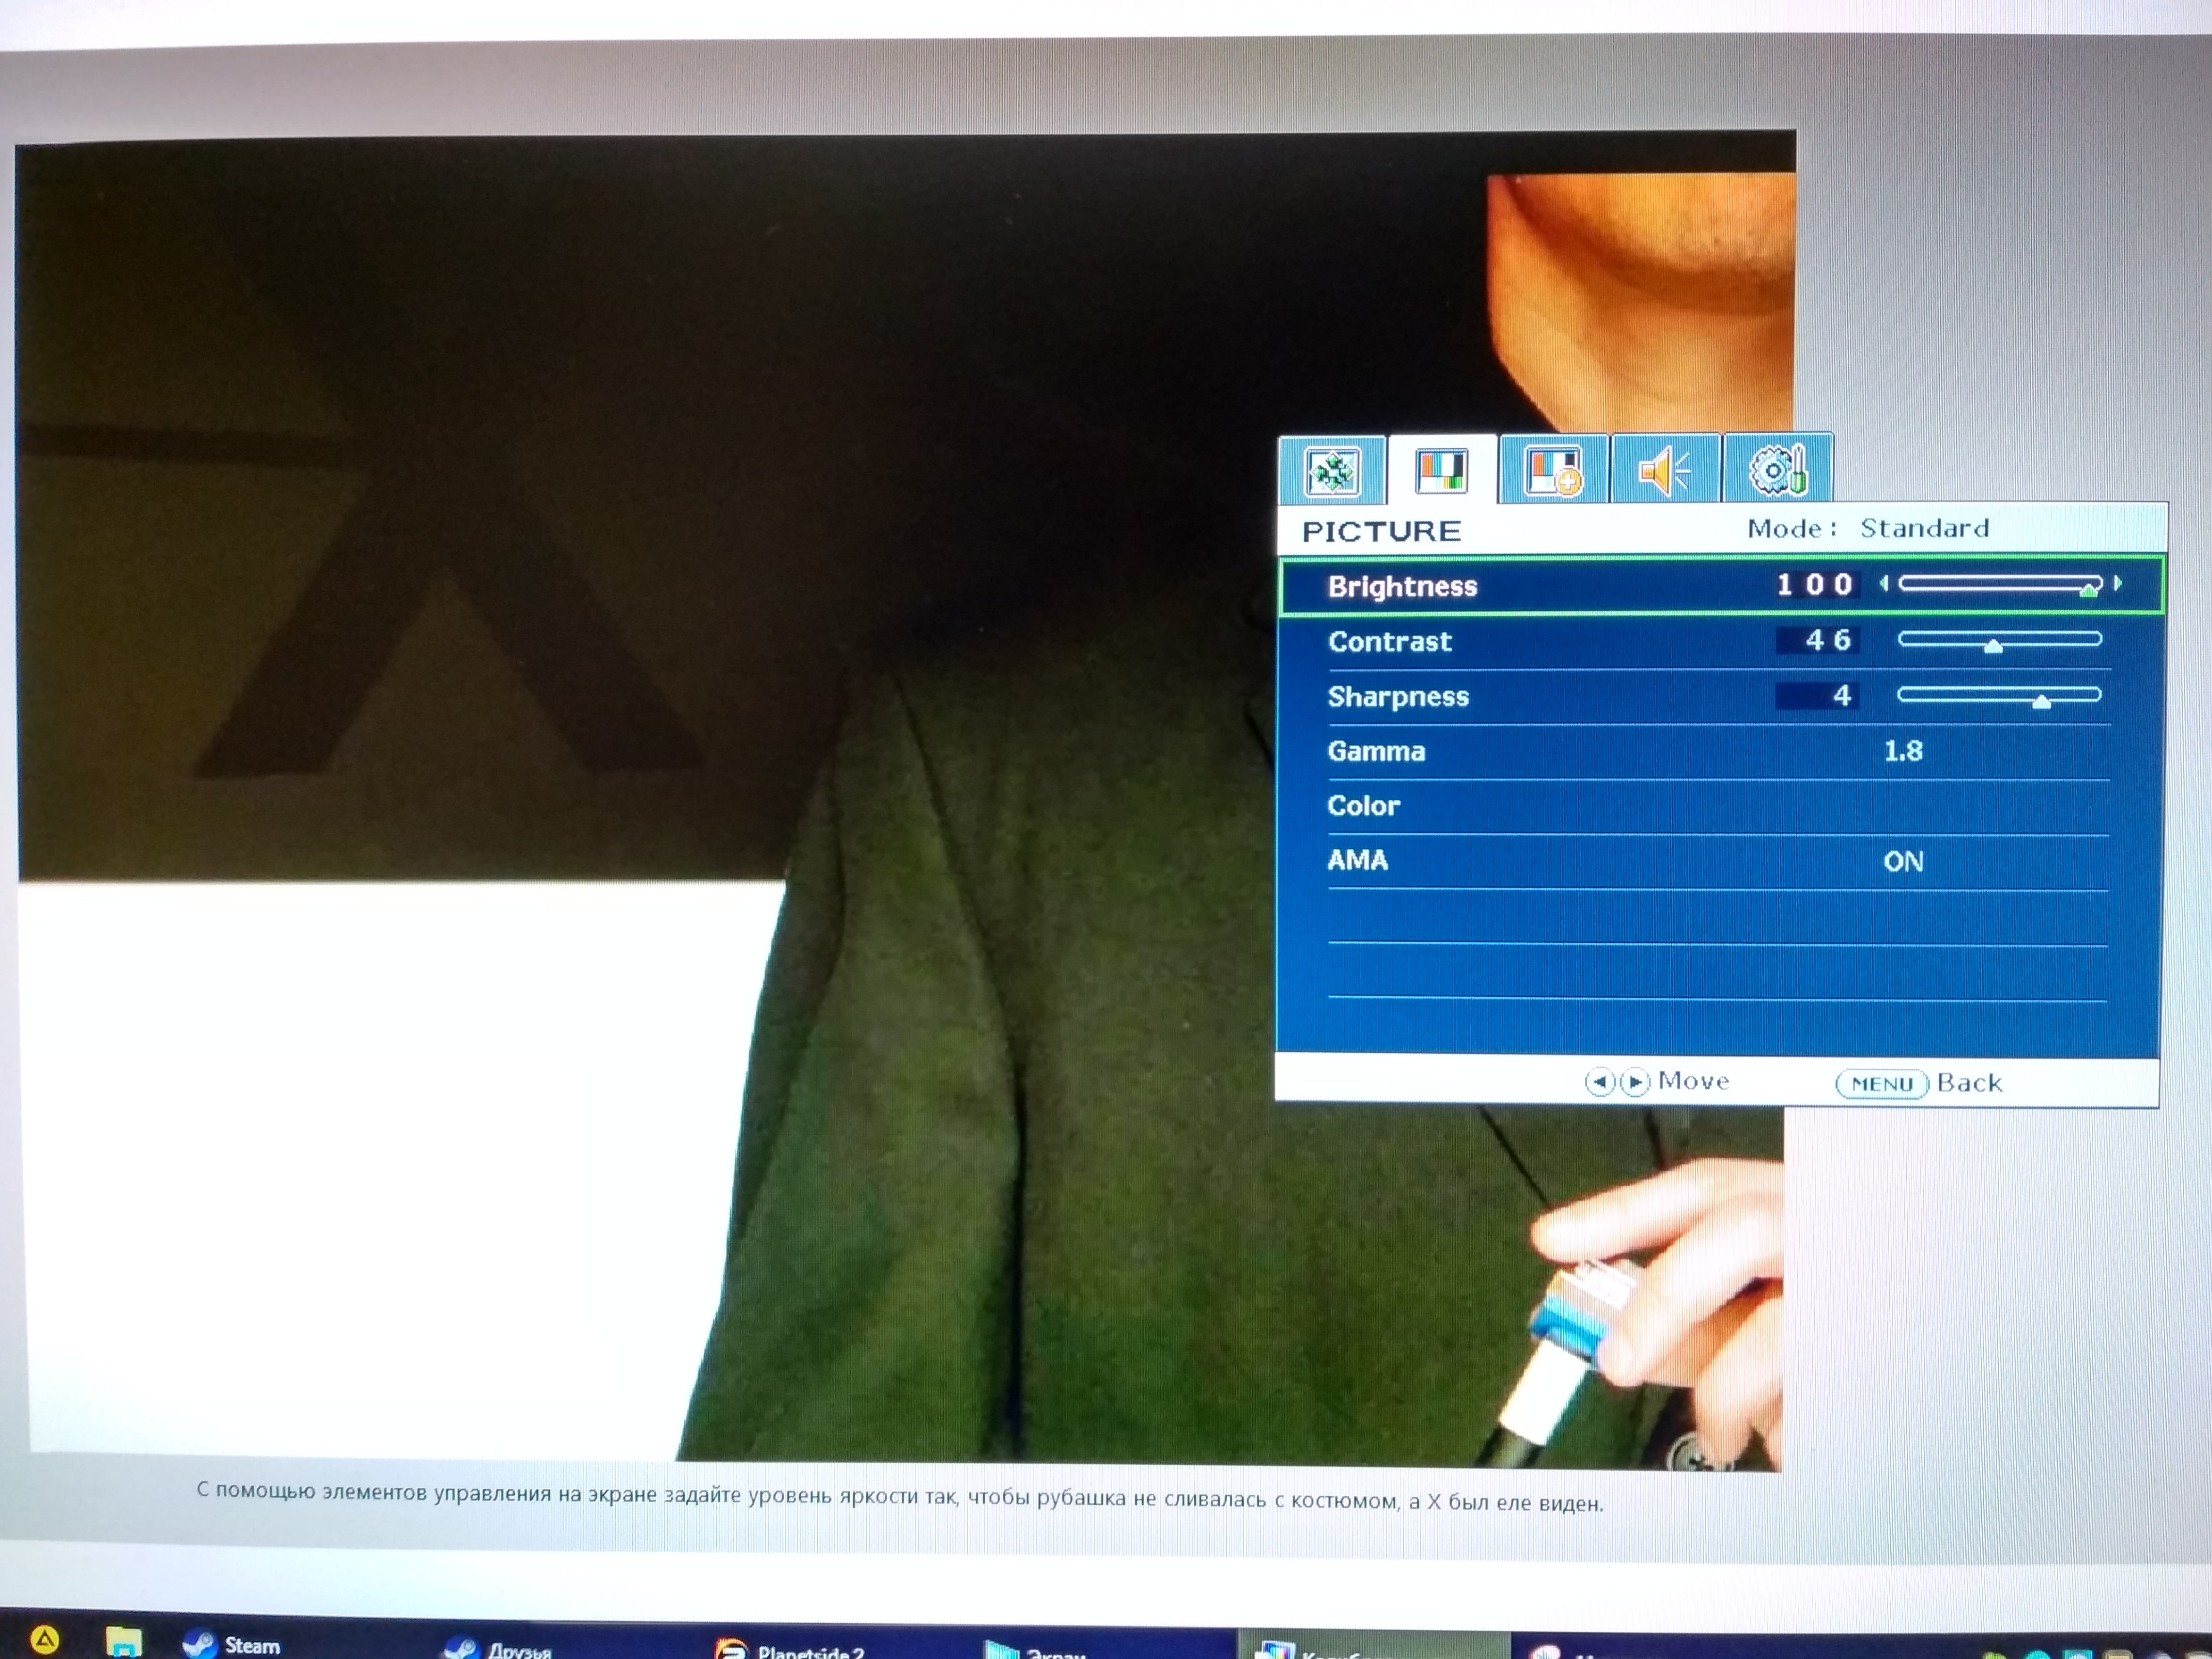
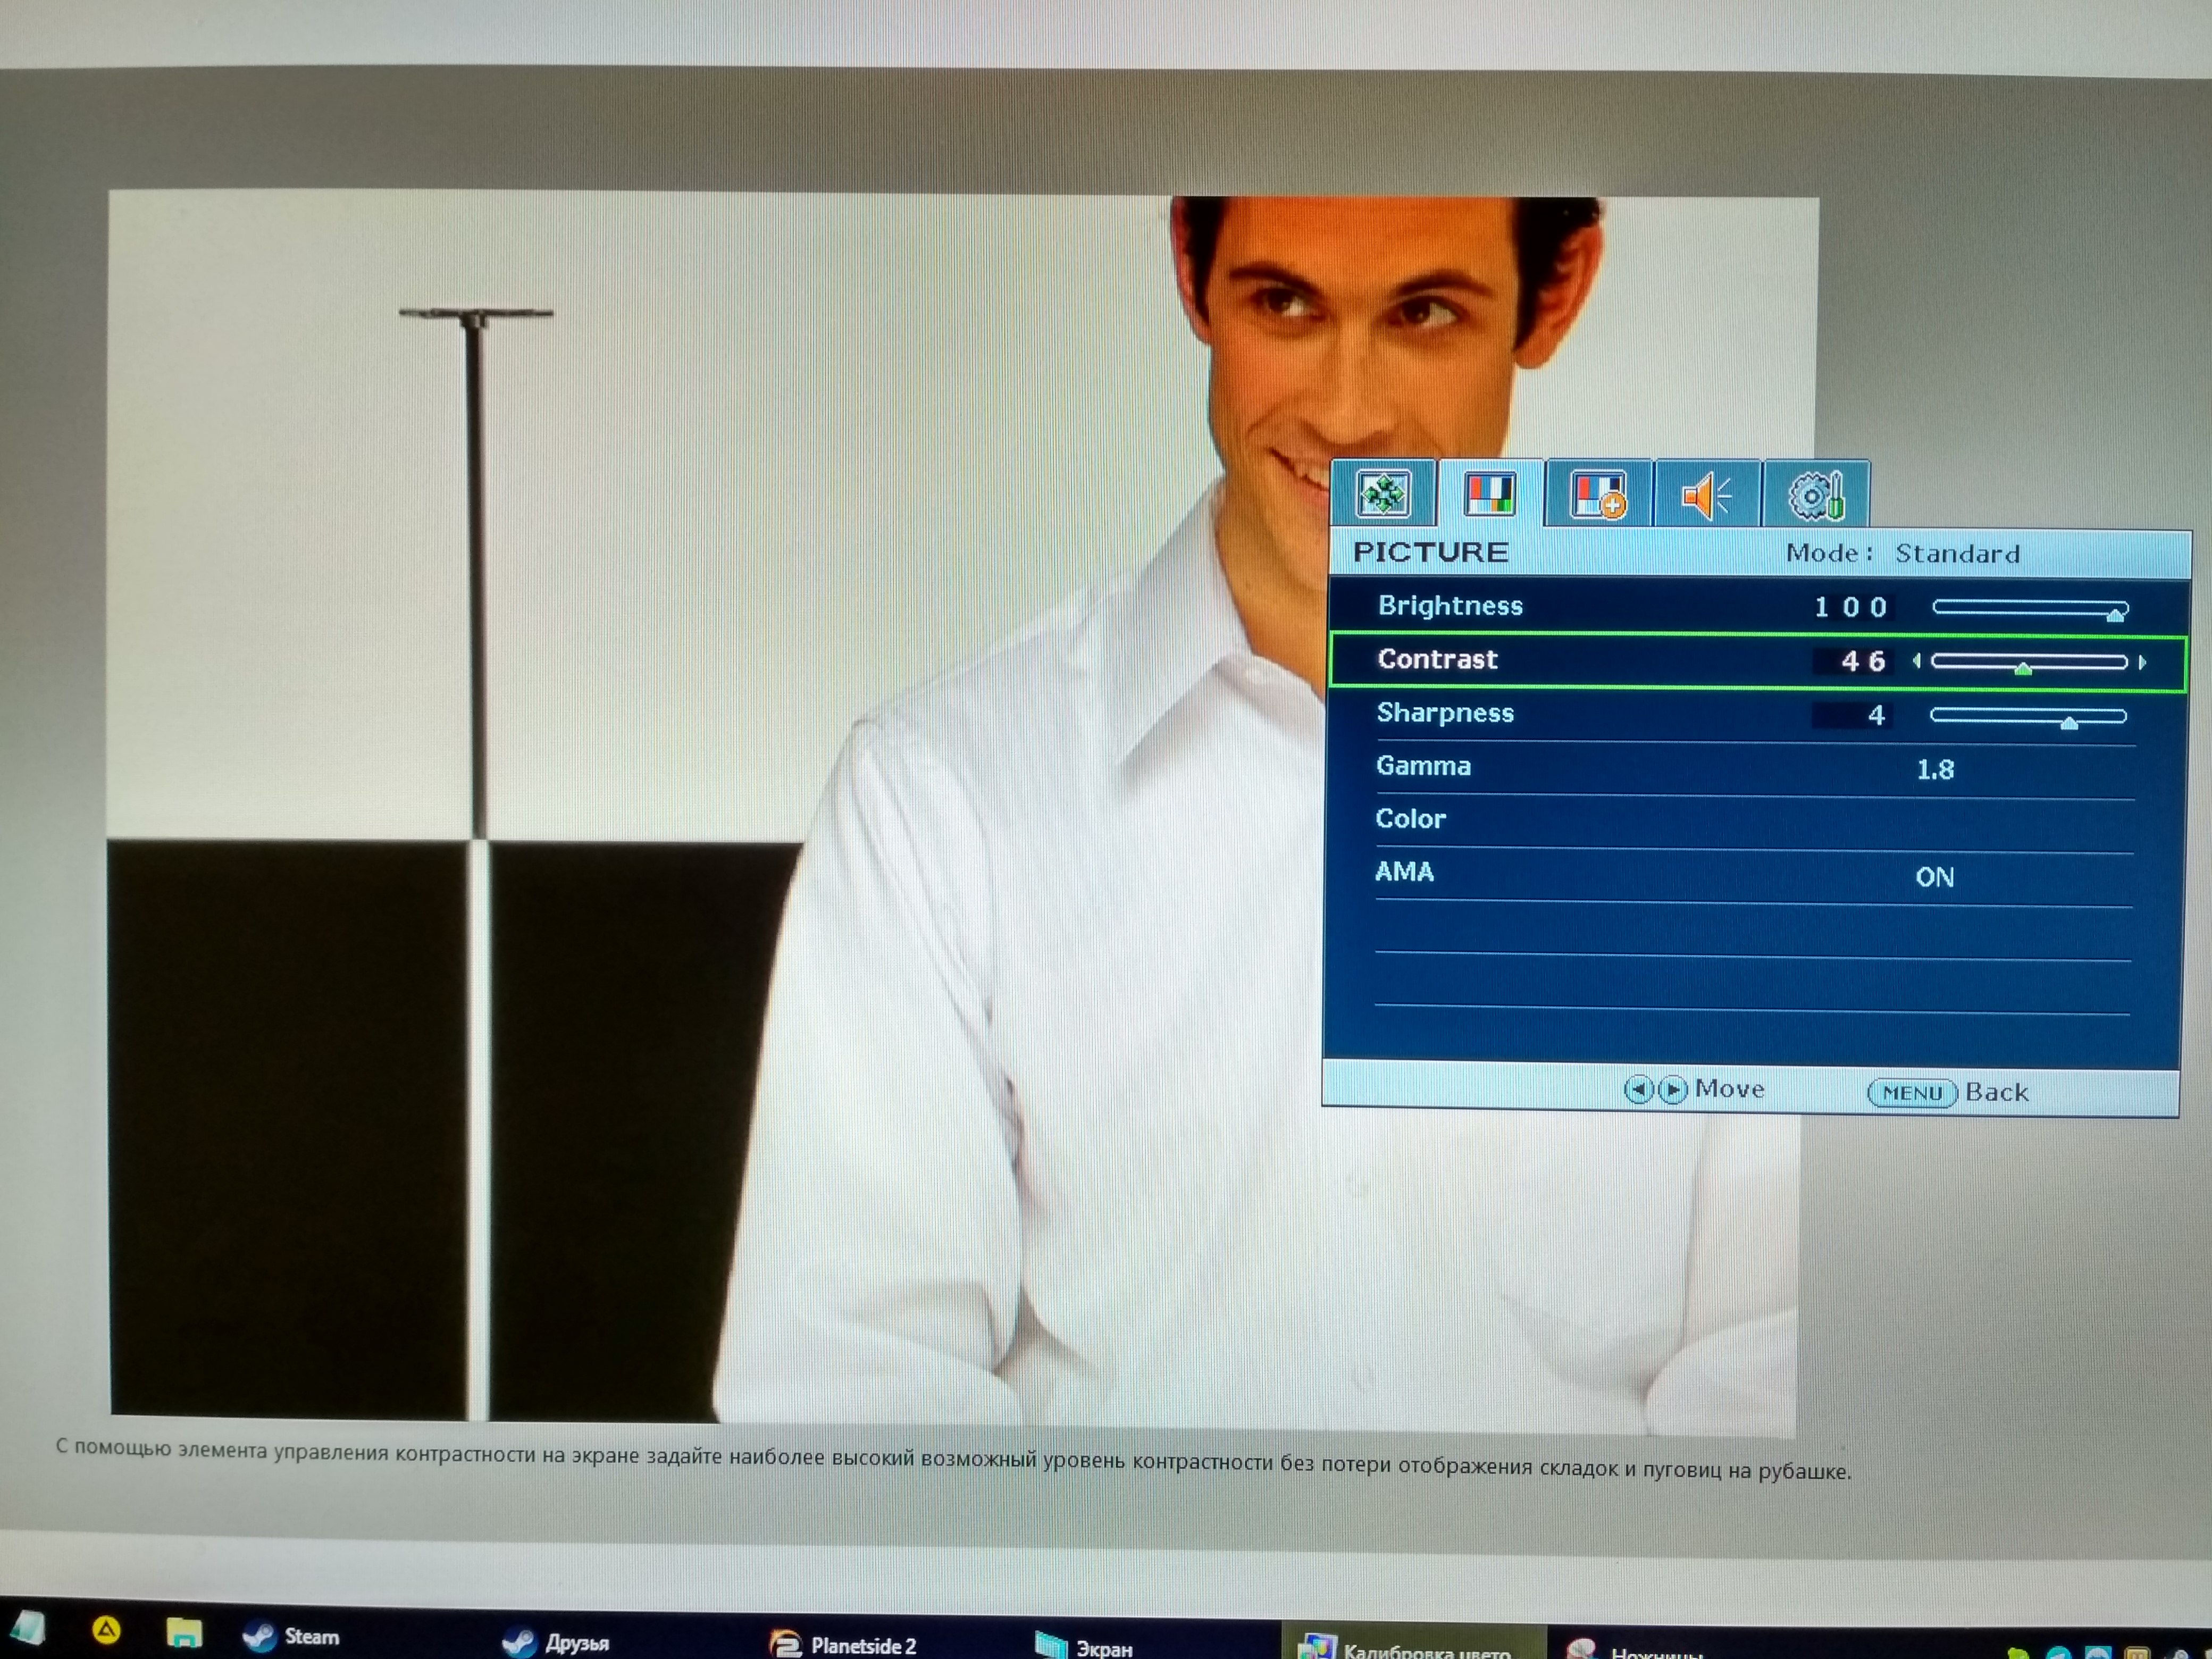
Brightness. PlanetSide 2 doesn’t give you access to Contrast settings, and increasing Brightness without changing Contrast will just make everything whiter.
If the game looks too dark to you, it’s better to keep game’s Brightness at 0, and change your Display or Graphics Card brightness and contrast parameters instead (thanks to st0mpeh for this info).
Generally, how bright you want your game to, be depends on your display, personal preference and how much outside light do you have in your room.
[All] Vertical Field of View determines your field of vision. Check the Vertical Field of View section for more detailed information.
Wide View Mode – enable this for multi-monitor setups or if you want to increase Vertical FoV past its maximum of 74 degrees.
It’s hard to play PS2 on multiple monitors, as even with “Centralized HUD” enabled, the minimap and chat will remain in furthest left corners of your left monitor.
Vertical Sync synchronizes FPS to monitor’s refresh rate to prevent tearing, but introduces some input lag. This video does a great job at explaining it.
PlanetSide 2 uses built-in Triple Buffering (source) – when VSync is enabled, it improves performance when FPS falls below refresh rate. You can read more about it here.
As an alternative to VSync, most nVidia GPUs have Adaptive VSync and AMD have Dynamic VSync, which can be enabled via GPU control panel. It automatically enables VSync if framerate exceeds display refresh rate, and disables it otherwise.
GPU Particle Quality is a remnant of old days, when PS2 had beautiful Physx particles.
Unfortunately, due to outstanding performance and stability issues, these particles had to be permanently disabled. Changing this setting will not affect anything.
[GPU] Render Distance sets the render distance for terrain.
Note that Render Distance has a hidden cap, depending on a continent, roughly ~2000-2500m. Setting render distance higher than that won’t affect anything.
Generally, for infantry players there’s no reason to have Render Distance higher than 1000m, and 1500-2000m for frequent vehicle pilots. In both case you might want to reduce Render Distance to improve performance.
Render distance for players and vehicles cannot be set manually. It’s dynamic and adjusts automatically depending on PC and server load – basically, the number of people in a battle. Players with long-range loadouts are rendered from longer ranges.
Smoothing – a built-in way of capping FPS. By default, the cap is equal to your monitor’s maximum refresh rate. Enabling this setting will result in input lag. You can learn more about ways of capping FPS here.
[GPU] Fog Shadows increase visibility on Hossin and Esamir, and when using a HS/NV scope.
[GPU] Ambient Occlusion – increases visual quality by adding shadows and contrast, even when shadows are disabled.
[GPU] Bloom (+video example) – adds contrast to bright light sources, mostly noticeable at night. It adds a lot to the “cinematic” feeling, but can make things harder to see, often almost blinding the player.
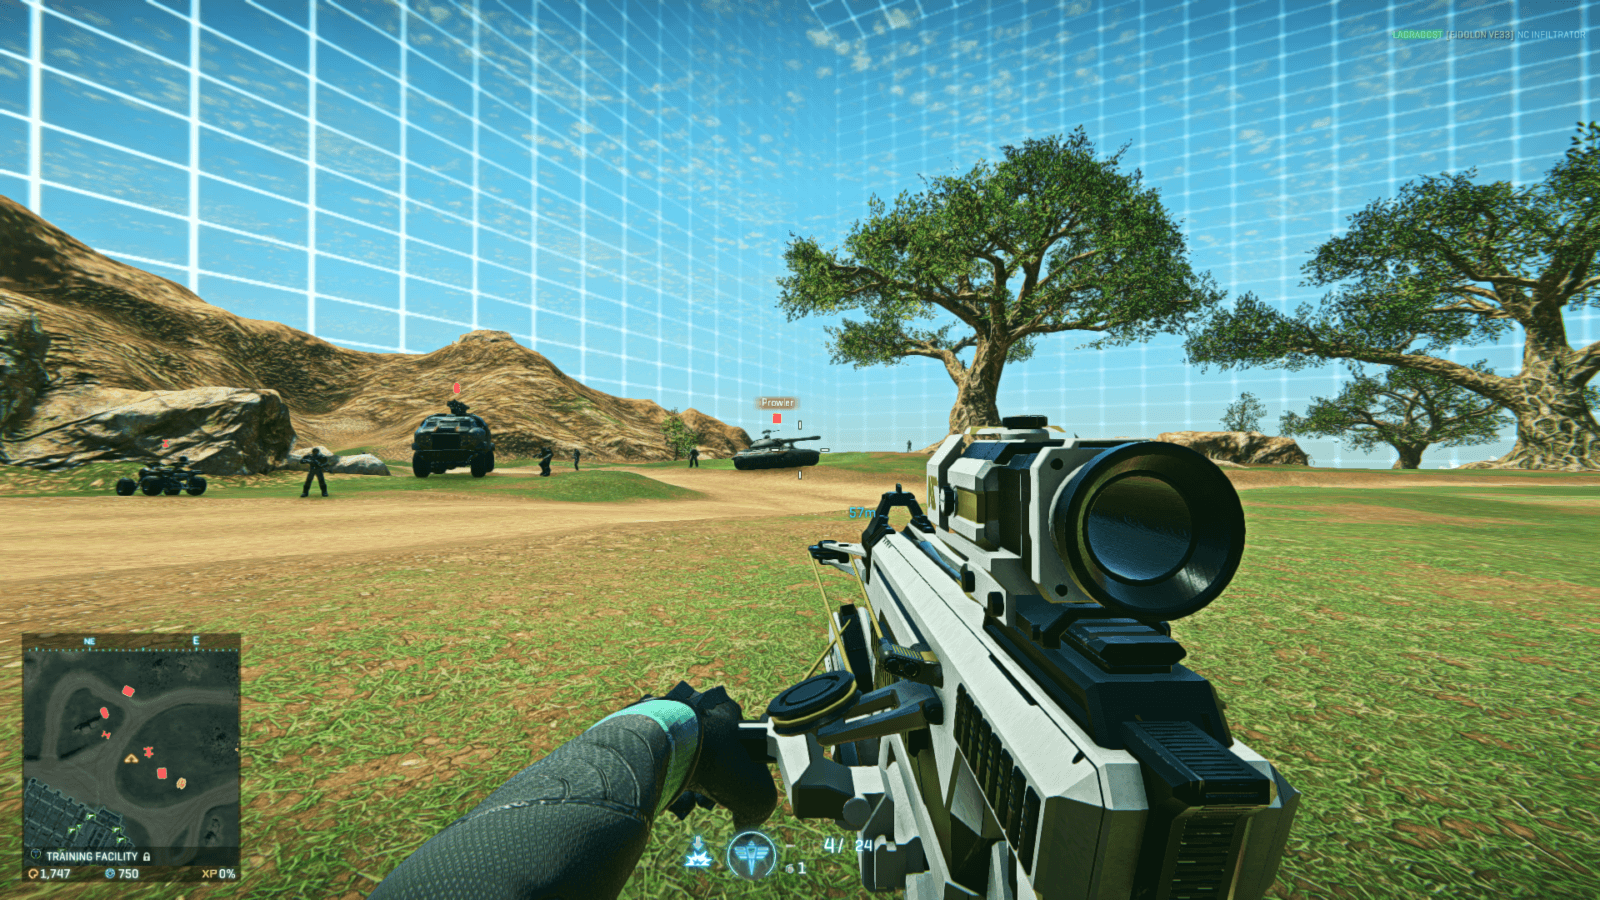
[All] Overall Quality – changes all other settings at once. As you can see, depending on settings, PlanetSide 2 can look very different.
[GPU] Graphics Quality – a rather big setting that affects a lot of different things at once, like Quality of cloaking shaders and smoke puff particles.
This setting progressively increases input lag as you turn it up. Medium is a good compromise IMO.
[VRAM] Texture Quality makes stuff prettier. Higher quality textures require more video memory. 2 GB VRAM should be enough for ultra textures, and it doesn’t have a straight performance impact. Some people have noted stuttering caused by Ultra Textures however, but as these are often isolated cases its worth testing to see what works best on your device.
[GPU] Lighting Quality will help find people by Muzzle Flashes and make stuff prettier. High setting looks notably better than low or medium.
[GPU] Shadows are controversial.
Seeing shadows can help you detect enemies, but they are one of the most performance-costing options, and they make everything look much darker, especially at night.
There seems to be little to no difference between shadow quality at different settings, so I don’t recommend trying to get a compromise. Either disable them completely, or set on high/ultra.
Disabling shadows also fixes a long-standing bug when players at long range warp all over the place.
[CPU] Particle Quality and [CPU] Effects Quality – should affect things like smoke puffs and bullet impact effects, making stuff prettier, but potentially negatively impacting visibility.
Side to side comparison video (all other settings ultra).
It is currently unclear what exactly both these settings do. It is possible that actual particle quality is governed by the Graphics Quality setting, while the Particle Quality setting only affects particle render distance.
In my tests of throwing a Smoke Grenade about 40m away, I was not able to find any difference between Low and Ultra Particle Quality. However, setting ParticleDistanceScale to 0 did not seem to have any effect with Ultra particles, while with Low particles it made particles only render to a distance of about 10m.
[CPU] Terrain Quality is supposed to affect the quality of terrain geometry, but there’s no noticeable difference in performance / visuals. Up to you.
[GPU] Flora Quality enables or disables 3D grass on the ground. It doesn’t seem to matter which setting to choose, it’s either on or off. Makes the ground game much prettier and immersive, but can negatively affect visibility of objects on the ground or behind a hill. Grass only renders at a short range of ~50m around the character.
[GPU] Model Quality – it is unclear whether this setting actually affects anything.


[GPU] Motion Blur blurs out transitions between frames, making action more fluid and pleasant to the eye. However, Motion Blur in PS2 is known to increase input lag, and generally has a high performance cost. Using Motion Blur is not recommended if you care about being competitive.
[CPU] Maximum Voice Channels – located on the “Audio” tab of the Settings menu. Affects the number of sounds that can be played simultaneously.
You may want to reduce this setting if you have a weak CPU, but it may cost you in game, as you may not hear certain key sounds, like enemy shooting you in the back 🙂
Anti-Aliasing – PlanetSide 2 has a form of built-in anti-aliasing. It works great at close range, but can make distant objects blurry and harder to see. Unfortunately, there is no way to turn it off at this time.
Performance cost
Unfortunately, there is no up to date information on performance impact of each individual setting.
“PlanetSide 2 Tweak Guide” by nVidia is horribly outdated, as since its release in 2012, PlanetSide 2 underwent massive internal changes and performance optimizations.
It’s safe to say that Graphics Quality, Shadows and Resolution are the most demanding options, but to find out which setting does what to your framerate on your PC, you will just have to experiment.
In general, if you have a weak CPU, decrease CPU-dependent settings to increase performance.
Or if you have a powerful GPU, you can increase GPU-dependent settings at no performance cost.
There are multiple testimonies that putting certain settings on “low” gives little to no performance, and sometimes can even reduce it, so pay attention to what you’re changing and what results you’re getting.
Suggested Settings
For a weak PC
For a good PC
PlanetSide 2 can look incredibly good at all ultra settings. Cinematic, even. However, certain graphical settings can affect visibility. I find the settings below to be the best compromise between looks and performance.
The game will look good, but will not hold you back by throwing special effects all over your screen. You need at least entry-level gaming PC to have good performance with these settings.
Advanced Tuning
In addition to tuning PlanetSide 2 performance, there are other, smaller things you can change to further customize the game for your own needs.
What is allowed and what isn’t
Here is the latest official stance regarding game client file modification.
It is expressly allowed to:
- Modify InputProfile_User.xml (this is your key/mouse/pad configuration)
- Modify UserOptions.ini (this is your saved graphics and game settings)
- Replace .ttf font files with other fonts.
- Use graphical overlays, such as Recursion Stat Tracker and Overwolf for TeamSpeak 3
All other game file modification is strictly forbidden, and may and will result in a permanent ban.
- Using ReShade, SweetFX or other programs that act as injectors is a bannable offense (source).
- Here is the latest official stance regarding keyboard, mouse and AutoHotkey Macros.
- You are allowed to use a VPN.
For Laptop Users
Originally posted on reddit by /u/HerrMyth.
As you may know, PS2 is one of the most (CPU+GPU) demanding games on the market, and laptops are not well equipped to face it, not because of hardware limitations, but because of heating issues.
A lot of mid-range laptops only have one built-in fan, and their cooling system is basically made to handle either one of those two situations:
- High GPU usage and low to mid CPU usage: Usual “gaming” scenario.
- High CPU usage and low GPU usage/use of the chipset: Intensive CPU task, video editing, chrome with 50+ tabs open…etc
PS2 requires both high CPU and GPU usage, and your laptop cooling system may not be able to handle it, therefore the temp will rise to a point that your hardware will throttle (reduce operating frequency) for safety reasons.
I had this problem: my i5 / GTX960M configuration performs well the first 10 mins of gameplay, then the performance drops, so I had to use potato settings for consistent performance.
I recently looked into it using these software that tracks your hardware data and sensor data:
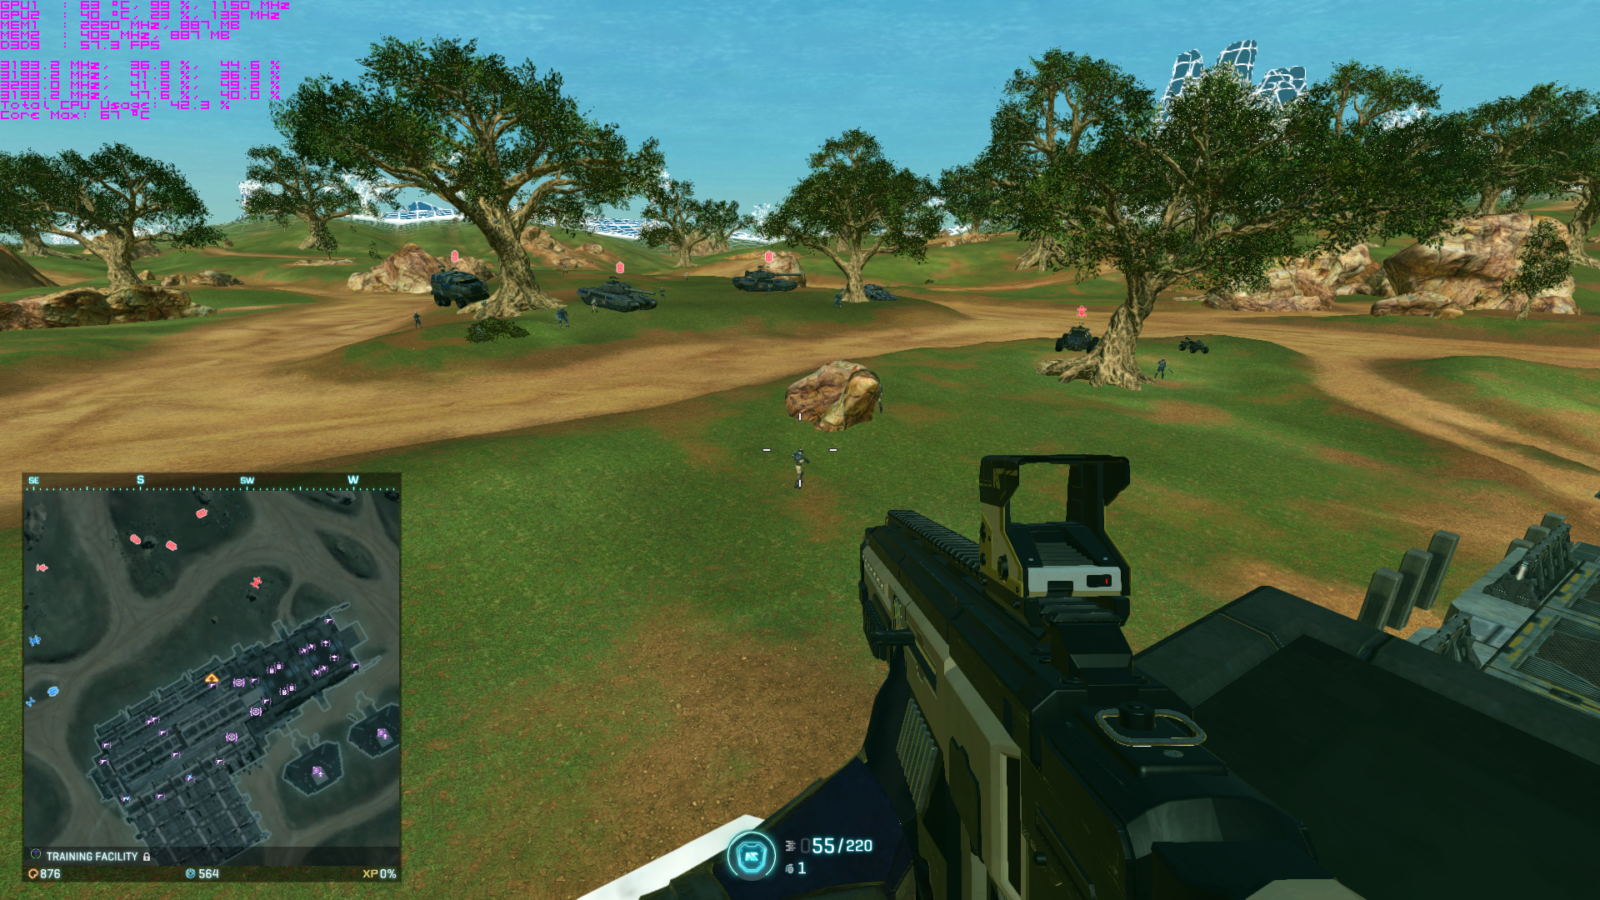
Basically, the GPU temp rose quickly to 80°C+, and the GPU Clock was throttled to 1/3rd of its nominal value : 1200Mhz to 405 MHz. You can guess the performance loss, and nothing to do with patches 🙂
Possible solutions:
- Clean your goddamn laptop fans, dust goes in and blocks the airflow, making the cooling system less efficient.
- Check that your cooling system is actually working at 100% while playing, i use this software Notebook Fan Control to push it to 100%, since Acer limits fan usage to 60%. This software DOES NOT GIVE ANY GUARANTEE, USE AT YOUR OWN RISK
- If the CPU Temp is the issue, you may consider reapplying some thermal paste, since the usual laptop manufacturers are stingy on it
- You might consider buying a cooling pad, don’t know it they are effective tho, since the first two points were good enough for me.
Undervolting
For those on laptops or other systems where your CPU is prone to thermally throttling itself, undervolting should help mitigate that. All CPUs are shipped with a stock voltage significantly higher than what is necessary for it to function – this is because all chips are different, so both Intel and AMD will set a higher voltage to ensure a greater number of processors will function.
Undervolting can not, and will not damage your CPU, nor will it void your warranty, so if you have thermal issues it is definitely worth the time and effort you need to perform it.
This guide will cover CPU undervolting, but it is possible to undervolt a GPU as well.
Depending on your CPU, there are a few options on how to go about this:
- Intel-Based Systems:
- ThrottleStop
- Intel XTU
Unfortunately at this time there is no equivalent for AMD laptops. If you’re undervolting on a desktop, then Ryzen Master is what you’re looking for.
This is can be a bit of a confusing process so I’ll list a brief guide on how to go about this. In this guide I’ll be using ThrottleStop as I’ve found it to be more reliable than Intel XTU. First, take a moment to search on Google and see what other’s have achieved for their undervolts for the same processor as you. Take note of numbers that look like the following: -60mv. You can use this to gauge what kind of undervolt you might be able to achieve. Start up ThrottleStop and you’ll be greeted by the following:
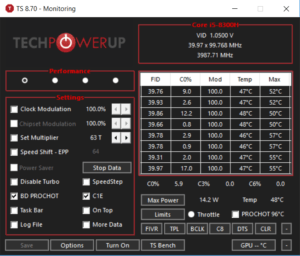
Ignore everything on ther for the time being except the TS Bench button (keep a note of this – it’ll come in handy later) and click the FIVR button. This will open up a second window. We’re interested in this portion of the middle column:
The biggest gains you’ll see are from undervolting the CPU Core and Cache – the rest will hardly affect anything. Start off with the core. Click the ‘Unlock Adjustable Voltage’ button, ensure it’s set to ‘Adaptive’ and then focus on the Offset Voltage.
Now reduce the ‘Offset Voltage’ value in very small amounts – no more than -10mv in one go. Every time you do so, use a CPU benchmark of some kind to test and see if your undervolt is stable. The TS Bench mentioned earlier works – have a play around with that and ensure you don’t get any BSOD crashes.
Don’t worry if you do – undervolting is completely harmless and should not cause any damage to the CPU itself. Just increase the offset voltage again (as in, bring the number closer to 0) to prevent crashing and you’re good to go. From here on its a bit of a cycle to see how low you can go whilst keeping your system stable.
ReShade and Lumasharpen
Note 1: know that there is a good deal of risk involved. While ReShade is not blocked by BattleEye, it has been directly forbidden by PlanetSide 2 developers. You could potentially get banned. However, as far as we know, no player has been banned for using ReShade. Yet.
Note 2: before using ReShade, check if your monitor has a Sharpening setting, which basically does the same thing you need ReShade for.
– Iridar
ReShade is a post-processing injector, it attaches itself to game’s process to apply filters, and make the game look better.
There are a lot of different filters to choose from, but we are only interested in one, Lumasharpen. It is a sharpening filter with a minimal performance cost, this is a godsend to playing at low resolution. Lumasharpen will cost you only 1-4 FPS, but the sharpened picture is worth it for a variety of reasons.
Alternatively, there is AdaptiveSharpen, but it has a much higher FPS impact.

As you can on see on the comparison, the effect is much more pronounced on a lower resolution, but it’s still obvious on a higher one. Lumasharpen makes the game much easier on the eyes, especially at lower resolution, and it makes targets stand out more.
Play around with filter’s settings. The only ones that truly change much, are sharpen strength and sharpen clamp. I prefer setting sharpen strength to maximum and playing around with sharpen clamp until the picture is easy on the eyes.
Specializing
PlanetSide 2 gives lets you play ground vehicles, aircraft and infantry. Naturally, you want to have great performance at all times. However, one concept that needs to be understood is that you don’t want to be GPU-bottlenecked in any scenario in PS2. Not only it impacts your FPS and Input Lag, it makes your guns shoot slower. You really don’t want that.
So when playing infantry, you want to push the most out of your hardware, and reduce Render Distance and Particles.
However, to play vehicles, especially aircraft, you need good Render Distance and Particles.
So if you have bad hardware, you will either have to dedicate entire sessions to playing infantry OR vehicles, or accept that you’re not going to perform as well as you could at infantry play.
Other ways to increase performance
HPET Bug
Full information here. Here is a quick summary:
Any PC has several timers that are used to measure time. HPET is one of them. Some systems suffer from “HPET bug” – accessing HPET takes too long. Normally this is not a huge deal because HPET is just one of the timers on the list.
However, certain programs – usually related to overclocking, benchmarking or system monitoring – can force HPET to be the only timer used by the system.
On systems affected by the HPET bug, this can result in a catastrophic decrease in performance, 30-40% FPS drop.
To make sure your system is not affected:
- Windows Search for “CMD”
- Right Click the Command Prompt and click “Run as Administrator”
- Type: bcdedit /deletevalue useplatformclock
If you get an “operation successfull” message – restart your PC. Congratulations, your PS2 performance is likely to significantly improve.
The only potential negative consequence is that the mentioned software that required HPET to be Forced On may stop working correctly. In this case, if you wish to Force HPET again, simply type bcdedit /set useplatformclock true in the command prompt instead.
If you get an “error occurred” message, then HPET is not forced to be the only timer in the system. Sorry, no free performance for you today.
Spectre and Meltdown Protection
Spectre and Meltdown are exploits that can be used by bad people to do bad things to your PC. If you update your OS and BIOS, you must likely already have protection against these exploits, but the problem is that those additional security measures eat a lot of CPU performance.
If you’re desperate to boost your performance, you can use this tool to temporarily disable Spectre and Meltdown Protection.
Task Priority
Increasing the task priority of PlanetSide2_x64.exe through Windows Task Manager would be an elegant solution of making sure the game gets as much processing power as possible.
Unfortunately, for some inexplicable reason, the task priority will automatically revert to “normal” within minutes, so this method does not work.
Disabling Core 0
Note: adjusting Windows Power Settings is a better solution to this problem, this is only listed here for general educating purposes. Also, this has no positive effect on Windows 10-based systems
CPU Power Settings
To save power, most modern CPUs adjust their clock frequency depending on load. Basically, when there’s nothing to do frequency decreases to save power, and when there’s a lot of stuff to calculate, frequency increases.
Same principle for core parking – during low load, one or several cores may “park” – temporarily disable. They will “unpark” when necessary.
However, these changes to frequency are not instant; delays are enough to cause framerate drops.
The easiest way to solve this is to just force your CPU to always run at maximum frequency.
Go to Windows Control Panel -> Power Options. There select “High Performance”.
Then click “Change plan settings” to right of it.
Click “Change advanced power settings”. A window will open.
In the list, find “Processor power management”.
Set “Minimum processor state” as “100%”
Set “System cooling policy” as “Active”
Set “Maximum processor state” as “100%”
GPU Power Settings
I was monitoring my GPU while playing, and I noticed that with Power Management Mode at its default ‘Optimal’ setting, there would be about a 1 second pause when entering/exiting the map screen and terminals, during which GPU usage dropped to 0%, and clock speeds dropped from 3D to 2D clocks, before going back up.
With ‘Prefer Maximum Performance’, GPU usage and clocks no longer drop, and the pause is almost eliminated.
GeForce Experience and nVidia Shadowplay
Shadowplay and GeForce Experience sometimes cause performance issues in PlanetSide 2 and games in general. Consider disabling nVidia Share or uninstalling GeForce Experience altogether, if you are having performance issues.
GeForce Experience 3.0 is specifically known for being worse than GeForce Experience 2.0 in every way imaginable. If you want, you can rollback to the previous version.
- Go to Windows Control Panel and uninstall your current version of GeForce Experience.
- Download and install GeForce Experience v2.11.4.0.
- Launch System Configuration utility by pressing Windows + R and typing “msconfig”. Or simply search for System Configuration in start menu.
- Go to “Services” and uncheck nVidia Network Service.
This will prevent the GeForce Experience from automatically updating to a newer version. You will have to download driver updates manually from the nVidia site. When installing new drivers, make sure to uncheck GeForce Experience. As long as you don’t check “clean install”, this should not uninstall your older version of GeForce Experience.
Network Calibration
Disabling Nagle’s Algorithm
This is often recommend to improve network performance in online games, but it will not work in PlanetSide 2, since Nagle’s Algorithm applies only to TCP protocol, while PlanetSide 2 uses UDP.
Using a VPN
VPN stands for “Virtual Private Network”. It is usually used for the purposes of privacy or bypassing content restrictions, but it can also potentially improve your connection to PlanetSide 2 servers, making it more stable and reducing latency.
Most decent VPN require regular payments, but usually offer free trials, so you don’t risk anything by trying one out.
Here’s the list of VPN that have been confirmed to improve connection to PS2:
- Avast SecureLine
- Windscribe
European servers for PlanetSide 2 are located in Amsterdam, Netherlands.
Display Calibration
Everyone’s eyes are different, and monitors rarely have good factory calibration, so it’s always a good idea to calibrate your display.
First, launch Windows’ Display Color Calibration tool. This guide will show you how.
Once the tool is launched, summon your monitor’s On Screen Menu. Usually, this is done by pressing control buttons on the monitor’s frame.
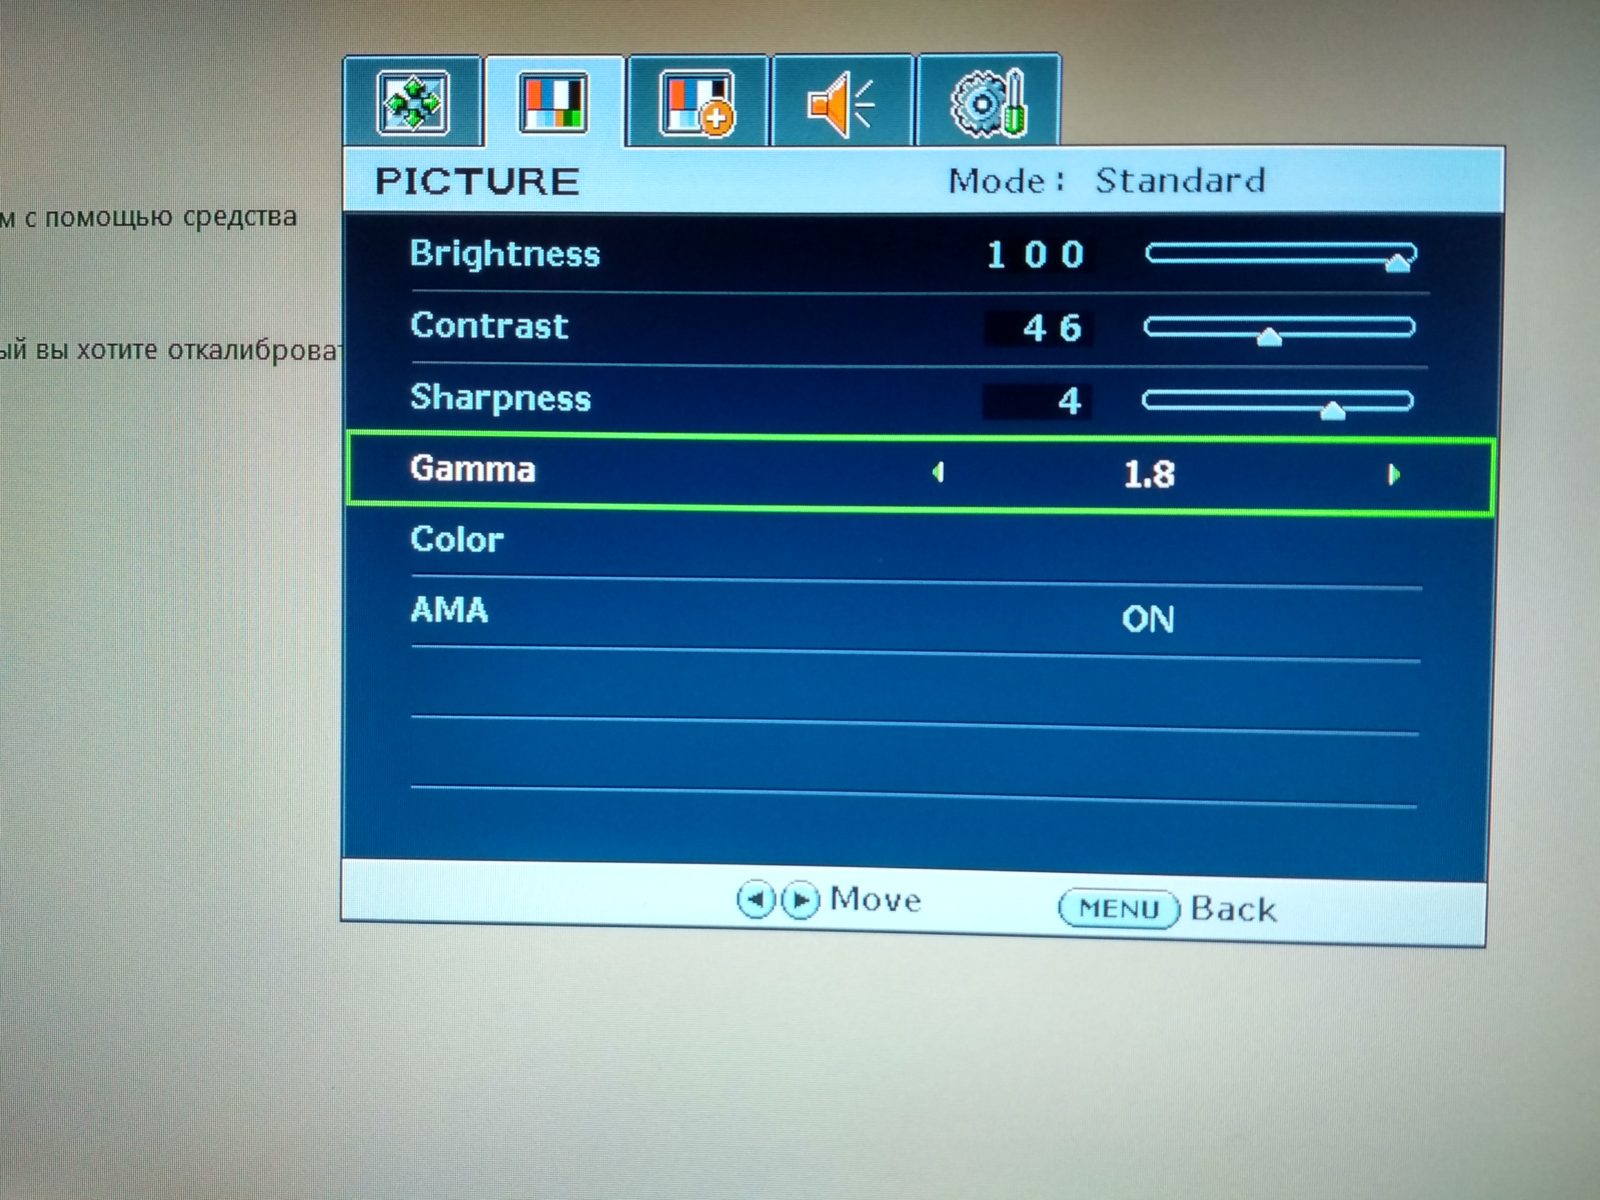
Note: On Screen Menu will look different depending on Monitor’s manufacturer and model. Refer to your monitor’s support page on manufacturer’s website if you have any issues.
In the On Screen Menu, locate Gamma setting, and set it to 1.8. This will increase visibility in PlanetSide 2 during night time, at the cost of reduced overall contrast.
Then, fine tune the Gamma setting in Display Color Calibration tool, and follow the next steps of the calibration wizard.
You will have to calibrate Brightness, Contrast and Colors. Follow the wizard’s instructions at the bottom.

All calibrations should be done through monitor’s On Screen Menu. This will allow the calibrations to persist through multiple Windows installations, and will let the calibrations persist in all games and movies.
Your Monitor’s On Screen Menu may also give you access to additional settings, such as Shaprness, refresh rate overclocking, increased color transition, correction of light trails, etc. Refer to your monitor’s manual for the complete list and instructions.
Don’t be afraid to experiment, you should always be able to reset the monitor to factory defaults in the On Screen Menu if you mess up the calibration beyond repair.
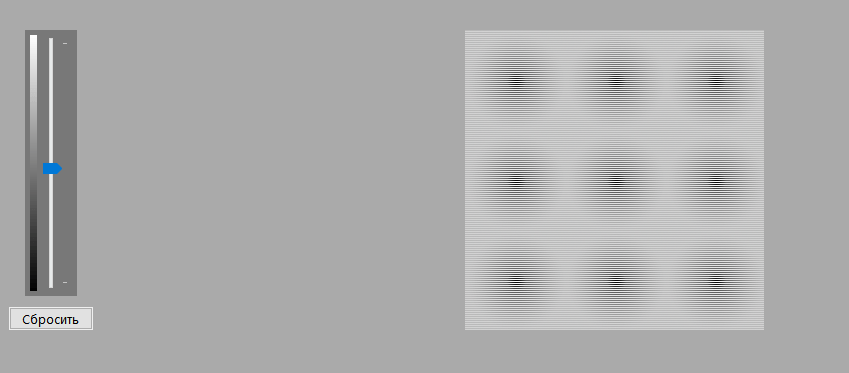
Color Vibrance
Increasing color vibrance will make colors more pronounced, increasing in-game visibility.
Go for the highest value that looks acceptable to you. Note that this is a global setting and will affect colors in all applications.
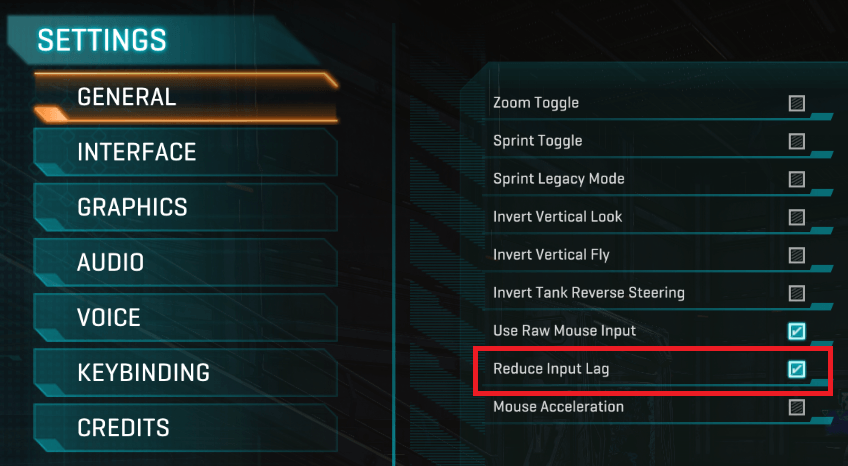
“Reduce Input Lag” Setting
The issue of input lag is a pretty complex in this game. Reducing the size of the flip queue in the graphics driver is a definitely input lag win (on single GPU setups, with or without VSync engaged), while the in-game option for ‘Reduce Input lag’ actually increases it, and can also lower performance slightly.
Furthermore, certain graphics settings, most notably Graphics Quality on its High setting, also increase the input delay, even if the frame rate or GPU-bounded-ness are not affected.
This setting is tightly related to the maximum amount of pre-rendered frames for DirectX games:
Maximum Pre-Rendered Frames (Flip Queue for AMD): this option controls the number of frames the CPU prepares in advance of being rendered by the GPU. Higher values should result in smoother framerate with more input lag, while lower values can help reduce mouse and keyboard lag, but cause stuttering.
In practice, exact results are often unpredictable and you should experiment to find the best value for your situation.
You can change maximum amount of pre-rendered frames in nVidia Control Panel.
AMD Graphics Cards use a dynamic flip queue size, and you can’t adjust it through conventional means.
Contradicting a Daybreak official, /u/Octiceps says that in-game option Reduce Input Lag can actually increase it, as well as reduce performance slightly, and it should disabled at all times.
More info: technical discussion of what frame lag is all about with diagrams.
Capping FPS
There are several reasons to cap FPS:
(1) To reduce the likelihood of tearing, when your current framerate exceeds your display Refresh Rate. This is mostly noticeable when using 60 Hz monitors. It’s nearly impossible to notice screen tearing at 120+ Hz.
(2) To make your gameplay more consistent. Having the game jump between high and low FPS may feel annoying, like the game is speeding up or slowing down. Capping FPS will reduce the magnitude of these jumps, though you will have lower FPS on average.
(3) To make it so your hardware doesn’t have to work at maximum power at all times. Capping FPS will reduce heat and noise emissions, as well as energy consumption. This can be especially important for laptops. You don’t really need 200+ FPS while AFKing in a warpgate.
(4) To avoid spikes of input lag when GPU-bound at low FPS. Note that being GPU Bound means the GPU often works at 99%-100% capacity. It does not mean you often see [GPU] near in-game FPS counter.
(5) To avoid the negative impact of framerate on Rate of Fire. PlanetSide 2 weapons will actually fire slower when your PC struggles to keep up with the game.
Capping FPS always introduces a bit of input lag. The lower the cap – the more noticeable it is.
There are several ways of capping FPS:
- Using in-game Smoothing setting.
- Changing MaximumFPS value in UserOptions.ini.
- Through Graphics Card drivers, for example nVidia Inspector.
- Using a third-party application, such as Riva Tuner Statistics Server (RTSS).
An in-game limiter is usually most ideal in terms of latency, but not in the case of Forgelight, where it adds a good deal of input lag.
The nVidia FPS limiter adds 2+ frames of input lag, as tests by Battlenonsense and Blur Busters have shown. It’s clearly not ready for prime time yet, hence being hidden and only accessible via nVidia Inspector.
RTSS’ FPS limiter operates at CPU-level, which is the closest an external method can get to the engine-level of an in-game limiter. The Nvidia limiter is driver-level, which is one further step removed from engine-level.
RTSS would be the best option, but according to my tests, it does nothing to solve the Framerate vs Rate of Fire issue, and actually makes it worse.
If your framerate is usually higher than your display’s Refresh Rate, then simply enable Smoothing. Otherwise, you can set the Smoothing’s FPS cap by adding:
SmoothingMaxFramerate=X
There’s also the
SmoothingMinFramerate=X
command, but it’s currently unclear whether there’s any reason to bother with it.
To the [Rendering] part of your UserOptions.ini. Just after Smoothing=1 is fine. It’s currently unclear whether this way is any different from just using MaximumFPS instead.
If you never want to deal with RoF vs Framerate issues, the FPS cap should be slightly below your absolute minimum framerate.
Vertical Field of View
PlanetSide 2 lets you change your Vertical Field of View, which is different from some of the other FPS games that let you change Horizontal FoV instead.
Vertical and Horizontal FoVs are linked through your Resolution’s Aspect Ratio. You can use this FoV Calculator for specific numbers.
Higher FoV means more “stuff” fits on your screen, so it’s often recommended to keep Vertical FoV at the default value of 74 degrees, which is the maximum. However, it’s not that simple.
While there will be more “stuff” on your screen, that “stuff” will be smaller. High FoV can make it hard to acquire targets. This becomes even more of a problem if you have a small monitor.
Another consequence of high FoV is reduced performance.
Other less obvious side effects:
- Field of View affects how much zoom you’re getting when Aiming Down Sights with different optics.
- Abnormally high FoV will create a “fish eyes” or “fish bowl” effect, which can feel uncomfortable, and abnormally low FoV can cause motion sickness.
To avoid motion sickness, FPS games should be played at a minimum of 90 Horizontal FOV. To get that 90 Horizontal FoV, set your Vertical FoV not lower than:
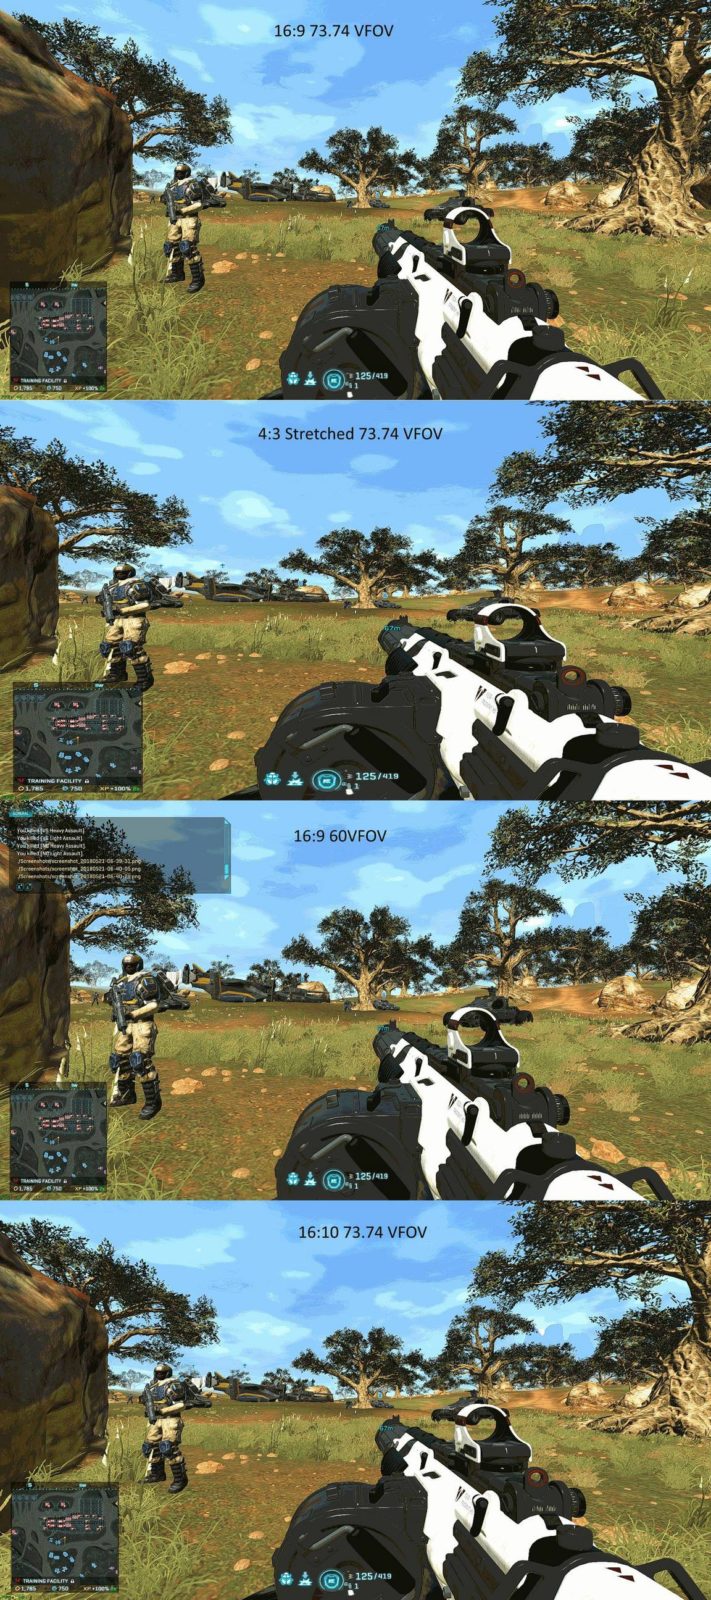
1024×768 (4:3) – Horizontal 90 = Vertical 74
1920×1080 (16:9) – Horizontal 90 = Vertical 59
1680×1050 (16:10) – Horizontal 90 = Vertical 65Here is the comparison for visibility and target size at different FoVs and Aspect Ratios:
If you do have a small monitor and/or weak hardware, it can be necessary to reduce FoV or use a squarer Aspect Ratio.
There are pros and cons to both of these methods.
Playing at a stretched Aspect Ratio only reduces your Horizontal field of view, while lowering your Vertical FoV will also reduce your vertical field of view. This is a fairly important difference for PlanetSide 2, as it does have some vertical gameplay.
Lowered vertical FoV definitely feels a lot more claustrophobic than playing stretched. It also increases visual vertical recoil, flinch and screen shake.
On top of that, a squarer aspect ratio will provide better framerates (less pixels to render horizontally, given the same amount of vertical pixels).
![often see [GPU] near in-game FPS counter](wp-content/uploads/2017/11/7Pa3K6z.png)
Going above maximum FoV
PlanetSide 2 settings menu will not let you set Vertical FoV higher than 74 degrees. However, if you enable Wide View Mode, you can set Vertical FoV all the way up to ~150 degrees in UserOptions.ini. Check this video by ZoranTheBear for more info.
UserOptions.ini
UserOptions.ini located in PlanetSide 2 folder contains all of the graphical and performance settings that you can possibly customize, as well as the list of people that you muted (ignored) in game and mouse sensitivity settings, but not keybinds.
According to PlanetSide 2 development team, players can make any changes to UserOptions.ini without fearing a ban.
Here’s how this file typically looks:

A few noteworthy fields:
RenderQuality
You can set this value to 1.414214 or 2.000000 to get 2x or 4x Supersample Anti-Aliasing respectively.
This will have a serious impact on your performance, but will make the game look a bit smoother. Not recommended unless you have a very powerful GPU.
Also, if you’re a proud owner of GTX 970 or GTX 980 (or any other nVidia GPU with Maxwell architecture) you can enable DSR in your nVidia Control Panel, which is basically the same thing as SSAA.
It’s possible that DSR can provide better visuals/performance than editing Render Quality, but as a side effect, DSR will scale down your HUD.
MaximumFPS
Provides a way to cap FPS on the game’s engine level. Functions independently from Smoothing, through probably has the same principle. This value is set to 250 by default.
ParticleDistanceScale
Credit: EddieCarbone.
ParticleDistanceScale=0.650000
This value sets the render distance for particles, like tracers and explosions.
Lowering it to something like “0.000010” will make particles render only at close ranges and increase performance, but make it harder for you to play, because you won’t see things like weapon fire tracers and smoke puffs from damage vehicles.
This value can also be increased to increase the range where you can see particles, which can be important for aerial combat.
Generally there’s no reason to touch this setting for an average player.
UseLod0a
UseLod0a=0
Does “something” related to extremely weak hardware and how the game handles Level of Detail based on distance to an object.
Generally it’s better to disable this setting, unless you run extremely old and weak hardware (c) Billbacca the developer.
Disable automatic decloak
By default, infiltrators can decloak by pressing “fire” button. This wasn’t always this way, and oldschool players, who are used to decloaking manually, may find this annoying.
To disable automatic decloak, find or add this line in UserOptions.ini under [General]:
DecloakOnFire=0
Disable ability queue
If your character is unable to perform a certain action, but becomes able to perform that action within a specified time frame, that action will be automatically performed later.
This is easier to explain on an example.
Let’s say you decloak, and try to throw a grenade while decloaking. The decloaking animation will prevent you from throwing the grenade.
If Ability Queue is set, for example, to 0.5 seconds, the game will remember that you were unable to throw the grenade, and if you will become able to throw the grenade in 0.5 seconds, your character will do that automatically when the decloaking animation completes.
However, this creates more problems than it solves.
The common occurrence is that you’d double tap the cloak key (or use the DecloakOnFire, but also hit the ability key) and uncloak, but have the AbilityQueue kick in and you’d wind up recloaked.
It basically plays out like you have lag anytime you’re decloaking and is a good way to cloak trap yourself or find yourself using an ability at a time it’s only going to get you killed.
When it was first added and enabled by default, it caused a lot of very frustrating moments and a lot of angry infils.
I’d strongly advise keeping Ability Queue at 0.0 because it ultimately will screw you over.
To disable ability queuing, find or add this line in UserOptions.ini under [General]:
AbilityQueueSeconds=0.000000
Custom reflex reticle color
Credit: originally posted on reddit by MrRube.
UserOptions.ini has two lines you can use to change your reticule color.
The first is “TintModeReticuleStyle”. By default this is set to “0”. Changing it to “1” will allow you to use the second line to change the color of all your reticules.
The second line is “TintModeReticuleColor”. When “TintModeReticuleStyle” is set to “1”, you can set “TintModeReticuleColor” to a decimal color value.
For example, if you wanted all your reticules to be neon green, you would set it to “65280”.
Use this site to find out the decimal value for any color you want (thanks LordMcze).
So if you want all of your reticules to be neon green, put these values in [UI] section of your UserOptions:
TintModeReticuleStyle=1
TintModeReticuleColor=65280
Custom crosshair overlay
A custom crosshair overlay will add a secondary crosshair in the exact center of your screen. This will help you aim with hip fire better, spot enemies while being a passenger in a vehicle, fire your tank cannon in 3rd person view, and to be more precise while using a weapon with iron sights, which tend to wobble all over the place, even though the weapon itself always fires in the exact middle of the screen.
There are two common ways of creating your own custom crosshair overlay in PS2:
1. Using Overwolf, which is customizable overlay for TeamSpeak.
Install Teamspeak and Overwolf from the web, and download crosshair overlay from here.
2. Using Recursion Stat Tracker, which is a community-created tool for creating in-game overlay.
Download Recursion Stat Tracker from here and a crosshair of your choice from here. You can preview the crosshairs here.
Change game’s font
Credit: originally posted on reddit by B4rr. Brought to my attention by quickbeam2.
Changing game’s font is explicitly allowed by PS2 developers.
The standard in-game font is called Geo-Md.tff.
To change it you have to copy another font into: […\PlanetSide 2\UI\Resource\Fonts\Geo-Md.ttf] after the launch pad updates the game.
It is a chore to do manually every time, so you can create a *.bat file in your game folder to do this for you. It can also run Recursion Stat Tracker (RTST) and TeamSpeak (TS), unless they are running already.
You can create the .bat file you need using the code from pastebin:
| What to launch | PasteBin link |
|---|---|
| PS2 | https://pastebin.com/aJTXzEC3 |
| PS2 (steam client) | https://pastebin.com/tAh2JZyw |
| PS2+RTST+TS | https://pastebin.com/VfKQ56qu |
| PS2 (steam)+RTST+TS | https://pastebin.com/E6pCEGYc |
How to:
- Go to the “…\PlanetSide 2\UI\Resource\Fonts” folder.
- Copy a font that you would like to use in the game into this folder.
- Create a new text file and paste the code from the links above.
- In that code, change “verdana.ttf” to the name of your new font.
- If necessary, change the paths of the *.exe files. (Especially steam users: Make sure that if you make a shortcut to PS2 on your desktop, that it has the same ID. I don’t know if they will coincide.)
- Save the text file as Planetside2.bat
- Create a shortcut to your desktop or start menu.
- [OPTIONAL] Right click the shortcut, properties, change icon, browse to the installation folder and select LaunchPad.ico or select another *.ico file on your PC.
- Double click the shortcut. Wait for the Launcher to be done with updating. Press any key twice in the command line window.
- Enjoy PS2 (and have Recursion and TS started automatically) in Verdana, Comic Sans, or Windings.
Improving Image Quality
You can improve image quality at a negligible performance cost through GPU Control Panel in these two ways:
- Set Anisotropic Filtering to 16x.
- Allow Negative LoD Bias and set it somewhere between -0.3750 and -0.7500.
You can find more details in this reddit post by sixoo.
Mouse Configuration
Credits for this section: MattiAce, ItZMuRdA.
1) Get a mouse with a good sensor
There’s a great in-depth guide here, which will tell you what makes a good gaming mouse, along with a few examples.
And there’s another, very technical and comprehensive guide here.
If you need a simpler “just tell me what to buy” approach, there’s a great guide at Tom’s Hardware. They also have one for mouse pads.
2) Set up your mouse
Nawyria has a great guide on setting up your mouse sensitivity here.
The most reliable way to make sure everything works right is to go to Windows Control Panel -> Mouse, and set mouse sensitivity to sixth notch. This means that per one “dot” your mouse moves, your pointer will move by 1 pixel. Also disable “Enhance Pointer Precision”, as it can mess up your aiming.
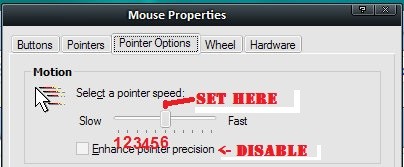
In PlanetSide 2 settings, disable Mouse Acceleration and disable Use Raw Mouse Input.
- Allegedly, Raw Input can cause *issues* in *some games*. I do not know if PS2 has these issues, but one can never be too careful.
- Mouse Acceleration increases the distance mouse pointer travels if you move your mouse fast. This makes working out muscle memory for twitch aiming incredibly hard.
3) DPI Settings
- It is said that PS2 can’t handle DPI higher than 1600, so it’s better to keep DPI within that boundary, and adjust in-game sensitivity slider instead.
- Generally, it’s better to have high DPI and low in-game sensitivity than vice versa.
4) Find the right sensitivity
PlanetSide 2 has three sensitivity sliders:
- “Mouse sensitivity” – a general sensitivity slider. Applies to aiming from the hip.
- “Aimed sensitivity” – for aiming down sights with iron sights, 1x and 2x scopes.
- “Scoped sensitivity” – for aiming down sights with 3.4x and 4x scopes, and 6x – 12x sniper scopes.
Go to VR Training, and run around, taking aim at different targets. Try to do this in one fast mouse swipe (twitch aiming). Check out this video if you have a hard time figuring out what I mean.
- If you constantly move your aim too far, then you need to lower your sensitivity.
- If you feel like you need to move your hand too much, then increase it.
- This is the most important part. Just go with what feels right, and devote enough time to it.
- The “average” mouse sensitivity is 15-25 cm of moving the mouse per 360 degree turn in the game.
- High sensitivity is helpful for fast reaction turns in close quarters, and with lower sensitivity it’s more convenient to aim at enemies at range, especially when using low-magnification scopes.
Another exercise is to track moving targets with your mouse. It’s convenient to do on your allies. Again, if you constantly lose the target, lower the sensitivity, and if you have to move your hand around too much – increase it.
Adjusting to new sensitivity will be hard, and in the beginning you will often do worse than you would have done with the old sensitivity. Hopefully, the end result will be worth it.
5) Set ADS sensitivity : hip sensitivity ratio
In most FPSs with ADS mechanic, the ratio between ADS sensitivity and hip sensitivity is 0.5 : 1 or 0.66 : 1.
I.e., while ADSing your aim moves at half or 2/3rds of the speed compared to aiming from the hip.
However, PS2 has a bit different internal ratio. If you want to set up a specific ratio between hip aim sensitivity and ADS senstivity, check out this guide on reddit.
If you don’t want to get into details, it’s perfectly fine to just set Aimed sensitivity the same value as Mouse sensitivity.
Mouse Polling Rate
Mouse Polling Rate is basically how often your mouse sends updates on movement and clicks to your PC. Higher polling rate decreases mouse-based input delay and reduces impact from microstutter, and generally improves how quickly and accurate your cursor’s position updates to the position of your mouse.
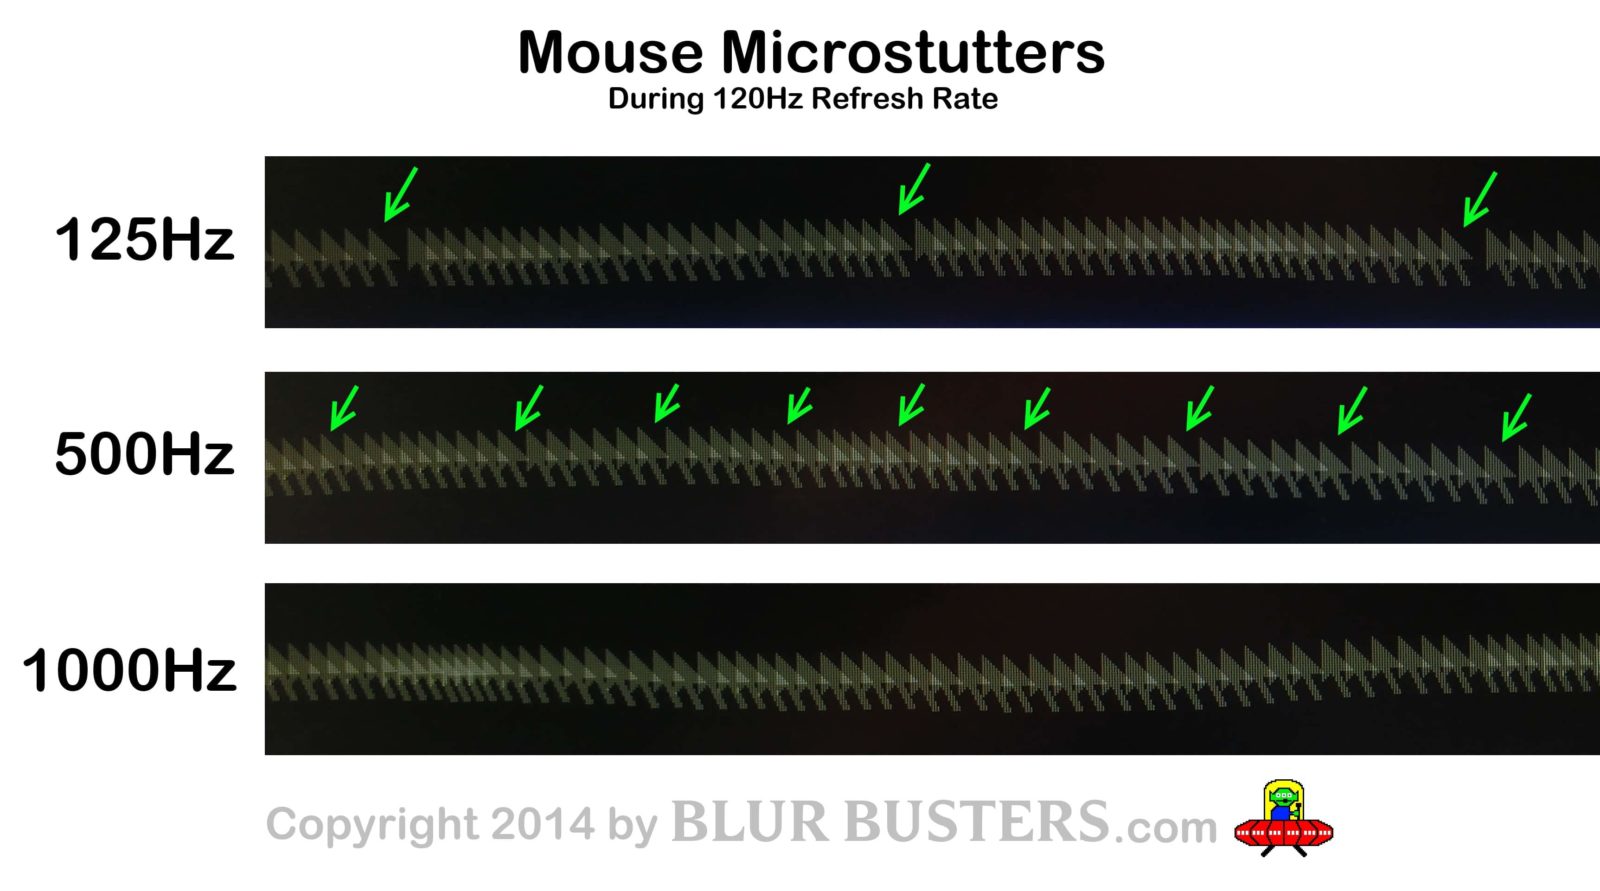
Most gaming mice allow you to change the polling rate between 125 and 1000, most cheap mice run on 125 and most other non-gaming mice run either 250 or 500. While it’s possible to change polling rate on mice without available software, I don’t recommend doing that, so what I’m about to say mostly pertains to people with gaming mice.
It’s a known fact that polling rate affects CPU usage by a fair amount. You can observe the effect of polling rate(through vigorous mouse shaking) on CPU usage here:
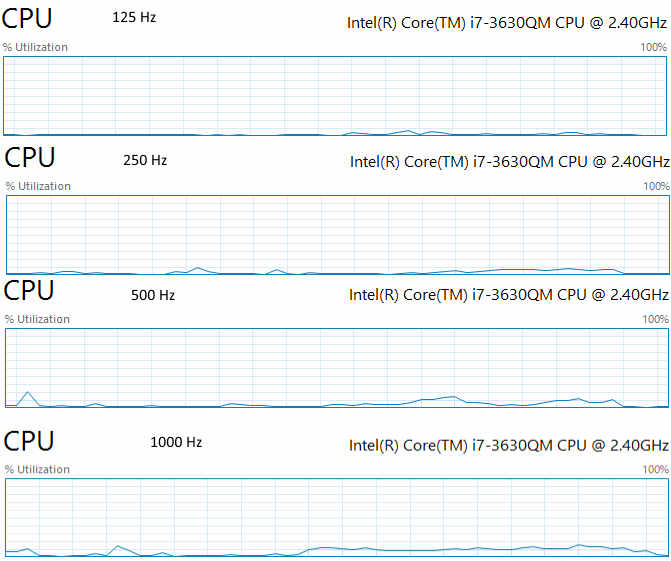
Now, my CPU is no 2700x or 8700k, but it’s no core2duo either. The graph is for all 8 threads, but per thread usage is similar, with one thread using slightly more than average and others using slightly less. On top of that, high polling rate and tremor don’t go well together. For the above reasons I use 500 Hz. It utilizes less resources than 1000Hz, has very little input lag and it may or may not smooth out some minor mouse shaking.
Oh and some shitty and/or old gaming mice have trouble achieving 1000Hz polling rate, but pretty much all gaming mice achieve 500 without issue. Keep in mind that this only pertains to some old mice, and high-quality brands(Logitech/Zowie) along with newer mice are all unaffected, so don’t base your decision around that.
Credits
This guide is mostly a poorly formatted collection of tips related to PlanetSide 2 performance, and it includes a lot of content by other people. I give credit where it’s due, but I’d like to point out /u/Octiceps among others for his invaluable expertise when it comes to Input Lag, VSync and other contributions, as well as /u/DastardlyCoxcomb for his amazing guide on improving performance and visual quality for those without powerful gaming machines.
Seems like the Flora Quality does actually do something, on High there are some extra rocks or bushes that don’t show up on Low, maybe something else as well.
Some more info for FOV.
FOV in games explained;
Part 1: https://youtu.be/blZUao2jTGA
Part 2: https://youtu.be/S1XsPYPGcl0
Easy FOV Calculator: https://themetalmuncher.github.io/fov-calc/